I submitted a support to IFI to see if this DAC is defective. If it is not I will just use it with the IFI Signature amp qith my 6xx cans. I am planning on getting a new preamp in the fall...if I have enough $$$.That is interesting, I have heard a lot of good things about Yamaha and that confirms it. Are you leaving it as is or getting another DAC?


-
AUDIO VIDEO PROCESSING, SETUP & ENVIRONMENTOfficial REW (Room EQ Wizard) Support Forum Audiolense User Forum Calibration Equipment Auto-EQ Platforms / Immersive Audio Codecs Video Display Technologies / Calibration AV System Setup and Support Listening Room / Home Theater Build Projects Room Acoustics and Treatments AV Showcase Movies / Music / TV / Streaming
-
AUDIO VIDEO DISCUSSION / EQUIPMENTHome Theater / Audio and Video - Misc Topics Essence For Hi Res Audio AV Equipment Advice and Pricing Awesome Deals and Budget AV Equipment AV Receivers / Processors / Amps UHD / Blu-ray / CD Players / Streaming Devices Two Channel Hi-Fi Equipment DIY Audio Projects Computer Systems - HTPC / Gaming HD and UHD Flat Screen Displays Projectors and Projection Screens AV Accessories Buy - Sell - Trade
Navigation
Install the app
How to install the app on iOS
Follow along with the video below to see how to install our site as a web app on your home screen.
Note: This feature may not be available in some browsers.
More options
You are using an out of date browser. It may not display this or other websites correctly.
You should upgrade or use an alternative browser.
You should upgrade or use an alternative browser.
Negatron II
- Thread starter NBPK402
- Start date
- Post hidden due to user being banned.
- Post hidden due to user being banned.
I need to get a new AVP, and I am also planning on looking for a 2 channel preamp with HT bypass.An A/V preamp or a stereo preamp? I know that you have a trade off with an A/V preamp when it comes to music and am thinking about adding a dedicated 2 channel preamp with HT bypass.
ddude003
Senior AV Addict
More
- Preamp, Processor or Receiver
- PrimaLuna Dialogue Premium TubePre (2 channel+sub)
- Main Amp
- McIntosh MC152 SS Amp (2 channel)
- Additional Amp
- Yamaha RX-A850 Pro (the other 5 channels lol)
- DAC
- Chord Electronics Ltd. Qutest
- Computer Audio
- MacBook Pro, Custom i7 7700k De-lid 2xAsus1080ti GFX, Audirvana Studio, Hang Loose Convolver+FIR, Tone Projects Michelangelo, Pulsar Massive & 8200, LiquidSonics, SoX with Million Tap mod
- Universal / Blu-ray / CD Player
- Sony UBP-X700 /M Ultra HD 4K HDR & PS5
- Streaming Equipment
- Netgear Nighthawk S8000 Streaming Switch
Lumin U1 Mini Streamer Transport
- Streaming Subscriptions
- QoBuz Studio Premier, Amazon Prime & Netflix
- Front Speakers
- Martin Logan ElectroMotion ESL
- Center Channel Speaker
- Martin Logan Motion C2
- Surround Speakers
- Martin Logan Motion 4
- Surround Back Speakers
- Martin Logan Motion 4 (yes, another set of these)
- Subwoofers
- SVS SB-1000 Pro
- Screen
- Elite Screens Aeon CLR3 0.8 Gain 103-inch
- Video Display Device
- Samsung The Premiere LSP7T UST Laser Projector
- Remote Control
- PrimaLuna, Lumin iApp, Samsung & Yamaha
- Other Equipment
- Cifte 12AU7 NOS & Genalex Gold Lion Tubes in Pre
ThrowRug, SaddleBlankets, WideBand & Bass Traps...
I don't doubt that a proper implementation of a ESS SABRE™ Ultra DAC ES9016S, in the CXA5100, might sound a bit better than the Burr Brown chip in the IFI... Horses for courses... And you are comparing two devices with a ~10x price difference? I also think Airplay may be doing some funky conversions...I hooked up my IFI Signature DAC to my cxa5100 via balanced to see how it sounded. It sounded pretty good in some areas but something just did not seem right...so I ran Roon through Airplay to compare and was shocked by the differences. The IFI Signature DAC was very wooly on the bass when compared to the CXA5100 via Airplay. The CXA5100 was also much more revealing on vocals on up too. The cxa 5100 has amuch more 3d sound too.
For a 6 year old AVP it smoked the IFI Signature on my setup. I had thought that streaming ROON via Airplay would sound worse than a stand-alone DAC, but was shocked to find out it still kicks butt!
Last edited:
My reasoning is digital tech keeps changing and getting cheaper. I would have thought that just going to direct via balanced to a new DAC would be a good improvement over using Airplay, but apparently not.I don't doubt that a proper implementation of a ESS SABRE™ Ultra DAC ES9016S, in the CXA5100, might sound a bit better than the Burr Brown chip in the IFI... Horses for courses... And you are comparing two devices with a ~10x price difference? I also think Airplay may be doing some funky conversions...
Finally a little progress...
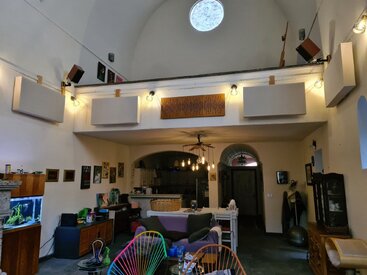
5 6" thick acoustic panels (4" of Roxul) for the front (black burlap)
4 6" thick acoustic panels same as the front, but in natural burlap
6" dimmable LED lights for the living room controlled via Insteon wall switches
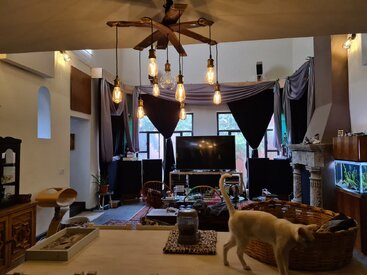
1 new wine stave chandelier with 8 dimmable LEDs, and mone large LED. This is controlled via 2 Insteon wall switches.
Front is a mockup to see 8f we have enough material for the valance. The center will have another layer sewed tonit to allow it to come down lower. I have Peacock blue tiebacks that will be used for 2 purposes...one is for holding the valance to the framework, and the other is to tie back the curtains to some black steel brackets behind the tv on the wall.
Lastly is my 3 IcePower 50asx btl amps sitting on the left speaker awaiting final wiring. I will have 1 Icepower per front 3 speakers and 1 AmpCamp per speaker. The amps will only be used for the mids and I will change the wires depending on if I want to do serious listening or casual. The 2 woofers in each speaker will be individually powered by a IcePower 125asxbtl amp per driver. All the baas drivers will be in the largeamp case on the bottom left of the rack.
PS for Sonnie, i made the panels and the chandelier 100% myself, but I had the chdelier and light switches installed by an electrician. IcePower amps aassembled by me and a friend is either going to teach me to solder or solder for me.")
I had an electrician install the height channel lighring wiring from the switch to the first lamp using a product that is used for speakers...it is made by Sewell and is called ghost wire. It is a 16 gauge copper ribbon wire that has an adheasive on one side and is attached to the wall and has the other side with a textured finish which we painted. We also used it for the chandelier since originally there were 2 lamps and we now wanted one chdelier centered and have the 8 outer LEDs powered with one switch and the large center LED powered with another switch. I think it worked out well...with the only hard part being the adapter converting the flat wire to a light switch wire. With hindsite I think we could have stripped it back more and then bent the wire to a conventual wire shape and heat shrinked it.
5 6" thick acoustic panels (4" of Roxul) for the front (black burlap)
4 6" thick acoustic panels same as the front, but in natural burlap
6" dimmable LED lights for the living room controlled via Insteon wall switches
1 new wine stave chandelier with 8 dimmable LEDs, and mone large LED. This is controlled via 2 Insteon wall switches.
Front is a mockup to see 8f we have enough material for the valance. The center will have another layer sewed tonit to allow it to come down lower. I have Peacock blue tiebacks that will be used for 2 purposes...one is for holding the valance to the framework, and the other is to tie back the curtains to some black steel brackets behind the tv on the wall.
Lastly is my 3 IcePower 50asx btl amps sitting on the left speaker awaiting final wiring. I will have 1 Icepower per front 3 speakers and 1 AmpCamp per speaker. The amps will only be used for the mids and I will change the wires depending on if I want to do serious listening or casual. The 2 woofers in each speaker will be individually powered by a IcePower 125asxbtl amp per driver. All the baas drivers will be in the largeamp case on the bottom left of the rack.
PS for Sonnie, i made the panels and the chandelier 100% myself, but I had the chdelier and light switches installed by an electrician. IcePower amps aassembled by me and a friend is either going to teach me to solder or solder for me.
I had an electrician install the height channel lighring wiring from the switch to the first lamp using a product that is used for speakers...it is made by Sewell and is called ghost wire. It is a 16 gauge copper ribbon wire that has an adheasive on one side and is attached to the wall and has the other side with a textured finish which we painted. We also used it for the chandelier since originally there were 2 lamps and we now wanted one chdelier centered and have the 8 outer LEDs powered with one switch and the large center LED powered with another switch. I think it worked out well...with the only hard part being the adapter converting the flat wire to a light switch wire. With hindsite I think we could have stripped it back more and then bent the wire to a conventual wire shape and heat shrinked it.
Attachments
Last edited:
Today I finished my 2 new high frequency amps (3rd one hopefully tomorrow) for the k402MEHs...EXCEPT for the LED for displaying status. This part might rake a while as I need to test out a dc stepdown converter tonsee if it will do what I want. What Inam planning on doing is running it off of the IcePower aux power supply which is 24v unregulated. The downconverter is supposed to be able to do this "
Maintain stable output voltage and limit the output current over a range of input voltages. Great for general voltage conversion, battery charging, powering raw LEDs, automotive electronics, battery conversions, micro-controllers, and electronic projects.
Input Voltage: 8-36V DC, Output Voltage: 1.25-32V DC, Max Load: 75W/5A Peak, 50W/3.5A Sustained (whichever is lower, amps or watts)
Conversion Efficiency: Up to 95%, (our test result: 24V->12V1A: 92.7%)
Dimensions: 51x26.3x14mm, XL4015 IC, 180KHz Switching Frequency
Input must be at least 1V more than the output voltage. Applying reverse polarity voltage to the input or output may damage the module. Current limiting function requires at least 5.6V input.
This module combines the high efficiency XMLSEMI XL4015 DC-DC buck converter IC with a TI LM358 Op-Amp for stable current regulation. Now I am not sure what they mean by a capacitive load...would the down converter be one? I am only going to be powering 1 LED by each downcoverter and a resistor.
Yesterday rewired 2 of the 3 MEHs for 1 amp per woofer instead of 1 for 2 woofers. Because of the impedance of the woofers I was only capable of 125w per woofer, and now I will have 450w per woofer...pure overkill, but should help for dynamics.
I purchased the cases off Ebay, and then had a friend machine it so I could complete the amps. I then finished off the amps. I know the work is not as nice as what others here have done, but I am still a beginner in DIY, and due to my health I cannot do some work and must farm it out. To do the soldering I used a mask, and I hope that is enough to protect my lungs.
Next I will be completing the rewire of the AmpCamp amps, and starting to assemble the mini MEHS, and finish the valance for the curtains.
Last edited:
I now have all 3 amps with EMI filters installed, and will start on the LEDs as soon as Inreceive my DC variable output box. I bought this so I can test the convertor boards to see how they work before I install them. Last time I installed a device that converted 25v DC to 12v I blew a amp board, so this time I hope to be able to donit properly. This will also allow me to wire up some LEDs to see how rhey work with different size resistors... I want to match the brightness of the AmpCamp Mono LEDs.
In the pics you can see that I have tidied up the wiring a little more and hot glued some of the wirong plus the TDK EMI filters. I do not know itpf they will make any difference as I did not have a EMI problem in the bigger amp, but I had a bunch laying around from the 90s when I was testing out all the mods at the time. Now I am older and just want itnto sound as good as I can for a reasonable amount of cash. Hopefully next week I will get the big amp case holes drilled and tapped for the 125asxBTL amp module
 s (I have put the 50asxbtl amps in the new cases and I will be putting 3 new 125asxbtl amp in their place).
In the pics you can see that I have tidied up the wiring a little more and hot glued some of the wirong plus the TDK EMI filters. I do not know itpf they will make any difference as I did not have a EMI problem in the bigger amp, but I had a bunch laying around from the 90s when I was testing out all the mods at the time. Now I am older and just want itnto sound as good as I can for a reasonable amount of cash. Hopefully next week I will get the big amp case holes drilled and tapped for the 125asxBTL amp module
This is the cable I am using foe the XLRs foe the horn amps... I love the fact that it has a cloth covering and is Soooooo flexible, and not expensive either. I got them off of Amazon, but they appear to be out of stock. I love them so much I emailed the Manufacturer and asked if I can get shorter XLR lengths or speaker wires withnthe cloth covering!

Yesterday I cut all the kerf for 2 speakers (that was a lot of work! 96 cuts for 1 speaker!), and today I finiahed the first amp 100%. I did the best I could and it works...so I am happy. I will work on the other amps and hopefully get them done next week. Once that is done I will work on the K402 MEH Minis. You can see the amp on top of its speaker and also my acoustic panels(one is flush with the right hand side and is left there until Inlisten seriously at night. Then I move it out so it is on the right side against the speaker angled to where it is sorta like a horn.). The left hand side has 2 Acoustic panels and they stay like that...in front of the curtains.
Yesterday I worked on my lighting, which I have been wanting to get setup for remote controlling for quite a while. I am using Insteon lights and outlets with a ISY994I hub. I used this before in my last home, but I was using CQC Automation Software to control it. This time I decided to try just a android app for the ISY and the eeb interface. I found it very easy to set up scenes and set them up with my Insteon scene switches.
I made folders and copied my switches and outlets to them..one example is I made a folder called Home Theater and then copied all the switches I wanted to it. Next I created a scene and selected all the devices from the folder to be in the scene, including the switch button (for when I want to use a wall scene controller). I then did this for each scene controller and then showed my wife how to use it. I even made one that turns off all the lights in the house at night.
Now the downside is that I do not have the custom screens or custom layouts, but that is ok for me for now. I like that I can turn on only my stereo amps or turn on or off my other amps remotely now too.
Last edited:
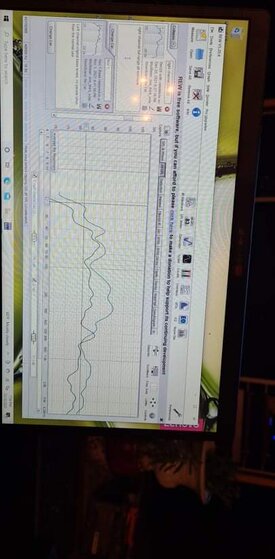
A little update... i have now completed the wiring of 1 125asx2 BTL module per woofer, and ran the first REW for my friend Chris to tune. The old REW was good, but the new readings look great!. First look wss about 15db higher at 20hz, and that was after lowering the bass gain by 8db. One thing it also did was mess up how flat it was before, and now it has a bug bump around 100Hz...as well as other discrepencies up to 1k. Now to be honest I have another thing I did for this tune besides the amp. The other thing was I refined my measurement technique. When we originally tuned them I just laid a 2x4 piece of Roxul in the gap between the horn and the cabinet on each side of the cabinet, put onempiece of Roxul on the floor, and 1 after my DIY Mic stand. This time I used my 6" deep acoustic panels and made sort of a box. I wanted to have it be a complete box, but my other panels are mounted up high on the walls. In the future I hope to have 1 or 2 more panels to complete the box better. I also used some stick on felt to to help stop the reflections. I would have used more, but I ran short. I was not perfectly square when I took the picture so it looks like it is not centered on the horn throat, but it is.
Last edited:
I reran REW today, and this is what it looks like after 8db gain cut on the bass. I have that huge peak at around 100hz still, and a big dip 700hz.
Does anyone know why this would happen when all I did was run a duplicate amp to each woofer instead of connecting both speakers to one mono amp? The bass is much better, and if I can retune it without messing up the phase growth it would be perfect IMO. I also do not know why REW is not going below 23hz, when it is set to go to 10hz. Just to be safe I have another mic on the way to see if it slipped out of calibration somehow in the last 6 years of use.
Does anyone know why this would happen when all I did was run a duplicate amp to each woofer instead of connecting both speakers to one mono amp? The bass is much better, and if I can retune it without messing up the phase growth it would be perfect IMO. I also do not know why REW is not going below 23hz, when it is set to go to 10hz. Just to be safe I have another mic on the way to see if it slipped out of calibration somehow in the last 6 years of use.
Update... today a friend came over and worked his magic on outpr valance, and I am very happy with the way it came out.. Next I will lowerntye right channel spotlight to match the left and get some more black felt for right above the light.

Last edited:
Today I worked on the name plates I had laser cut for my speakers. Chris is the person who came up with the design combo and also helped me get mine done...so I put his name on the plates. The top plate is what I did today...whe I started it was a little worse than the bottom plate. I used my orbital with 150 grit for a few passes (looking to se if I could still see any pits or deep scratch still), and continued until I could see none. Then I used the orbital with 240 grit until I could not see any of the lines from the 150 grit. Once I finished that I went to some 300 grit and sanded in one direction until that is all I could see. Next I moved to 1000 grit wet dry sand paper and sanded 90 degrees from the 300...until I could not see any 300 grit marks. I kept doing this until I had done 1200, 1300, 1500, 2000, and finally 3000 (rotating the sanding 45 or 90 degrees). I am seeing a few scratches from the 2000 layer still, so I think I need to hit it some more with the 3000 grit until they are gone, or maybe hit the whole front with 2000 again and then do 3000 again?.
Pic # 2 gives a much better look at the shine...so far.
Does anyone know if 3000 is high enough before I use a buffing compound on the copper plates,ad if the buffing will remove the scratches from 2000 grit sandpaper
?
Pic # 2 gives a much better look at the shine...so far.
Does anyone know if 3000 is high enough before I use a buffing compound on the copper plates,ad if the buffing will remove the scratches from 2000 grit sandpaper
4 Celestion woofers arrived today! These woofers look great and I love not having to crimp or solder the connectors...should make it much easier for me to swap out. I am going to swap out the center woofers after measuring 1 more time with the Emminence Kappa 15c woofers. Then I will measure with the Celestion woofers, and last I will measure with the Celestion Axi2050 Compression driver...once I get it. Then I can see how all the Celestion compares to Celestion vs EV DH1A and Kappa 15C.
Last edited:
Woofers are now installed. This is a REW I ran with the old tune, and the new woofers.
1st pic is the old tune, and the 2nd is how I tuned it (I need someone to look at the 2nd one to see what is wrong with it.

 )
)
1st pic is the old tune, and the 2nd is how I tuned it (I need someone to look at the 2nd one to see what is wrong with it.
Attachments
I just got done wetsanding 3 of the copper plates. I went from 240grit dry sandpaper to 1k wet dry all the way up to 10k wet dry sandpaper. I have 3 more to go, and then I need to try buffing them. The top left one is only
1k wet sanded and looks very close to how my first one was that had been sanded prior to me getting them, and redoing them.

1k wet sanded and looks very close to how my first one was that had been sanded prior to me getting them, and redoing them.
Today I spent some time and my friends shop...I would tell him and show him (the best I could) what I wanted, and he would program it, and then fire up the CNC and let the magic begin! This is what we have so far...
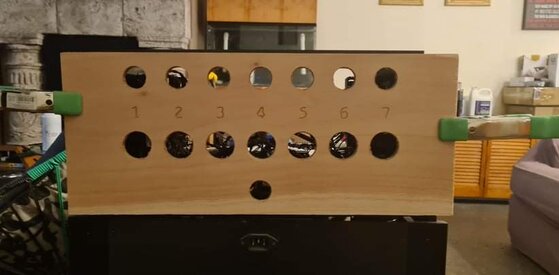
Front panel, and the rear panel we will this time have 3 power switche..1 for stereo,, 1 for center, and the last one for heights. For the rear we have 7 XLR inputs, and 7 speakons for outputs., plus 1 powercon for power. I decided instead of putting names on each input and output...to just put a number inbetween the XLR and Speakons. I figure even if I sold this amp this would be dummy proof since you cannot put a XLR cable in a speakon or vise versa, and the power con connector is blue.
Next I need to drill some holes for mounting, drill 2 holes in the original front aluminum, and do some sanding. For the rear panel I am planning on making the numbers black, and then I will clearcoat the front and rear. Then I will use some contact cement to attach the wood on the front to the aluminum faceplate. Lastly rewire the 3 amps that will be in the center and rewire all the power to the new sw. This time I decided to replace all my amp switches with a little smaller switches that have LEDs builtin that run off 120v. Much cleaner I hope and easier.
 Inside the amp I am planning on having the 2 amps on the sides still, but now I want to go with 3 amp modules on their sides down the center, and also have a fuse for power inline.
I very much like the way this is coming along with the mahogany wood and aluminum. Now I will have all my equipment with some mahogany wood.
Front panel, and the rear panel we will this time have 3 power switche..1 for stereo,, 1 for center, and the last one for heights. For the rear we have 7 XLR inputs, and 7 speakons for outputs., plus 1 powercon for power. I decided instead of putting names on each input and output...to just put a number inbetween the XLR and Speakons. I figure even if I sold this amp this would be dummy proof since you cannot put a XLR cable in a speakon or vise versa, and the power con connector is blue.
Next I need to drill some holes for mounting, drill 2 holes in the original front aluminum, and do some sanding. For the rear panel I am planning on making the numbers black, and then I will clearcoat the front and rear. Then I will use some contact cement to attach the wood on the front to the aluminum faceplate. Lastly rewire the 3 amps that will be in the center and rewire all the power to the new sw. This time I decided to replace all my amp switches with a little smaller switches that have LEDs builtin that run off 120v. Much cleaner I hope and easier.
I very much like the way this is coming along with the mahogany wood and aluminum. Now I will have all my equipment with some mahogany wood.
New AVP coming soon...this time it will be a Marantz AV8805a preamp. I cant wait to try out Auro3D!
Last edited:
Todd Anderson
Editor / Senior Partner
More
- Preamp, Processor or Receiver
- StormAudio ISP.24 MK2
- Main Amp
- Emotiva XPA-5
- Additional Amp
- Emotiva XPA Gen3 2.8 multichannel amp
- Other Amp
- Denon X8500H
- DAC
- THX ONYX
- Computer Audio
- AudioEngine A2+
- Universal / Blu-ray / CD Player
- Kaleidescape TERRA
OPPO UDP-203
Panasonic UB9000
- Streaming Equipment
- iFi Audio Zen Blue
- Streaming Subscriptions
- Spotify
- Front Speakers
- GoldenEar Technology Triton One.R
- Center Channel Speaker
- GoldenEar Technology SuperCenter Reference
- Surround Speakers
- GoldenEar Invisa MPX
- Surround Back Speakers
- GoldenEar Invisa MPX
- Front Height Speakers
- SVS Prime Elevation x4 (Top Front, Top Mid-Front)
- Rear Height Speakers
- SVS Prime Elevation x4 (Top Middle, Top Rear)
- Subwoofers
- Quad Array SVS SB16s
- Other Speakers
- Behringer 1124p; Aura Bass Shaker Pros; SuperSub X
- Screen
- Seymour Screen Excellence, Enlightor NEO AT Screen
- Video Display Device
- JVC NZ8
- Other Equipment
- Sony 65-inch A95L OLED
Sony 65-inch X900F
ZeroSurge 8R15W x 2
ZeroSurge 2R15W x 2
Wow... you've made serious progress! Congrats. Everything is looking GREAT!!!
I love those copper plates. Have you done anything with them, yet?
I love those copper plates. Have you done anything with them, yet?
I still want to clearcoat the copper plates, and then I am going to get my friend to make me a new rear cover for the speakers, and CNC the recess for them.Wow... you've made serious progress! Congrats. Everything is looking GREAT!!!
I love those copper plates. Have you done anything with them, yet?
Hopefully next week I will be assembling the amp, and then hooking it up to the new flagship Marantz AVP. I guess the Trinov or Storm will be held off till my next AVP...by that time everything except a projector and screen will be done.
Well it has been a while since I updated the build...I have now added a Denafrips Pontus ii DAC, and a Lumin U! Mini streamer. In addition I just placed an order for the Denafrips Athena preamp.
I very highly recommend the Denafrips Pontus ii DAC...the build quality is top notch with nice thick aluminum pieces that are CNC'd. Inside you find it is stuffed with components (not your typical DAC where you open it up and see a couple of parts). This is my first time having a ladder DAC and I honestly cannot imagine going back to a single chip DAC. In my setup the walls literally disappeared. It is the most holographic sound I have ever experienced! I am noticing so much more information and the back ground is dead silent.
Now since this is making such a big difference in my setup... I am moving on to having a matching preamp for all my stereo listening and use the 8805A for my movies and multichannel music. I will be installing it in my setup as soon as I receive it. I will be running the left and right pre out XLRs into one of the source inputs on the Athena for when I want to use the Marantz. In order to get it setup properly, I will measure the output with a SPL meter with only the 8805A and then I will measure again with the Athena in place and turn the volume until it is the same SPL. Thanks to a large LED screen and the fully balance volume control I can fine tune the levels very easily. I will hookup my Pontus ii to one of the source and then when I want to listen to stereo I just switch the input... multichannel...just switch the input and adjust the volume via the remote.
Down the road, I am thinking of getting a pair ot Denafrips Thallos power amps and replace the Ice power amps in the front and use them for my surround amps.
Last edited:


Popular tags
20th century fox
4k blu-ray
4k uhd
4k ultrahd
action
adventure
animated
animation
bass
blu-ray
calibration
comedy
comics
denon
dirac
dirac live
disney
dolby atmos
drama
fantasy
hdmi 2.1
home theater
horror
kaleidescape
klipsch
lionsgate
marantz
movies
onkyo
paramount
pioneer
rew
romance
sci-fi
scream factory
shout factory
sony
stormaudio
subwoofer
svs
terror
thriller
uhd
ultrahd
ultrahd 4k
universal
value electronics
warner
warner brothers
well go usa