Make a good measurement system with REW and Raspberry

Thread Starter
Joined
Feb 8, 2018
Messages
279
Location
Italy
I am an electronic technician who has been a HiFi enthusiast and speaker loudspeaker for many years. I have always felt the need to have
a reliable and precise instrument to perform electro-acoustic measurements, but the various systems on the market had a prohibitive cost for
a non-professional like me, so after trying various software including ARTA I used REW.
I decided to use REW because it is a multiplatform software and this is a great advantage, it is also free but John has done a great job and
deserves a little contribution from us all for his work.
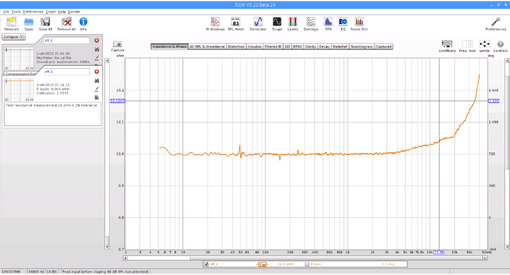
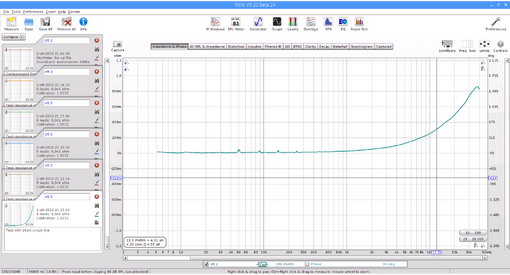
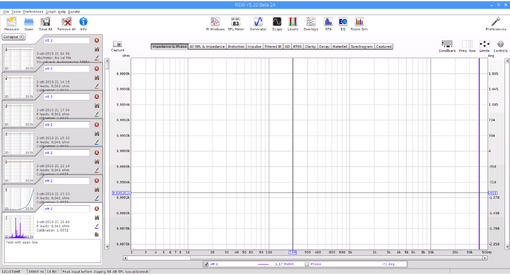
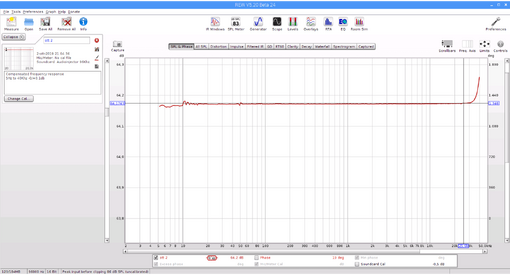
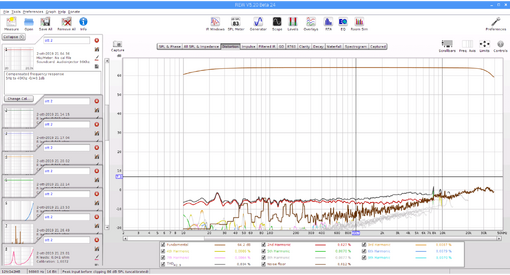
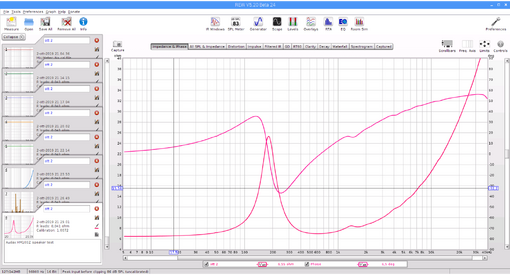
For several years I have been using Linux both at work and as a hobby so I installed REW on an AMD PC platform with excellent results.
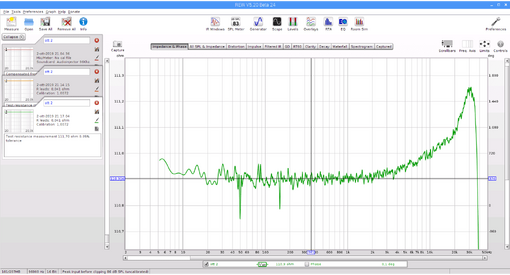
The Raspberry adventure began about 2-3 years ago, I first searched for the best linux version and then verified the correct execution of REW.
Many of you will think that with a Raspberry it is not possible to execute a program like REW fast enough, but I can assure you that on the Pi 3
version the software runs very efficiently.
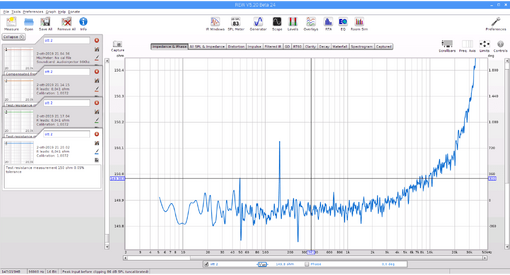
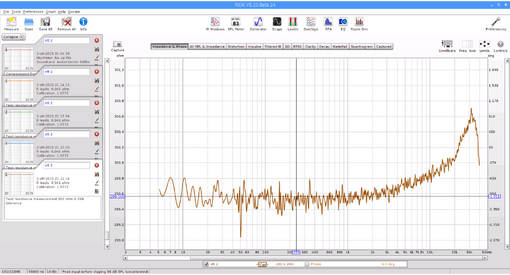
Later I will begin to explain, to those interested, how to create a measurement system on the Raspberry platform.

Thanks
 
Thread Starter
Joined
Feb 8, 2018
Messages
279
Location
Italy
First of all, I would like to apologize for my very poor English, luckily I can get a good google translate help and so I hope to be understood.
As I told you before, the idea was to help give some useful information to those of you who wanted to build a system based on Raspberry.
I chose this SCB (Single computer Board) because my intention was to create a reliable, accurate and also economic tool and from my point
of view Raspberry is a perfect choice also for the great support of the community.

For those who want to start the adventure, the first thing you need to know is the main source of information. On the site there is almost everything you need to start using your Raspberry.
To start you must necessarily buy one, take the Pi 3+ version with its power supply and with a 16Gb micro SD card at a cost of around 55 Euros.
Second step download the latest version of Raspbian from the official site and the third step to create the micro-SD boot for the raspberry.

Later we will see in detail how to do this.
 
Thread Starter
Joined
Feb 8, 2018
Messages
279
Location
Italy
Before starting to describe how to transfer the operating system to the SD, I wanted to remind you that unfortunately the raspberry does not have an onboard sound card, so you need to buy one with good features.
To transfer the operating system you can follow the instructions directly at this link
Having a PC with the wondows system, I download the .img file and then with the Win32DiskImager
software select the img file downloaded and write directly to the SD.
If all went well, you can now take out the microSD and insert it into the Raspberry slot. Connect a monitor with an HDMI cable then the keyboard and mouse and connect the power supply. After about 20 - 30 seconds the system will boot.
 
Thread Starter
Joined
Feb 8, 2018
Messages
279
Location
Italy
At this point, after creating the SD for booting the operating system, you must make a minimum initial configuration to set the language and other small configurations very simple type select the wifi network by entering the SSID and the password for internet connection .
After checking the internet connection via the Chromium browser, you are ready to update the system.
Open a terminal and type the commands:
sudo apt update
wait for the update and give the command
sudo apt upgrade
After downloading all the necessary files the system will be updated to the latest stable version.

Now you have a perfectly functioning and updated Raspberry.
 
Last edited by a moderator:
Thread Starter
Joined
Feb 8, 2018
Messages
279
Location
Italy
Now comes the beauty, at the moment we have only quickly described the installation of the Raspberry, but to build
the tool we need to create and assemble and configure many parts all very important without which
it is not possible to build it.
You also need to be good enough with electronics and electrical circuits, even to avoid getting hurt
with electricity. I hope you have this knowledge, otherwise it is better to give up.
To complete the work we need to create the following circuits:

1 Power supply
2 Power amplifier
3 Microphone preamplifier
4 Switching circuit

Some can be purchased while others should necessarily be made.
The circuits to buy are the sound card which is very important for the performances
and the power amplifier while the power supply and the microphone preamplifier must be
made according to the patterns I will provide you. So to make them you will need knowledge and
familiar with the assembly and testing of electronic circuits.
 
Thread Starter
Joined
Feb 8, 2018
Messages
279
Location
Italy
25257

This is only the principle diagram of the analyzer in its second version realized several years ago.
The third version is the one you see in the image of my profile.
 
Thread Starter
Joined
Feb 8, 2018
Messages
279
Location
Italy
25269

The most important circuit of the whole system is the sound card, unfortunately for Raspberry there are many DACs but few sound cards with ADC converter. Many cards have only the mono channel input for the microphone and generally they are very poor, others are very high performance but they cost a lot and are often not supported by the Linux kernel.
Unfortunately I am still looking for a good supported sound card, I tested the external USB Behringer UCA202 - UCA222 card which is fully supported by the Raspbian operating system but of really poor quality. The UCA202 is noisy and with a really poor input buffer to the point that I had to completely eliminate it to design an external one. Then another negative element is the maximum sampling frequency of only 48Khz, this limits the use to the 10Hz - 20Khz band analysis only.
Despite all these negative aspects, at the moment it is the one I use on my version of hardware 3.0, but I'm not happy at all.
On the web it is possible to find many modifications to the card to improve its performance, although it must be considered that the PCM2902 chip used is now considered obsolete.
Here are some interesting links.
 
Thread Starter
Joined
Feb 8, 2018
Messages
279
Location
Italy
25271


Another interesting audio card built specifically for the Raspberry is the Audioinjector stereo. This card is very cheap but working with the I2S bus it is able to work at 96Khz sampling rate, unfortunately its features are only slightly better than the Behringer card and for a long time the drivers included in the kernel were really bad and had very unstable operation with the REW software. Only recently the drivers have been updated and at present it is working fairly well. However, it remains an economic choice and with some defects, for example the frequency response of the DAC section is very wavy at the upper end of the band and this ripple is also unstable over time so it is difficult to make an optimal compensation with REW.


We will see later how to install the card on the raspberry.
 
Thread Starter
Joined
Feb 8, 2018
Messages
279
Location
Italy
I would be grateful if someone in this forum wanted to share some experience with a similar system based on REW and Linux software on Raspberry, it would be an important moment of confrontation to improve my realization and yours too.

Thanks
 
Thread Starter
Joined
Feb 8, 2018
Messages
279
Location
Italy
25301

Another sound card I am evaluating is the HiFiBerry DAC + ADC, at the declared performance level it is the best one, in fact it uses two separate chips for the good DAC and ADC functionalities respectively the PCM5122 and the PCM1861 which operate at the maximum sampling frequency of 192Khz. The 192Khz limit is mainly due to the Raspberry I2C / I2S signal frequency. Although the declared performances are very good, this card still has some defects, in particular the audio input lines have a very high capacity that limits the bandwidth, moreover the chip configuration is in slave mode and receive the clock from the raspberry. In this operating mode the stability of the generated and sampled signal is certainly lower than in the master mode.
Another negative characteristic is due to the lack of the input line in balanced mode despite the PCM1861 has this prerogative.
This card has a much higher cost than the others and despite the manufacturer declaring very good features, I would say that it has several defects.
To minimize the effects of cutting at high frequencies, I had to insert an external buffer so doing I could have a response from 8.8Hz up to about 87Khz +/- 3db.


Tony V.

Senior Member
Joined
Apr 14, 2017
Messages
1,063
Location
Edmonton, AB, Canada
More  
Preamp, Processor or Receiver
Onkyo TX RZ920
Main Amp
Samson Servo 600
Additional Amp
QSC MX1500
Universal / Blu-ray / CD Player
Panasonic 220
Front Speakers
EV Sentry 500
Center Channel Speaker
EV Sentry 500
Surround Speakers
Mission 762
Surround Back Speakers
Mission 762
Subwoofers
SVS PB13u
Video Display Device
Panasonic AE 8000
Remote Control
Logitech 1100
Streaming Subscriptions
Denon DT 625 CD/Tape unit, Nintendo WiiU, and more
Hi Antonio, just wanted to thank you for the work you have done in getting us this info. I am sure people will find this useful as a small portable setup would be nice if your moving around from venue to venue.
 
Thread Starter
Joined
Feb 8, 2018
Messages
279
Location
Italy
Tony, thanks for your attention, I can assure you that with the raspberry you can configure a real measuring instrument, even if fairly well performing. I have been working there for years and I have reached the point that I no longer use personal computers to carry out all the electro-acoustic measurements. Unfortunately I notice that in the forum there is hardly anyone who uses the Raspberry and very few who use linux on PC.
If you like, I will continue to illustrate what it takes to build this tool.

Thanks
 

Tony V.

Senior Member
Joined
Apr 14, 2017
Messages
1,063
Location
Edmonton, AB, Canada
More  
Preamp, Processor or Receiver
Onkyo TX RZ920
Main Amp
Samson Servo 600
Additional Amp
QSC MX1500
Universal / Blu-ray / CD Player
Panasonic 220
Front Speakers
EV Sentry 500
Center Channel Speaker
EV Sentry 500
Surround Speakers
Mission 762
Surround Back Speakers
Mission 762
Subwoofers
SVS PB13u
Video Display Device
Panasonic AE 8000
Remote Control
Logitech 1100
Streaming Subscriptions
Denon DT 625 CD/Tape unit, Nintendo WiiU, and more
Oh please do continue, I am interested in following your progress.
 
Thread Starter
Joined
Feb 8, 2018
Messages
279
Location
Italy
Amplifier
The choice of the amplifier was less complex, I needed a low power 1W on an impedance of 8 ohms equivalent to 2.83Veff / 8 ohms with low distortion. To do this I used a fairly appreciated HiFi amplifier, the LM3886 chip powered with dual voltage +/- 24v Vdc. In this configuration it is able to deliver a maximum power of about 20W and used at 1W it is able to easily drive even very heavy loads. This amplifier is also recommended by the author of the Arta software in the Hardware & Tools document.
http://www.artalabs.hr/support.htm
Also you can buy it for a few dollars on amazon or ebay already assembled or to be mounted.

25330
 
Thread Starter
Joined
Feb 8, 2018
Messages
279
Location
Italy
25404

Reference diagram of the low frequency amplifier used.
The maximum output power is about 20W on 8 ohms, but is used at the reference power of 1W on 8 ohms equal to a voltage of 2.83Veff.
 
Thread Starter
Joined
Feb 8, 2018
Messages
279
Location
Italy
The attached diagram is modified with respect to that of the data sheet, in fact it is possible to note a different value of the resistances of the feedback network.
In the original scheme the closed-loop gain of the amplifier is equal to 21 corresponding to 26.44db while in the enclosed one it is reduced to 10.7 equal to 20.58db, this reduction guarantees less distortion of the system. The THD total harmonic distortion, at the power of 1W on 8 ohms, is 0.07% better.
 
Thread Starter
Joined
Feb 8, 2018
Messages
279
Location
Italy
Some constructions with LM3886 guarantee better performances in terms of THD but have a greater circuit complexity since they use an additional operational amplifier as a comparison node considerably increasing the gain of the open loop system. This increase results in greater complexity of the feedback network to avoid system instability.
You can learn more about the LM3886 amplifier topic at the following links:

 
Thread Starter
Joined
Feb 8, 2018
Messages
279
Location
Italy
Switching circuit
This circuit serves to carry out the commutations to carry out the measurements and the calibration. As a first approach we can realize the circuit described in the Arta manual The Switch box - AP1_MeasuringBox-ver-2-Rev1Eng. In my measurement system the commutations are all served by relays so that they can be controlled via software.


Attachments

  • AP1_MeasuringBox-ver-2-Rev1Eng.pdf
    312.8 KB · Views: 86
Thread Starter
Joined
Feb 8, 2018
Messages
279
Location
Italy
The resistors of the divider at the input of the 8.2K ohm R1 R3 audio card and 910 ohm R2 R4 must all be with a 1% tolerance and possibly selected so as to have the same value on both channels. In this way we have the guarantee that on both channels we have the same signal, this is important for the accuracy of the impedance measurement.
As for the Rerf resistance, my advice is to use a resistance with a power of 5W and a low inductance so
not to alter the measurement at the higher frequencies of the audio range.
Possibly measure the resistance with a precision instrument so as to be able to enter the correct value in the REW software in the Rsense field.
To check the functionality of the circuit, I recommend getting a high precision 10 ohm resistor to calibrate the instrument.
I use a resistance of 10 ohm 0.1% of precision, but there are also other values that can work well for example 12.5 ohm 0.1%.
Remember that the accuracy of the impedance measurement is essential especially for the detection of the TS parameters of the speakers.

Let me know if these tips are useful, otherwise if they are obvious and already known, I avoid talking about these technical aspects.

Thanks
 
Thread Starter
Joined
Feb 8, 2018
Messages
279
Location
Italy
To give you an idea of the performance of the system in version 2.0 the one I am trying to describe, I attach some response measurements of the amplification system and impedance measurements with different test resistances and lastly a speaker impedance measurement. The measurements were made with the Audioinjector sound card at the maximum sample rate of 96Khz. The measurement band was set from 5Hz to 40Khz.
The version 2 of the instrument is however to be considered obsolete and I use it exclusively to test the sound cards, but nevertheless it still behaves quite well.

25538
25539
25540

Let me know what you think ...
 

Attachments

  • Test_resistenza_10_ohm.png
    Test_resistenza_10_ohm.png
    68.1 KB · Views: 109
  • Test_resistenza_111_ohm.png
    Test_resistenza_111_ohm.png
    89 KB · Views: 106
  • Test_resistenza_150.png
    Test_resistenza_150.png
    100.5 KB · Views: 91
  • Test_resistenza_300.png
    Test_resistenza_300.png
    112.5 KB · Views: 89
  • Test with short circuit line.png
    Test with short circuit line.png
    103 KB · Views: 87
  • Test with open line.png
    Test with open line.png
    95.9 KB · Views: 82
  • Response_compensate_Audioinjector .png
    Response_compensate_Audioinjector .png
    60.2 KB · Views: 88
  • Distorsione_sistema.png
    Distorsione_sistema.png
    134.3 KB · Views: 96
  • Audax HM100Z speaker test.png
    Audax HM100Z speaker test.png
    113.9 KB · Views: 92
Thread Starter
Joined
Feb 8, 2018
Messages
279
Location
Italy
As I said the system in its version 2 is currently used to test the REW software with various sound cards. The hardware configuration is very simple but useful for technical checks.
From the photos you can see that inside the metal container is contained all the electronics except for the Raspberry and the dedicated sound card. At the front of the system there are only the power on switches for selecting the SPL mode (Res) / Impedance (Imp) and the Test switch to perform system calibration. In the back there are the connections with the sound card two for the input one for the output. The free connector is relative to the microphone input, then there are two test points to measure the Bias voltage of the microphone and an adjustment trimmer. Finally, there is the BF output set at 2.83Veff equivalent to 1W on 8 ohms and of course also the input of the 220Vac power supply.
In the next post, I will also show you the microphone connection and some near-field response measures.
Thanks
 
Thread Starter
Joined
Feb 8, 2018
Messages
279
Location
Italy
Before making the response measures, I would like to briefly comment on the impedance measurements. As you can see, to check the validity of the measurements I used high precision test resistors, this is the main method to check that the system is actually calibrated. It is also possible to carry out tests with condensers and precision coils, but these components are much more expensive and difficult to find.
The first measure I made is that of the 10 ohm resistance with 0.1% precision, from the graph you immediately realize the accuracy of the system. The curve is in fact perfectly superimposed on the 10 ohm level and tends to increase beyond 3 - 4 Khz. This increase is mainly due to the inductive effect of the connection cable between the amplifier and the test resistor. The 10 ohm resistance has been chosen because it is a value very similar to the typical impedance of a loudspeaker (normally 8 ohms).
The second test was performed with a 111.070 ohm resistance with 0.05% accuracy, also in this case the system behaves very well measuring 110.9 ohms. Surely the difference of 0.170 ohm is a good precision but lower than that of the previous measurement carried out with 10 ohm resistance. The more we increase the value of the test resistance and the greater the error of the system, this phenomenon is due to the ratio between the measured resistance and the input impedance of the measuring instrument which in our case is about 10K ohm. You can check this problem with the 300 ohm resistance measurement, however since a speaker usually has an impedance that varies from a minimum of a few ohms to a maximum of 100 ohms we can say that in this range of values our system is absolutely precise.
 
Thread Starter
Joined
Feb 8, 2018
Messages
279
Location
Italy
The measure of the frequency response compensated with the calibration file made with the Audioinjector card, shows the linearity of the system. It can be seen that the answer is perfectly flat between 5 Hz and 30Khz and increases by 0.1 db beyond this frequency, this result is very good for carrying out response measurements of loudspeaker systems.
The 1Khz THD distortion has a value of 0.034% is to be considered good and absolutely adequate for the distortion measure of the speaker systems that is normally much higher than this value.
 
Thread Starter
Joined
Feb 8, 2018
Messages
279
Location
Italy
I am sure that many of you think that the realization of this tool is unprofessional, but it is certainly an initial version of a project which then evolved into version 3 of the tool which implements some interesting functions such as the measurement of electrical resistance with precision to thousandth of ohm. This precision is useful for measuring the resistance of the moving coil of the loudspeakers and that of the connection cables.
Version 3 is completely managed by an additional software that joins REW to carry out checks on the hardware and the settings for the measurement. the realization of this instrument is certainly more demanding and is not for everyone.
 
Top Bottom