


mechman
AV Addict
More
- Preamp, Processor or Receiver
- Pioneer VSX-832
- Streaming Subscriptions
- HBO Max, YouTubeTV, Hulu, Netflix, Disney+
- Front Speakers
- Definitive Technology Studio Monitor 55s
- Center Channel Speaker
- Definitive Technology CS8040
- Surround Back Speakers
- Definitive Technology DI6.5R
- Other Speakers
- Apple TV 4K
- Video Display Device
- LG OLED65C7P
- Remote Control
- Logitech Harmony 650
Learn How to Setup your TV, HDTV, OLED TV, LED/LCD TV or any type of Video Display for your Home Theater System.
Source
The source for your display can be your Blu-ray player, a game console (PS3, Xbox), an Over The Air (OTA) antenna, or a cable/satellite box. The key to this is that you want your source to be able to match the resolution of your new display. If your display is capable of displaying a HD image, it would be worthwhile to invest in a Blu-ray player, a HD cable/satellite box or the proper OTA antenna that will get you an HD image. Same goes for 4K – if you have a 4K display, you should invest in a 4K Blu-ray player
Connection
Connection should be made using an HDMI cable for a HD display. This will provide you with the proper digital signal that your display expects. HDMI cable can be quite expensive at local stores so you may want to look into purchasing one from one of the various online retailers who sell them at a significant savings. Avoid the higher cost cables as they are rarely worth it.
There is no need for a special HDMI cable for 4K/HDR. If your cable is a high speed cable (most cables sold in the last 4 years) then you should be fine. The only hitch would be if the cable run is over a long distance – say 20 feet or more. Then you may want to do your research and invest in a high quality cable that will work with 4K/HDR. We have a thread here on this particular subject.
Aspect Ratio/Resolution
New displays are capable of 4K, 1080p, 1080i, and 720p resolutions. For your source output, we would recommend setting all cable, FIOS, all satellite boxes and BD players to "Native output" and let your TV and or audio receiver do all the scaling. The reason is the cable/FIOS/Satellite boxes have very low cost (low quality) internal video processing, whereas most audio receivers and TVs have better video processing.
The aspect ratio of newer displays is 16:9. This can sometimes be labeled as HD in some menu systems. You want the image to be displayed properly therefore some ratios such as zoom and full should be avoided.
Picture Presets or Picture Modes
Today's displays contain various preset picture modes. They usually include something along the lines of Dynamic/Vivid, Standard, User and Cinema/Movie. Higher end displays will also have a THX and/or an ISF setting(s). If your display supports HDR, it will also have a HDR setting.
The Dynamic setting is generally a higher brightness, contrast and sharpness mode which, in my experience, results in an overall bluish look to the image. This is usually a setting that would be favored by video games and rooms with a lot of ambient lighting.
Standard setting will have a little less brightness and contrast than Dynamic.
Cinema/Movie mode would have brightness, contrast and sharpness set to a more realistic value for a more realistic look. This would probably be the closest mode to the Rec. 709 standards without calibrating anything.
User mode would be a mode that can be changed, either through calibration with a meter or by eye, and then sometimes named by the end user as their preferred mode.
THX mode - from THX's web site:
Quote:
HDR mode will set the display to the optimal setting for viewing HDR content. There are different flavors of HDR and you can research that here.
Picture Controls - Display Adjustment
There are a myriad of settings within new display's menu settings. The general consensus among video enthusiasts and professionals is that any specialty functions such as Auto Black, Expanded Black, Black Corrector, Automatic Contrast, Dynamic Contrast, Dynamic Range, Auto Color, ACL, Auto Flesh Tone, etc. be shut off unless you really think it will improve your overall picture. Keep in mind that in doing so it will counteract any image fidelity you hope to achieve. There can also be one or more of some sort of motion control type of setting(s) too. These will usually be labeled as "motion smoothing", "motion interpolation", "tru-motion", etc. Shut all of these off or you'll risk the soap opera effect on your image. The controls that can and should be adjusted are Brightness, Contrast, Color, Tint, and Sharpness. Some LCD/LED and OLED panels also contain an adjustment call Backlight. This will be discussed at the end of this section. Optimization discs used for adjustments include the Spears & Munsil HD Benchmark, Disney's World of Wonder (WoW), and DVE HD Basics.
Brightness
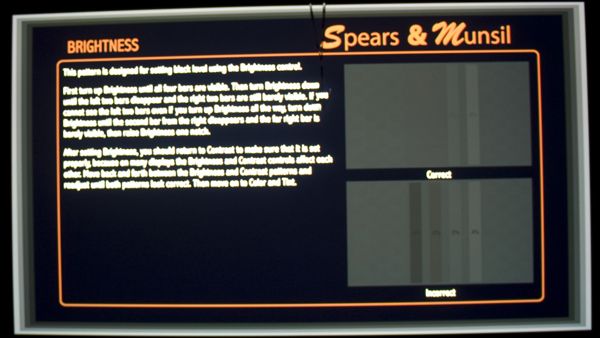
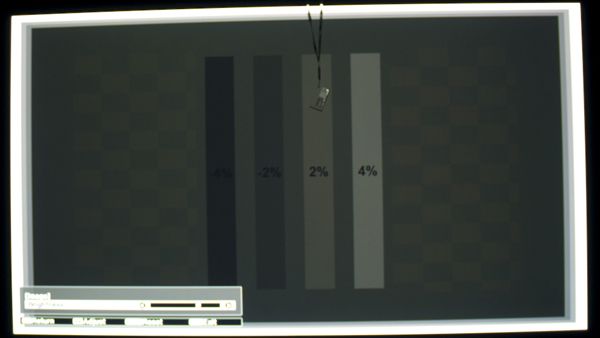
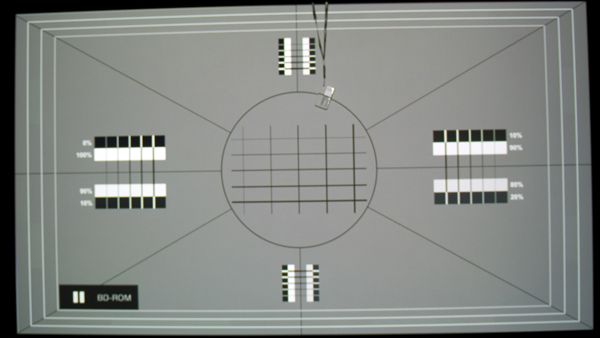
Contrary to what most people think, brightness actually controls the black levels of your display. This should be adjusted using one of the calibration discs or the THX Optimizer available on many dvd/blu-ray discs already released. Most discs have this labeled as 'Brightness'. Spears & Munsil has it labeled 'PLUGE Low'. PLUGE stands for Picture Line-Up Generation Equipment. Here's how the various brightness patterns look.
Keep in mind that these are screen grabs from my home theater projector. They may appear differently than they should on your display. You should also keep in mind that your computer monitor may not display these images correctly either.
Spears & Munsil:
Disney's WoW:
DVE HD Basics:
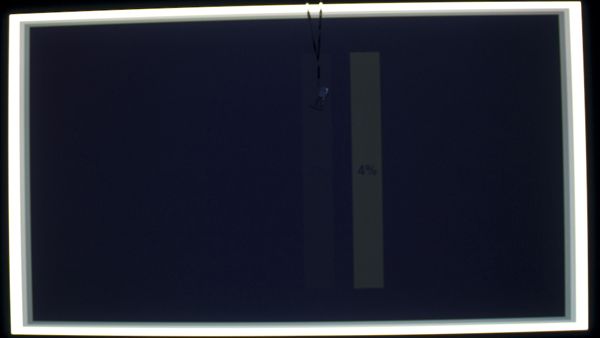
Here's what the pattern will look like when brightness is set too high on the Spears & Munsil disc:
Brightness should be set in the above image so that the 0% (16) bar blends in with the background. This should make the two bars to the left disappear and the bar to the right (1%) should be barely visible.
SpectraCal Video on Brightness - Spectracal has a series of videos up on Youtube hosted by Michael Chen describing how and why to set these basic things on your display. Here's the first one on Brightness:
Brightness.mov - YouTube
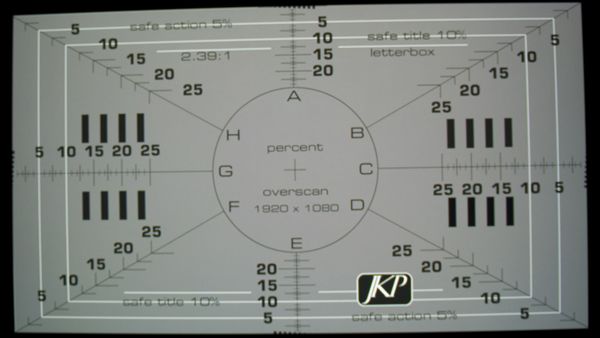
Contrast
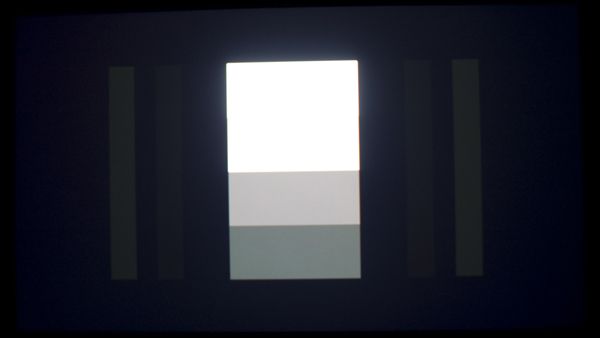
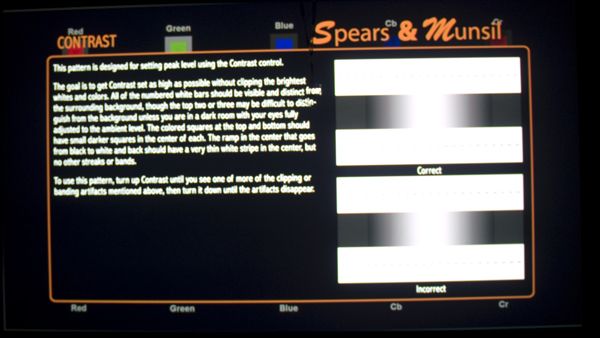
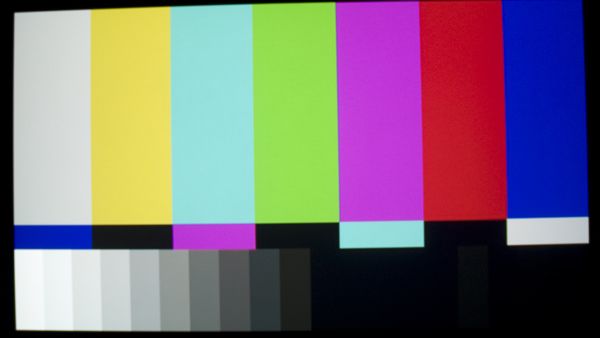
Contrast is the white level setting. On some sets (Sony for instance) this can also be labeled as Picture. Michael Chen (michael tlv), an instructor for both THX and ISF video calibration courses, puts three rules to calibrating your white levels - no clipping, no discoloration, and no eye fatigue. Clipping occurs when you're contrast is set too high causing white levels in the upper area to blend in with those that are of a lower value. For instance, 229-235 white all blend in with 228 white. Discoloration occurs when you see any hint of color (usually pink) within the upper white levels. This is generally caused by contrast being set too high. The third rule is no eye fatigue. Eye fatigue should be checked with a 100% white window box image. If viewing that image causes fatigue (do you think it's too bright or that it hurts your eyes), your contrast is set too high. This can also be set using a meter. The general rule of thumb for this is to set it from 35-50fL. This can be display dependent in that a front projection system should be set from 12-16fL while an LED/LCD can be around 50fL. It's also important to note that this is user dependent as well. If 35fL is causing you eye strain, turn the contrast down until it's at a more comfortable value.
The pattern for Contrast will look like this on the various discs:
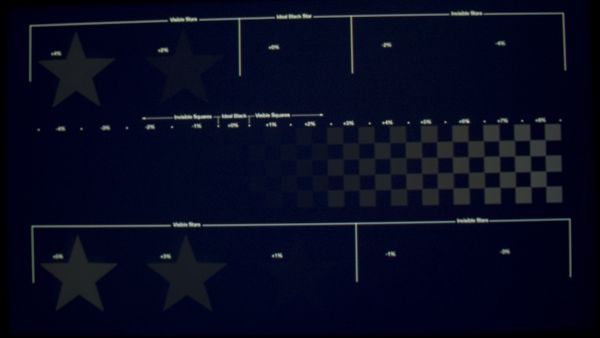
Spears & Munsil:
Disney WoW:
DVE HD Basics:
SpectraCal videos on Contrast
Contrast(Part-1).mov - YouTube
Contrast(Part-2).mov - YouTube
Color/Tint
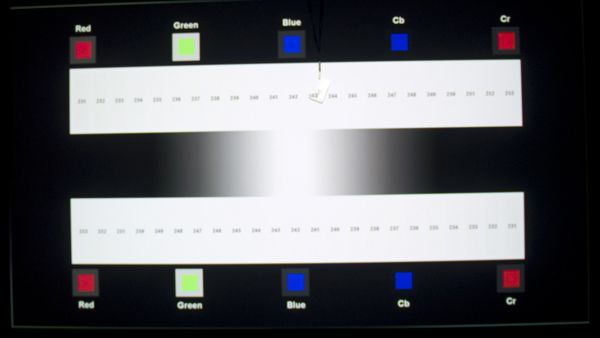
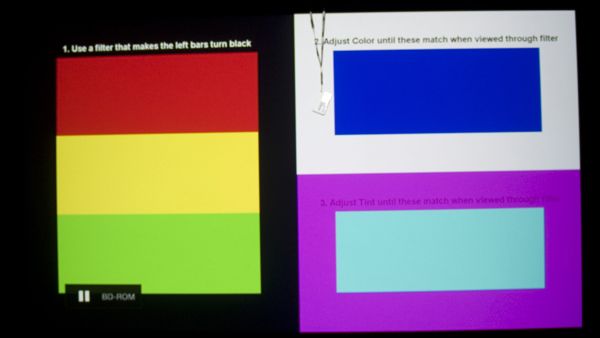
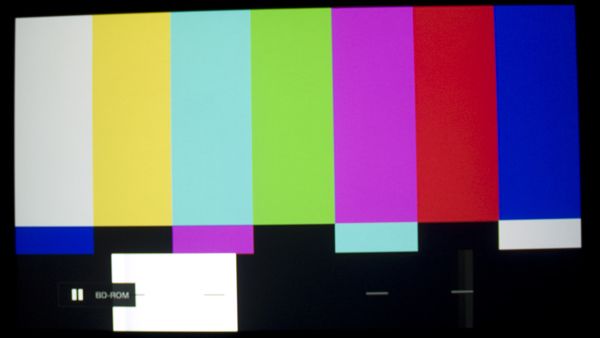
Color - This can sometimes be labeled 'Saturation'. Adjustments by eye alone can be difficult but what you would look for are over saturated skin tones (red faces) or cartoon type color image. If you have no calibration disc with the blue filter, your best option would be to set your display to it's Cinema, Movie, or THX mode and leave well enough alone. Some sets will have something called 'Blue Only' mode. This would replace the blue filter and allow you to adjust color and tint properly with a SMPTE color bar pattern displayed. With the blue filter and the color bar pattern, you want to adjust color until the blue and white bar match each other while looking through the blue filter.
Tint - This can also be labeled as 'Hue'. Tint is pretty much the same as color - if you don't have a meter or a disc, leave it alone. To adjust it with a disc you will need either the blue filter or a 'Blue Only' mode on your display. With the blue filter and the color bar pattern, you want to adjust tint until the cyan and magenta bar match each other while looking through the blue filter.
Spears & Munsil
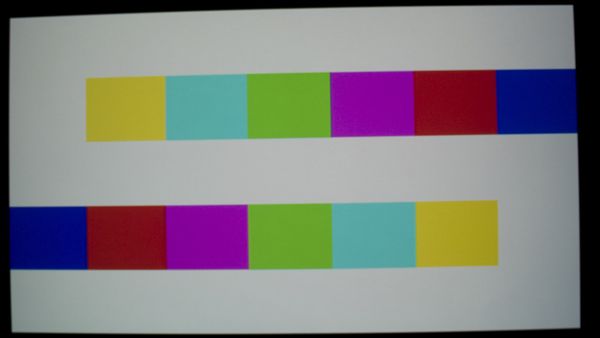
Disney WoW - there are different images for the beginner portion of the disc. They are just real life images with skin tones and fruit/vegetables in them that you use to adjust the image to what your eye thinks is correct. I don't recommend this. Use the advanced image for Color/Tint, which is shown below, with the included blue filter or with your display set to blue only mode.
DVE HD Basics:
Verify your color adjustments with a known image. There are some reference images on each of the discs that you can use if you don't have something handy.
SpectraCal video on Color/Tint
Color and Tint.mov - YouTube
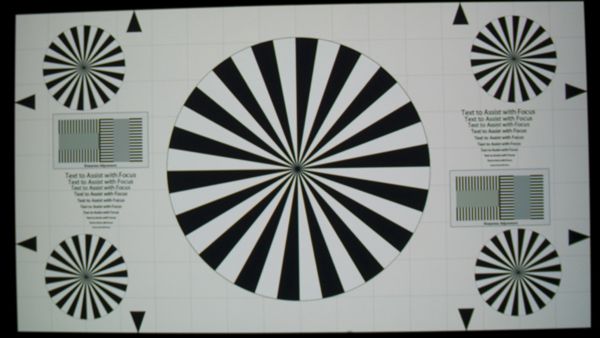
Sharpness
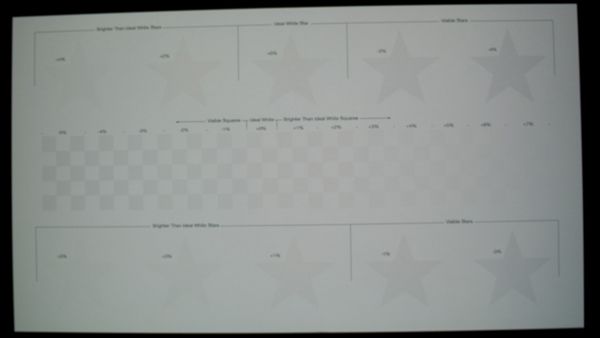
Also known as artificial edge enhancement, sharpness should be set as low as possible. Set too high, sharpness can cause something called the halo effect. One of the better ways to check for this is to use a scene with the edge of a building in it. You will usually see a ghost line next to the edge of the building. Using the patterns on the calibration discs, when sharpness is set too high you will see a glowing (white) line or a halo next to the black lines. Set too high, sharpness actually results in less detail on your display. The procedure for setting sharpness using the patterns that follow is to set sharpness to a high setting that results in the haloing effect. Then turn it down until the halo/white glow goes away.
Spears & Munsil:
Disney's WoW:
DVE HD Basics:
SpectraCal video on Sharpness
Sharpness.mov - YouTube
Gamma
Gamma is probably best explained at this Wikipedia page. Recommended gamma values for your display vary from 2.2-2.5 depending upon your environment's variables. Gamma cannot be adjusted by eye. It requires a meter to read the luminance of grayscale images.
There is a Gamma image on the Disney WoW disc but I didn't get a shot of it. And I never have checked to see if it matches up with measured readings from a meter or not, but I may get to it next week.
Backlight
Backlight is a value inherent to LCD/LED display technology. Normally this setting would be very high OOTB (Out Of The Box). Reducing it will alleviate both eyestrain and your electric bill. My Sony LED's backlight is set to 0. My LG OLED65C7P varies depending upon which picture mode I'm using. For HDR I believe it's around 80 and ISF Dark is down around 40 IIRC.
Room Considerations
You'll want to avoid glare and/or reflections from either daylight or room lighting. If possible, place the display in an area that will be affected the least by these issues. Use blackout curtains or shades if reflection from daylight is bothersome to you. It's also important to remember not to view your display in a totally dark environment. That is not good for your eyes. If you want to have the room as dark as possible, we suggest investing in a back light for your display.
An excellent article on 'The Importance of Viewing Environment Conditions in a Reference Display System' by Alan Brown.
Advanced
DIY Calibration with a meter/software
DIY Guide coming soon here to AV NIRVANA!
Advanced Calibration from a professional
If you are looking for a Professional Calibration, we suggest looking into one of the individuals listed in this thread. If you cannot find someone in that thread you can always start up a new thread in the Video Calibration forum asking for recommendations. THX has a list of their certified calibrators maintained here.
This is a work in progress - I'll be adding to it over time.
Source
The source for your display can be your Blu-ray player, a game console (PS3, Xbox), an Over The Air (OTA) antenna, or a cable/satellite box. The key to this is that you want your source to be able to match the resolution of your new display. If your display is capable of displaying a HD image, it would be worthwhile to invest in a Blu-ray player, a HD cable/satellite box or the proper OTA antenna that will get you an HD image. Same goes for 4K – if you have a 4K display, you should invest in a 4K Blu-ray player
Connection
Connection should be made using an HDMI cable for a HD display. This will provide you with the proper digital signal that your display expects. HDMI cable can be quite expensive at local stores so you may want to look into purchasing one from one of the various online retailers who sell them at a significant savings. Avoid the higher cost cables as they are rarely worth it.
There is no need for a special HDMI cable for 4K/HDR. If your cable is a high speed cable (most cables sold in the last 4 years) then you should be fine. The only hitch would be if the cable run is over a long distance – say 20 feet or more. Then you may want to do your research and invest in a high quality cable that will work with 4K/HDR. We have a thread here on this particular subject.
Aspect Ratio/Resolution
New displays are capable of 4K, 1080p, 1080i, and 720p resolutions. For your source output, we would recommend setting all cable, FIOS, all satellite boxes and BD players to "Native output" and let your TV and or audio receiver do all the scaling. The reason is the cable/FIOS/Satellite boxes have very low cost (low quality) internal video processing, whereas most audio receivers and TVs have better video processing.
The aspect ratio of newer displays is 16:9. This can sometimes be labeled as HD in some menu systems. You want the image to be displayed properly therefore some ratios such as zoom and full should be avoided.
Picture Presets or Picture Modes
Today's displays contain various preset picture modes. They usually include something along the lines of Dynamic/Vivid, Standard, User and Cinema/Movie. Higher end displays will also have a THX and/or an ISF setting(s). If your display supports HDR, it will also have a HDR setting.
The Dynamic setting is generally a higher brightness, contrast and sharpness mode which, in my experience, results in an overall bluish look to the image. This is usually a setting that would be favored by video games and rooms with a lot of ambient lighting.
Standard setting will have a little less brightness and contrast than Dynamic.
Cinema/Movie mode would have brightness, contrast and sharpness set to a more realistic value for a more realistic look. This would probably be the closest mode to the Rec. 709 standards without calibrating anything.
User mode would be a mode that can be changed, either through calibration with a meter or by eye, and then sometimes named by the end user as their preferred mode.
THX mode - from THX's web site:
Quote:
In the studio, every shadow, color and detail is carefully adjusted to deliver the right mood and impact. Only THX Certified plasmas, LCDs and projectors, featuring THX Movie Mode, let you recreate this experience at home with the push of a button.
What Does It Mean To Be THX Certified?
It means each TV and projector has gone through a rigorous design and laboratory testing process, which includes more than 400 data points to ensure exceptional image quality and signal processing performance in your home theater.
What Are The Key Benefits Of THX Certification?
Exclusive THX Movie Mode: Comes as close as possible to reproducing the HD Color Standard used by filmmakers in the studio with THX Movie Mode.
Smooth motion for every type of content: THX certification improves de-interlacing and scaling performance, ensuring smooth motion for action-oriented content.
Optimized video scaling: Presents all content in the best resolution possible, including standard definition video.
Color, Black Levels And Beyond In Your Home Theater
Sports fans and home theater junkies often complain of jaggy lines and image softening when a TV’s motion becomes too intense. THX works closely with manufacturers to minimize these types of distracting artifacts, letting you experience clean, smooth motion and vivid colors with every frame.
While the THX mode is calibrated at the factory, the environment where this is done is probably very different from your environment. At a minimum, we'd recommend white/black level calibration using one of the discs mentioned in this thread.
HDR mode will set the display to the optimal setting for viewing HDR content. There are different flavors of HDR and you can research that here.
Picture Controls - Display Adjustment
There are a myriad of settings within new display's menu settings. The general consensus among video enthusiasts and professionals is that any specialty functions such as Auto Black, Expanded Black, Black Corrector, Automatic Contrast, Dynamic Contrast, Dynamic Range, Auto Color, ACL, Auto Flesh Tone, etc. be shut off unless you really think it will improve your overall picture. Keep in mind that in doing so it will counteract any image fidelity you hope to achieve. There can also be one or more of some sort of motion control type of setting(s) too. These will usually be labeled as "motion smoothing", "motion interpolation", "tru-motion", etc. Shut all of these off or you'll risk the soap opera effect on your image. The controls that can and should be adjusted are Brightness, Contrast, Color, Tint, and Sharpness. Some LCD/LED and OLED panels also contain an adjustment call Backlight. This will be discussed at the end of this section. Optimization discs used for adjustments include the Spears & Munsil HD Benchmark, Disney's World of Wonder (WoW), and DVE HD Basics.
Brightness
Contrary to what most people think, brightness actually controls the black levels of your display. This should be adjusted using one of the calibration discs or the THX Optimizer available on many dvd/blu-ray discs already released. Most discs have this labeled as 'Brightness'. Spears & Munsil has it labeled 'PLUGE Low'. PLUGE stands for Picture Line-Up Generation Equipment. Here's how the various brightness patterns look.
Keep in mind that these are screen grabs from my home theater projector. They may appear differently than they should on your display. You should also keep in mind that your computer monitor may not display these images correctly either.
Spears & Munsil:
Disney's WoW:
DVE HD Basics:
Here's what the pattern will look like when brightness is set too high on the Spears & Munsil disc:
Brightness should be set in the above image so that the 0% (16) bar blends in with the background. This should make the two bars to the left disappear and the bar to the right (1%) should be barely visible.
SpectraCal Video on Brightness - Spectracal has a series of videos up on Youtube hosted by Michael Chen describing how and why to set these basic things on your display. Here's the first one on Brightness:
Brightness.mov - YouTube
Contrast
Contrast is the white level setting. On some sets (Sony for instance) this can also be labeled as Picture. Michael Chen (michael tlv), an instructor for both THX and ISF video calibration courses, puts three rules to calibrating your white levels - no clipping, no discoloration, and no eye fatigue. Clipping occurs when you're contrast is set too high causing white levels in the upper area to blend in with those that are of a lower value. For instance, 229-235 white all blend in with 228 white. Discoloration occurs when you see any hint of color (usually pink) within the upper white levels. This is generally caused by contrast being set too high. The third rule is no eye fatigue. Eye fatigue should be checked with a 100% white window box image. If viewing that image causes fatigue (do you think it's too bright or that it hurts your eyes), your contrast is set too high. This can also be set using a meter. The general rule of thumb for this is to set it from 35-50fL. This can be display dependent in that a front projection system should be set from 12-16fL while an LED/LCD can be around 50fL. It's also important to note that this is user dependent as well. If 35fL is causing you eye strain, turn the contrast down until it's at a more comfortable value.
The pattern for Contrast will look like this on the various discs:
Spears & Munsil:
Disney WoW:
DVE HD Basics:

SpectraCal videos on Contrast
Contrast(Part-1).mov - YouTube
Contrast(Part-2).mov - YouTube
Color/Tint
Color - This can sometimes be labeled 'Saturation'. Adjustments by eye alone can be difficult but what you would look for are over saturated skin tones (red faces) or cartoon type color image. If you have no calibration disc with the blue filter, your best option would be to set your display to it's Cinema, Movie, or THX mode and leave well enough alone. Some sets will have something called 'Blue Only' mode. This would replace the blue filter and allow you to adjust color and tint properly with a SMPTE color bar pattern displayed. With the blue filter and the color bar pattern, you want to adjust color until the blue and white bar match each other while looking through the blue filter.
Tint - This can also be labeled as 'Hue'. Tint is pretty much the same as color - if you don't have a meter or a disc, leave it alone. To adjust it with a disc you will need either the blue filter or a 'Blue Only' mode on your display. With the blue filter and the color bar pattern, you want to adjust tint until the cyan and magenta bar match each other while looking through the blue filter.
Spears & Munsil
Disney WoW - there are different images for the beginner portion of the disc. They are just real life images with skin tones and fruit/vegetables in them that you use to adjust the image to what your eye thinks is correct. I don't recommend this. Use the advanced image for Color/Tint, which is shown below, with the included blue filter or with your display set to blue only mode.
DVE HD Basics:
Verify your color adjustments with a known image. There are some reference images on each of the discs that you can use if you don't have something handy.
SpectraCal video on Color/Tint
Color and Tint.mov - YouTube
Sharpness
Also known as artificial edge enhancement, sharpness should be set as low as possible. Set too high, sharpness can cause something called the halo effect. One of the better ways to check for this is to use a scene with the edge of a building in it. You will usually see a ghost line next to the edge of the building. Using the patterns on the calibration discs, when sharpness is set too high you will see a glowing (white) line or a halo next to the black lines. Set too high, sharpness actually results in less detail on your display. The procedure for setting sharpness using the patterns that follow is to set sharpness to a high setting that results in the haloing effect. Then turn it down until the halo/white glow goes away.
Spears & Munsil:
Disney's WoW:
DVE HD Basics:
SpectraCal video on Sharpness
Sharpness.mov - YouTube
Gamma
Gamma is probably best explained at this Wikipedia page. Recommended gamma values for your display vary from 2.2-2.5 depending upon your environment's variables. Gamma cannot be adjusted by eye. It requires a meter to read the luminance of grayscale images.
There is a Gamma image on the Disney WoW disc but I didn't get a shot of it. And I never have checked to see if it matches up with measured readings from a meter or not, but I may get to it next week.
Backlight
Backlight is a value inherent to LCD/LED display technology. Normally this setting would be very high OOTB (Out Of The Box). Reducing it will alleviate both eyestrain and your electric bill. My Sony LED's backlight is set to 0. My LG OLED65C7P varies depending upon which picture mode I'm using. For HDR I believe it's around 80 and ISF Dark is down around 40 IIRC.
Room Considerations
You'll want to avoid glare and/or reflections from either daylight or room lighting. If possible, place the display in an area that will be affected the least by these issues. Use blackout curtains or shades if reflection from daylight is bothersome to you. It's also important to remember not to view your display in a totally dark environment. That is not good for your eyes. If you want to have the room as dark as possible, we suggest investing in a back light for your display.
An excellent article on 'The Importance of Viewing Environment Conditions in a Reference Display System' by Alan Brown.
Advanced
DIY Calibration with a meter/software
DIY Guide coming soon here to AV NIRVANA!
Advanced Calibration from a professional
If you are looking for a Professional Calibration, we suggest looking into one of the individuals listed in this thread. If you cannot find someone in that thread you can always start up a new thread in the Video Calibration forum asking for recommendations. THX has a list of their certified calibrators maintained here.
This is a work in progress - I'll be adding to it over time.

")

