Negatrons IIs final rack

NBPK402

Moderator
VIP Supporter
Thread Starter
Joined
Apr 17, 2017
Posts
1,866
Location
San Miguel de Allende Mexico
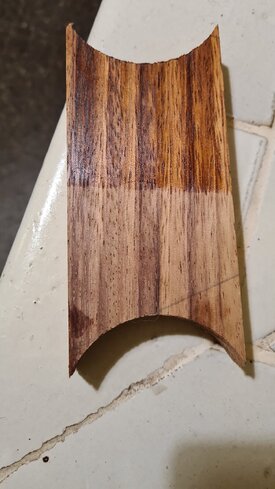
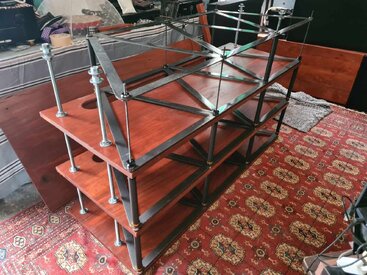
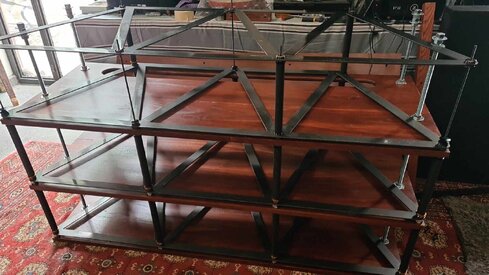
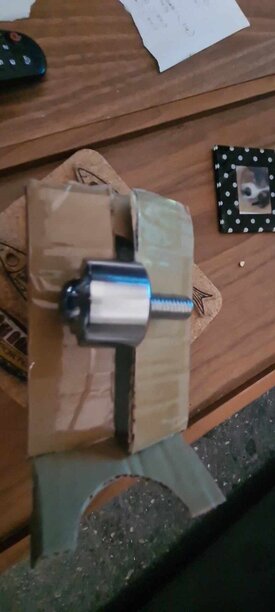
I am making a new Audio Equipment cabinet out of 1" Perota wood. The new cabinet will be about 6'w x 4'h x2'd. I am trying to make the rack to were it looks like a solid piece of artwork with access points hidden. The cabinet will have exposed screws screws in the top and bottom and possibly on the sides too. Inside of the cabinet will be my custom Perota rack.The slats will be attached to a wood frame with black speaker grill sandwiched between the 2. I am still debating on doing the slats on all for sides, just on the front, or front and sides. IThe rack will have shelves that are resting on a the steel shelves i have already had made and painted, and will be held together by round Perota wood columns. the whole internal rack will be attached to the top and bottom panels at the same locations as the columns and also via the side panels. Similar to the pics below... The completed metal shelf is also shown. The whole rack will be can be easily disassembled for moving too. I am thinking of making the 3' wide x 4' high doors with the hinges behind the grill cloth frame and use some magnets to make sure the whole assembly stays flush when closed. Sometime this week the basic rack part should be completed. Comments, suggestions all welcome..


front panel.jpg
hidden access.jpg
Perota wood.jpg
rack painted.jpeg
rack.jpg
 
Last edited:
Wow, that looks pretty neat! Keep posting updates!

Regards,
Wayne
 
It looks like you have exactly nailed what your vision is for this audio equipment rack/cabinet... Waiting to see your final execution... Given the skill level you have shown in your other AV projects, I'm confident this project will be awesome...
 
It looks like you have exactly nailed what your vision is for this audio equipment rack/cabinet... Waiting to see your final execution... Given the skill level you have shown in your other AV projects, I'm confident this project will be awesome...
Thanks, I am currently looking for some nice heavy duty soft close hinges. I can't wait to see how it comes out.
 
Here are some pics of the boards glued up...still need to cut to final sizes and then we will do a test build. next week we should be doing a test build, and if everything goes well...we will disassemble and finish and oil the pieces.
20230304_095944.jpg
20230304_095845.jpg
20230304_095906.jpg
 
Today i went to the carpenter to make sure everything is going right. We now have the rough cutout for all my wiring on one shelf. Tomorrow he said the rack portion should be ready for assembly at my house, and he will come over and finish sanding, oiling, sealing and the top finish coats. Then he will measure for the cabinet doors (2 doors for the front and 1 door for each side), and the rear frame.

The large hole that goes most of the width of the rack is for wiring and a little bit of cooling. Shelf is upside down for measuring hole locations.
20230310_150151.jpg
20230310_150144.jpg
20230310_150158.jpg
 
Some beautiful pieces of wood you have there!!! Is it politically incorrect to say Nice Rack... :bigsmile:
 
Very nice! What type of finish are you planning to use?
 
Some beautiful pieces of wood you have there!!! Is it politically incorrect to say Nice Rack... :bigsmile:
Sure!
I originally wanted Mesquite, but the carpenter told me the price and then the price for Parota...Parota looks like I wanted and was 1/2 the price and about half the weight. This rack will be heavier once we make the slotted cabinet doors and solid wood sides with a simple screen frame for the rear. the new sub will be matching wood too. :)
 
Not sure...my carpenter talked about oil, sealing the wood, and then a varnish top coat (might have a bit of a reddish tint put in it too). He will be spraying in our garage so I can pick just what i want.
I imagine the oil and the red tint varnish would really bring out the beauty of the wood grain. Should be a really unique piece when you're done.
 
Last edited:
Your welcome @NBPK402, There must be some scrap you can try out various combinations on... If this is your last and best equipment rack, take your time picking your finishing touches...
 
Your welcome @NBPK402, There must be some scrap you can try out various combinations on... If this is your last and best equipment rack, take your time picking your finishing touches...
By making it the way I did... I can make it into 2 racks or make into a larger rack too.

BTW I showed it to my wife and she really liked the wood...she has never said that to me about any of my projects.
 
The wood I have is supposedly kiln dried...does that make a difference on how to finish it?
I don't know the answer... Kiln dried wood would be harder and more brittle and I think would be tougher on tools... I think kiln dried wood would tend to be more absorbent to finishes... I am not a master carpenter, mill operator or kiln operator... I don't even play one on TV... :justdontknow:
 
Last edited:
Wow... That looks pretty nice to me... Really brings out the natural colors of the wood... I think the Oil + Bees Wax product https://www.lowes.com/pd/Howard-Fee...nditioner-Actual-Net-Contents-16-oz/999918618 would be a little more stable and help seal... Kiln dried wood is pretty thirsty... Is that one application, a time to soak in and rubbed off? Are you going to do a sample of the varnish your builder suggests? It would be interesting to see two or more of those samples side by side... No matter what you choose to finish your rack with... I know it will be a beautiful piece of art... I guess the real question is... What do you think about the finish?
I believe that was 2 coats and it sucked it all up...back side is still bare. I asked mt Carpenter to make up some scraps with different products somI can see what I like the most. A part of me wants the gloss glassy look you see on the slabs and another part of mt likes a medium gloss.
 
The subs I am making will be made of BB plywood, and then either veneered in Parota or skinned with 1/2- 1" Parota.

Whatever I use...I want very low maintenance, since I do not want to have to remove all the equipment to maintain the shelves too.
 
Rack is almost complete,,, waiting on a few parts before the bottom is attached with the new ball casters. Then it will be turned over onto its (8) casters. I am planning on a additional shelf above it that will have spiked feet.Next will be detachable grill cloth panels all around to prevent dust. Over the next year additions will be made to it...spiked platforms for equipment, plexi dust covers integrated into platforms for our turntable and top loading CD.
 

Attachments

  • received_1398007880902554.jpeg
    received_1398007880902554.jpeg
    387.2 KB · Views: 26
  • received_761888589350428.jpeg
    received_761888589350428.jpeg
    245.7 KB · Views: 25
  • received_876087701050003.jpeg
    received_876087701050003.jpeg
    96.4 KB · Views: 26
  • received_1666259660776570.jpeg
    received_1666259660776570.jpeg
    133.7 KB · Views: 25
Getting closer now... I still need some detail to complete

to this level. Then I have 2 more levels I can still add. I added some skeaker grill material and old frames to the back and sides to cut dust. Just temporarily until I get this finished in size. I might also add some lighting...since the sides are transparent too.
1717200773402_20240531_181108.jpg
 
Back
Top