Sonnie Parker
Senior Admin
More
- Preamp, Processor or Receiver
- StormAudio ISP Elite 24 MK3 Processor
- Main Amp
- McIntosh MC1.25KW Monoblock Amps
- Additional Amp
- StormAudio PA 16 MK3
- Other Amp
- McIntosh MA252 2-Channel Hybrid Integrated Amp
- Music Server
- ROON Nucleus One
- Universal / Blu-ray / CD Player
- Magnetar UDP800 UHD Player
- Streaming Equipment
- Kaleidescape Strato C Media Player
Kaleidescape Terra Prime 22TB Server
Lenovo X1 Carbon
Apple TV 4K
- Turntable/Cartridge
- Music Hall Stealth Turntable
Ortofon 2M Blue Cartridge
- Streaming Subscriptions
- Lifetime Roon Subscription
Tidal
qobuz
Netflix
Amazon Prime
- Other Equipment
- MediaLight Mk2 v2 Flex Bias Lighting
Zero Surge 8R15W-1
Zero Surge 2R20W
- Front Speakers
- RTJ 410
- Front Wide Speakers
- JTR Noesis 110HT
- Center Channel Speaker
- JTR Kallos (Custom Built)
- Surround Speakers
- JTR Noesis 210RT
- Surround Back Speakers
- JTR Noesis 210RT
- Front Height Speakers
- JTR Noesis 110HT-SL
- Middle Height Speakers
- JTR Noesis 110HT-SL
- Rear Height Speakers
- JTR Noesis 110HT-SL
- Subwoofers
- JTR Captivator - 4000ULF-TL x2 + 2400 x6
- Bass Shaker System
- Dayton Audio BSA-200 Amp
4 BST-1 Bass Shakers
- Video Display Device
- Sony 98X90L
- Remote Control
- URC MX-890
- Cables
- AudioQuest - Various
THX PixelGen HDMI
Pangea Power Cables
Blue Jeans Cables
SVS Soundpath Cables
Custom Cables
- Satellite System
- None
- Other Equipment
- Salamander Synergy Equipment Stand
VTI Amp Stands for the Monoblocks
Solidsteel - S3 Series Amp Stand
- Network/Internet
- C-Spire 500MB Fiber
Omada OC300 Controller
Omada ER8411 10G Router
Omada SG3218XP-M2 10G/2.5G Managed Switch
Omada SG2210XMP-M2 10G/2.5G Managed Switch
SilentPower LAN iPurifier Pro (for Nucleus One)
Asustor Flashstor NAS
- Headphones/IEMs
- HIFIMAN HE1000se
Unique Melody Mest MKII
- Headphone DAC/Amp
- Eversolo DMP-A6
RME ADI-2 DAC FS
- Whole House System
- HEOS System
Home-150 Speaker x6
Samsung S9 Tablet w/ HEOS
- Office/Study System
- Office System
Dell Precision Computer
Roon Networked
Vanatoo Transparent One Encore Plus Speakers
- Secondary/Additional Room System
- AV Test Room System
NAD M33 Streaming DAC Amp
MartinLogan Motion XT F200
JTR Captivator RS1
miniDSP EARS
Zero Surge 8R15W-1
Zero Surge 2R20W
Dell Optiplex
Roon Networked
- Additional Room System
- Sunroom System
Denon AVR-X1800H HEOS Roon Ready Receiver
Zu Audio DW-6 Speakers
Dayton Audio IO8XTW Outdoor Speakers
Roon Networked
Dish Joey
JVC 37" TV
- Additional Room System
- Cabin System
Onkyo TX-SR805 Receiver
Infinity Primus P163 Speakers
RSL Outsiders Outdoor Speakers
Shield TV Pro
Sony 55" TV
- Additional Room System
- Vinyl Room
Accuphase E-280 Integrated Amp
Technics SL-1210GR2 Turntable
Ortofon 2M Blue Cartridge
KLH Model Three Speakers
Zero Surge 8R15W-1
- Additional Room System
- Barn Jam
Denon AVR-X1600H HEOS Roon Ready Receiver
Soundfield Custom Speakers
I created a thread back in August 2019 on tuning my 2019 RAM with the miniDSP C-DSP with DL, but several things have changed since then, and I decided I'd do another write-up on how I've tuned my 2020 RAM truck. Disclaimer: This is not chiseled in stone by any means, and it's not necessarily how others may do it, but it's what I've done thus far to get extremely good results, at least in my subjective mind of car audio, it sounds great to me. That does not mean I've got it exactly right, and it certainly does not mean I'm not going to make more changes if I discover I can do better in some way. I love to tinker with the settings and am obviously willing to try different methods and options. So if you are doing something different, feel free to share it.
I am writing this in the first person perspective, as I do not want to tell you what you need to do, hence all the references to "I". This is what "I" did, and it is merely a step by step guide of what "I" did, not necessarily what "you" should do, but hopefully it will be of some help to those who use the miniDSP and Dirac Live. Please keep in mind... this is my opinion of what has worked for me... as always, YMMV.
I will not use the miniDSP without first treating my vehicle. I use dampening material (butyl rubber) on the inside of the outside door skin as well as stiffening up as much of the door panel around the speaker as possible on the inside and outside of the inner panel. I also treated the rear wall (referencing mainly my truck, but I also treated the trunk in my wife's car, etc), and use some sort of closed cell foam layers between the door panel and door (Raamat Ensolite, etc), and on the rear wall, and inside various cavities in the rear and sides of the vehicle interior (when the panels are removed). The rattles and resonant vibrations that are created by a subwoofer and door speakers are too numerous and will negate the benefits of spending good money on a miniDSP, so it is my recommendation to do some homework and look at quality installs to see how various people treated their vehicles. Simply treating my truck made the factory system sound so much better that I almost could have lived with it if I wasn't so knuckle-headed and stubborn about my car audio. I've always treated my vehicles and it has always made an improvement in the sound, if nothing else by virtue of eliminating unwanted noises... making the interior quieter, etc. Another important note is that if your sub is in the back (most are unless you have a center console sub), anything vibrating in the back will make the sub sound like it's coming from the back instead of up front, which from the front is definitely what I prefer.
NOTE: Before beginning with the C-DSP... the first thing I do after installing the system is set my amp gains correctly. There are dozens of "how to set amp gains" on Google, but I found this one to be particularly useful and explains why using various test tones with my ear is as good as an oscilloscope: https://www.crutchfield.com/S-fMNqg2hm8PM/learn/setting-amplifier-gain.html
The C-DSP software is Version 1.8d2 ... along with Dirac Live 3 (just recently released as of July 2020).
My setup is using the factory 12" display in a 2020 RAM with the HK system. I have a JL Audio Stealthbox with dual 10's powered by a JL VX1000/1i amp, Hybrid Audio Technologies Unity 6x9 speakers in the front doors, with HAT Legatia X3-P in the factory dash location, and FaitalPRO in the rear headliner, all three sets powered by a JL XD600/6v2 amp. The factory subwoofer, center dash speaker and upper front door speakers are disconnected. The factory rear doors are still connected, but the headunit is fully faded to the front. My full install thread is here: 2020 RAM Laramie 4WD Audio System Build w/ 12" Display and JL Audio Stealthbox
The miniDSP C-DSP is being fed from the factory headunit in my RAM thru a PAC AmpPRO via the optical digital output. This will be channels 7 and 8 in the miniDSP. The factory headunit EQ settings are all flat, surround is off, and the fader is set full front. My rear factory speakers are still connected for the ANC, and if needed I can fade rear for back seat passengers, although that's not very often. If we have our friends in the vehicle with us, we are usually talking and not worried much about the audio... it's there for background noise.
I connect the miniDSP unit to a laptop with the supplied USB cable. I have always had to use an extension, but finally ordered a 10ft cable to keep connected to the unit and rolled up in the back for when I want to tinker with the system later on. A note to Tony at miniDSP... start including a 10ft cable with the system for those of us who have the miniDSP mounted a good distance from where we need our laptop for setup and calibration.
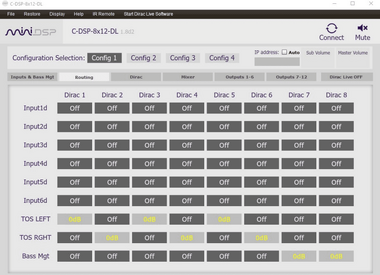
When I first open the C-DSP software, the screenshot below is what I see... then I click on Connect in the top right corner to connect to the miniDSP unit. My vehicle needs to be powered on so that the miniDSP is on.
I am on Config 1 and I click on each Input box in the far right column and set all but 7 and 8 to Off, because I am not using the first 6. I am only using the optical Toslink cable because it is a clean as it gets from the headunit to the miniDSP, and it's a full range signal. I click on HPF and LPF for each channel and make sure these are Bypassed. I am setting my x-over filters on the output side.


Next I click on Display in the upper menu row and make the appropriate selections (see screenshot below) for each option. I use ms for delay since I use Dirac Live to give me my delay settings that I manually enter later on. I leave the remote turn-on at the default settings with no issues, and on the actual miniDSP unit I have selected setting 2 for the remote turn-on, because it never fails when trying to use signal to turn it on, if I turn the volume down too low, it will occasionally turn off the amps. YMMV. The subwoofer channel selection is used if the remote control level knob is going to be used to control the subwoofer volume. The sub channels to be controlled by the level control knob are selected. I do not use the miniDSP remote myself... as I have no permanent need for it, as I only have one preset, and do not swap between presets, nor control the sub volume outside of my sub volume control knob for my JL Audio amp. I may use the remote initially to compare settings, but once I find what I like, I'm done with it. It may be better to use the miniDSP to control the sub volume, but I personally have found no adverse effects of using the JL Audio control knob (DRC-205). I rarely adjust it anyway. The final option in the list is the Dirac Channels Configuration. I'm using 1, 2, 3, 4, 7 and 8 for Dirac Live initially. I am using 5 and 6 for rear fill, but I do not include these in Dirac Live or any of my measurements. I may knock out the peaks with the PEQ, but that is the extent of it. I don't need to get the levels or the delay based off of what Dirac Live does for channels 5 and 6 because I am going to be setting the delay to 20ms and the levels at -6db and adjusting to the proper level for rear field, so I don't need DL to do anything with these channels... they are set to UNUSED so that they are not measured. Later on, I will come BACK to the DL Channels Configuration to change these, but I need to check all my channels first.

Next I move to the Routing tab and select the output channels as follows (see screenshot below). I'm using input channels 7 and 8 (left side labels), so all of my output channels (top labels) will be in those two rows, although I select 7 and 8 for Bass Management. These correspond to the outputs on the actual miniDSP unit where I have RCA outputs running to the inputs of the amps. I set the input levels of my amps with a voltmeter, per JL Audio's voltage recommendation for the speakers I am using (tons of Google results for various ways of setting gain). My VXi amp is super easy to set within it's own software, but the XD amp requires the voltmeter.
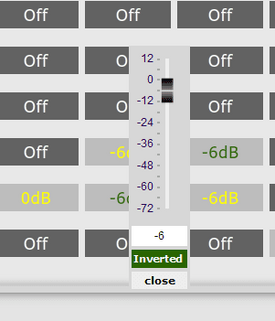
Note the settings for output channels 5 and 6. I go ahead and set these since I am using rear fill, and I see no harm in setting them now since I am not using these channels when I run Dirac Live (again, they are set to UNUSED in the Dirac Channels Configuration). This does not mean they will not play at all, it simply means they won't be used and won't play during the Dirac Live calibration. I then click on the corresponding button, and the popup allows me to set the level to -6dB and invert the polarity per the rear fill recommendations (that I have no idea who came up with, but it seems to work). As mentioned earlier, I will adjust the output levels under Outputs 1-6 tab later on to get the rear fill to my preference. I set them initially so that I could notice them, then over the course of a few days of listening, I gradually lowered the levels until I did not notice them, and until I thought my front stage sounded the best.


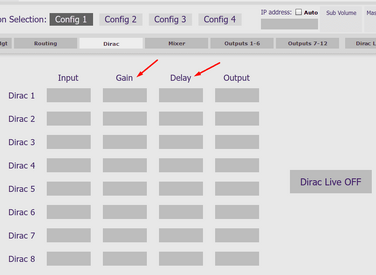
I'm not worried about the Dirac tab right now... moving on to the Mixer tab, This is where I labeled my speakers across the top, and I am using both outputs 7 and 8 of the miniDSP to feed to the subwoofer, so I select both of those. I will come BACK to the Mixer tab later and make some changes, but this is what I want for right now to do some preliminary testing and measurements.

To start with, I click on each block that shows 0dB except the Dirac1 and L DOOR (these may be labeled differently in different systems). Below is what it will look like... and this will be the only speaker playing.

I click each block to turn only that block on and leave the others off as I go thru each speaker to make sure they are playing as they should. I actually found out that I had a bad RCA cable on one of my speakers during this test. My right front dash was not playing... and I thought I had a bad amp channel for a minute, but thankfully it was an old RCA cable that needed to be updated.
Next I move on over to the Output 1-6 tab and setup each speaker's crossover. I click on the Xover button and the crossover window will popup. I now set the appropriate crossovers for each speaker. From recommendations of others and from my own experience, because I boost my sub levels up so much, I have found that creating a 1/2 octave gap in the xover between the sub and door speakers allows the sub bass to be up front without having to adjust the phase of the subwoofer at the crossover point. Thus, I high-passed my door speakers at 60Hz and the subwoofer is low-passed at 45Hz, which is 1/2 octave lower than the door speakers. It works very well with about a 10-12dB boost in the sub region. For my setup, I have the sub set at 10Hz (12dB for infrasonic filtering) to 45Hz (24dB)... door speakers are bandpassed at 60Hz (24dB) to 250Hz (24dB) and the dash speakers are high-passed at 250Hz (24dB). Here is an example of the xover setting for my left door speaker.

Obviously the crossovers are set based on the particular system design. For the rear fill speakers, this is how I have mine set... as recommended by several others who know better than I do why these settings work.

My next step is to check the levels and delay via a calibration run with Dirac Live. However, before I let Dirac Live tell me what my levels should be, I want to measure each speaker at the driver's seat listening position with REW so that I can make sure there are not any serious peaks that will skew the level results. If I have a 10dB peak at 400Hz, it will cause that speaker to be set lower than it really should be, and with the way I run my final Dirac Live with only two channels, this will make a difference... they should be level matched with a relatively non-peaky response. Thus, I want to eliminate any major peaks with the PEQ filters available in the C-DSP. This is pre-EQ, which a lot of users won't do and may not see necessary, but I have tested with and without, and I'm definitely going to always do this, as it has ALWAYS given me better end results and less issues. So... if this option is desired and to be followed, REW is needed (free download right here on AV NIRVANA) along with a UMIK-1 mic. I place the mic at center of where my ears would typically be located. I do this while sitting in the driver's seat by leaning my head back and placing the mic at the tip of my nose. I've also done it by setting up the mic on a stand and getting it exactly where center of my ears are... both methods seem to work out fine for me with very little difference. So I measure one speaker at a time using the RTA in REW.
I used the Generator in REW and recorded about 5 minutes worth of Periodic Pink Noise to a USB thumb drive to play thru my headunit.
Here are the settings I use for the pink noise...

Here are the settings I used for the RTA...

I then selected each speaker to measure, turning off all the other speakers in the Mixer tab.
I connected my UMIK-1 mic, loaded the calibration file for the mic and placed the mic at the tip of my nose for each measurement... then played the pink noise and used the RTA in REW to record the response, saving it as a measurement to REW.
I play the pink noise, then click the red record button on the RTA and get about 20-30 averages before I stop. Once I have stopped recording, I can then save the current measurement to the REW screen for viewing, smoothing, etc. As you can see below, I got 25 averages and then clicked Save Current.

To show one example.. after measuring the L DOOR speaker and clicking Save Current, the purple response in the below screenshot is what I see in REW. This is not drastic, but some are worse than others. I then go to the PEQ button in the Outputs 1-6 tab (see second screenshot) and add a few filters to get the green response. This allows the level matching and delay to be more precise between each speaker. The results here is from using 3 filters. I could use more and do more, but this is what I chose to do, and I let DL do the rest. The main thing here is to eliminate extremes so that level matching is better. Maybe one day DL can figure out now to correct the frequency of each channel, then do levels and delay for each speaker after they are corrected.


Now I am ready to run Dirac Live on each speaker to get the proper levels and delay. I can also physically measure the distance and convert it to ms... and also check the levels myself and set those, but I've found that Dirac gives me better end results. It might be worth trying both ways to determine the best results. I did it both ways, the DL way is better for me. YMMV.
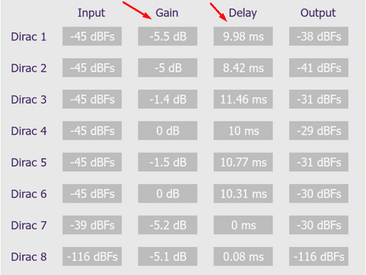
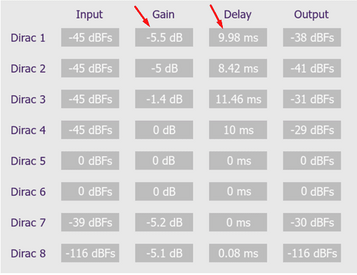
Next I run Dirac Live following the instructions to get to the measurement part. I only measure the one location, tip of my nose, because the first measurement is what creates the levels and delay settings, and that is all I need for now. Once this is done, I export it to the C-DSP, and then go to the Dirac tab in the C-DSP and grab all the levels and delay numbers. See screenshot below... these are my results that show up in the Dirac tab.

Now I enter these numbers in the Outputs 1-6 and Outputs 7-12 tabs accordingly (I did not measure 5, 6 or 8). Remember, I did not let Dirac measure channels 5 and 6 because I have manually set those. So I only input numbers from the Dirac tab for 1-4 and 7 (for the sub). HOWEVER... I did make one change, and that was to increase all the levels proportionately across the board (other than 5 and 6) to keep from cutting the levels and having to turn up the headunit volume too much... or running out of headunit volume. This was only a 5dB increase for each level setting. It did not effect the response, as the final DL calibration is performed after these settings. These settings simply keep all the speakers level with each other for better blending of each speaker during the calibration. You can see my updated levels below.


Now that I have my levels and I have my delay settings all entered, it's time to run the final Dirac Live calibration.
First, I need to go BACK to the Dirac Channels Configuration and set the channels I want to measure, which will now only be channel 1 for the left side, and channel 2 for the right side. ALL OTHER speakers are set to UNUSED. This MUST be updated or the calibration will try to measure a speaker with no output and create an error in the measurement process.

Next I go BACK to the Mixer tab and set my speakers so that the left speakers and sub play from channel 1 and the right speakers and sub play from channel 2. Remember, I am NOT measuring the rear fill speakers. I will set those manually, and adjust any major frequency anomalies with the PEQ. I don't need those two speakers causing issues with levels and delay because they are set differently anyway. They are turned on in the Mixer, but because I have them set to UNUSED in the Dirac Channels Calibration, they will not be measured.

This is going to create three sweeps during calibration... left, right and left. The subwoofer and all other speakers are measured together. Once finished, the results are seen in the DL software and the target curve can be set as preferred. Below is where I have mine set right now, and I am really liking it a lot. I've tried a couple of different target curves, and it's easy to open up the saved project in DL and make adjustments to the target curve and export to the C-DSP. This is where the remote can come in handy as a temporary tool, loading up to four different slots (Config 1-4) and changing between them to see what sounds best to you.

FWIW... I measure at the tip of my nose first, then at each ear, then right around my face area for the rest of the measurements. I've read where others get a measurement down low, a good bit forward, one in the passenger seat, etc, etc... all kinds of different ways to do it. I might suggest trying various methods for what is best for you. This is where the various results can be setup in the presets for comparison. While we all might like something similar, there may be something we prefer better one way over the other. The ultimate goal is to get what you like.
The results I have right now are superb... and just when I thought it could not get any better than my last truck setup, this is still a step up from it. I believe it's in the tuning, as the equipment in both systems is very similar in quality, but I approached this tune a little differently than my previous truck. As stated early on, this does not mean I want make changes, try other methods and/or modify various options above. This is all in the fun of doing the install and tuning. It's the hobby I'm infatuated with, so it seems it is ever-evolving for me.
I am writing this in the first person perspective, as I do not want to tell you what you need to do, hence all the references to "I". This is what "I" did, and it is merely a step by step guide of what "I" did, not necessarily what "you" should do, but hopefully it will be of some help to those who use the miniDSP and Dirac Live. Please keep in mind... this is my opinion of what has worked for me... as always, YMMV.
I will not use the miniDSP without first treating my vehicle. I use dampening material (butyl rubber) on the inside of the outside door skin as well as stiffening up as much of the door panel around the speaker as possible on the inside and outside of the inner panel. I also treated the rear wall (referencing mainly my truck, but I also treated the trunk in my wife's car, etc), and use some sort of closed cell foam layers between the door panel and door (Raamat Ensolite, etc), and on the rear wall, and inside various cavities in the rear and sides of the vehicle interior (when the panels are removed). The rattles and resonant vibrations that are created by a subwoofer and door speakers are too numerous and will negate the benefits of spending good money on a miniDSP, so it is my recommendation to do some homework and look at quality installs to see how various people treated their vehicles. Simply treating my truck made the factory system sound so much better that I almost could have lived with it if I wasn't so knuckle-headed and stubborn about my car audio. I've always treated my vehicles and it has always made an improvement in the sound, if nothing else by virtue of eliminating unwanted noises... making the interior quieter, etc. Another important note is that if your sub is in the back (most are unless you have a center console sub), anything vibrating in the back will make the sub sound like it's coming from the back instead of up front, which from the front is definitely what I prefer.
NOTE: Before beginning with the C-DSP... the first thing I do after installing the system is set my amp gains correctly. There are dozens of "how to set amp gains" on Google, but I found this one to be particularly useful and explains why using various test tones with my ear is as good as an oscilloscope: https://www.crutchfield.com/S-fMNqg2hm8PM/learn/setting-amplifier-gain.html
The C-DSP software is Version 1.8d2 ... along with Dirac Live 3 (just recently released as of July 2020).
My setup is using the factory 12" display in a 2020 RAM with the HK system. I have a JL Audio Stealthbox with dual 10's powered by a JL VX1000/1i amp, Hybrid Audio Technologies Unity 6x9 speakers in the front doors, with HAT Legatia X3-P in the factory dash location, and FaitalPRO in the rear headliner, all three sets powered by a JL XD600/6v2 amp. The factory subwoofer, center dash speaker and upper front door speakers are disconnected. The factory rear doors are still connected, but the headunit is fully faded to the front. My full install thread is here: 2020 RAM Laramie 4WD Audio System Build w/ 12" Display and JL Audio Stealthbox
The miniDSP C-DSP is being fed from the factory headunit in my RAM thru a PAC AmpPRO via the optical digital output. This will be channels 7 and 8 in the miniDSP. The factory headunit EQ settings are all flat, surround is off, and the fader is set full front. My rear factory speakers are still connected for the ANC, and if needed I can fade rear for back seat passengers, although that's not very often. If we have our friends in the vehicle with us, we are usually talking and not worried much about the audio... it's there for background noise.
I connect the miniDSP unit to a laptop with the supplied USB cable. I have always had to use an extension, but finally ordered a 10ft cable to keep connected to the unit and rolled up in the back for when I want to tinker with the system later on. A note to Tony at miniDSP... start including a 10ft cable with the system for those of us who have the miniDSP mounted a good distance from where we need our laptop for setup and calibration.
When I first open the C-DSP software, the screenshot below is what I see... then I click on Connect in the top right corner to connect to the miniDSP unit. My vehicle needs to be powered on so that the miniDSP is on.
I am on Config 1 and I click on each Input box in the far right column and set all but 7 and 8 to Off, because I am not using the first 6. I am only using the optical Toslink cable because it is a clean as it gets from the headunit to the miniDSP, and it's a full range signal. I click on HPF and LPF for each channel and make sure these are Bypassed. I am setting my x-over filters on the output side.
Next I click on Display in the upper menu row and make the appropriate selections (see screenshot below) for each option. I use ms for delay since I use Dirac Live to give me my delay settings that I manually enter later on. I leave the remote turn-on at the default settings with no issues, and on the actual miniDSP unit I have selected setting 2 for the remote turn-on, because it never fails when trying to use signal to turn it on, if I turn the volume down too low, it will occasionally turn off the amps. YMMV. The subwoofer channel selection is used if the remote control level knob is going to be used to control the subwoofer volume. The sub channels to be controlled by the level control knob are selected. I do not use the miniDSP remote myself... as I have no permanent need for it, as I only have one preset, and do not swap between presets, nor control the sub volume outside of my sub volume control knob for my JL Audio amp. I may use the remote initially to compare settings, but once I find what I like, I'm done with it. It may be better to use the miniDSP to control the sub volume, but I personally have found no adverse effects of using the JL Audio control knob (DRC-205). I rarely adjust it anyway. The final option in the list is the Dirac Channels Configuration. I'm using 1, 2, 3, 4, 7 and 8 for Dirac Live initially. I am using 5 and 6 for rear fill, but I do not include these in Dirac Live or any of my measurements. I may knock out the peaks with the PEQ, but that is the extent of it. I don't need to get the levels or the delay based off of what Dirac Live does for channels 5 and 6 because I am going to be setting the delay to 20ms and the levels at -6db and adjusting to the proper level for rear field, so I don't need DL to do anything with these channels... they are set to UNUSED so that they are not measured. Later on, I will come BACK to the DL Channels Configuration to change these, but I need to check all my channels first.
Next I move to the Routing tab and select the output channels as follows (see screenshot below). I'm using input channels 7 and 8 (left side labels), so all of my output channels (top labels) will be in those two rows, although I select 7 and 8 for Bass Management. These correspond to the outputs on the actual miniDSP unit where I have RCA outputs running to the inputs of the amps. I set the input levels of my amps with a voltmeter, per JL Audio's voltage recommendation for the speakers I am using (tons of Google results for various ways of setting gain). My VXi amp is super easy to set within it's own software, but the XD amp requires the voltmeter.
Note the settings for output channels 5 and 6. I go ahead and set these since I am using rear fill, and I see no harm in setting them now since I am not using these channels when I run Dirac Live (again, they are set to UNUSED in the Dirac Channels Configuration). This does not mean they will not play at all, it simply means they won't be used and won't play during the Dirac Live calibration. I then click on the corresponding button, and the popup allows me to set the level to -6dB and invert the polarity per the rear fill recommendations (that I have no idea who came up with, but it seems to work). As mentioned earlier, I will adjust the output levels under Outputs 1-6 tab later on to get the rear fill to my preference. I set them initially so that I could notice them, then over the course of a few days of listening, I gradually lowered the levels until I did not notice them, and until I thought my front stage sounded the best.
I'm not worried about the Dirac tab right now... moving on to the Mixer tab, This is where I labeled my speakers across the top, and I am using both outputs 7 and 8 of the miniDSP to feed to the subwoofer, so I select both of those. I will come BACK to the Mixer tab later and make some changes, but this is what I want for right now to do some preliminary testing and measurements.
To start with, I click on each block that shows 0dB except the Dirac1 and L DOOR (these may be labeled differently in different systems). Below is what it will look like... and this will be the only speaker playing.
I click each block to turn only that block on and leave the others off as I go thru each speaker to make sure they are playing as they should. I actually found out that I had a bad RCA cable on one of my speakers during this test. My right front dash was not playing... and I thought I had a bad amp channel for a minute, but thankfully it was an old RCA cable that needed to be updated.
Next I move on over to the Output 1-6 tab and setup each speaker's crossover. I click on the Xover button and the crossover window will popup. I now set the appropriate crossovers for each speaker. From recommendations of others and from my own experience, because I boost my sub levels up so much, I have found that creating a 1/2 octave gap in the xover between the sub and door speakers allows the sub bass to be up front without having to adjust the phase of the subwoofer at the crossover point. Thus, I high-passed my door speakers at 60Hz and the subwoofer is low-passed at 45Hz, which is 1/2 octave lower than the door speakers. It works very well with about a 10-12dB boost in the sub region. For my setup, I have the sub set at 10Hz (12dB for infrasonic filtering) to 45Hz (24dB)... door speakers are bandpassed at 60Hz (24dB) to 250Hz (24dB) and the dash speakers are high-passed at 250Hz (24dB). Here is an example of the xover setting for my left door speaker.
Obviously the crossovers are set based on the particular system design. For the rear fill speakers, this is how I have mine set... as recommended by several others who know better than I do why these settings work.
My next step is to check the levels and delay via a calibration run with Dirac Live. However, before I let Dirac Live tell me what my levels should be, I want to measure each speaker at the driver's seat listening position with REW so that I can make sure there are not any serious peaks that will skew the level results. If I have a 10dB peak at 400Hz, it will cause that speaker to be set lower than it really should be, and with the way I run my final Dirac Live with only two channels, this will make a difference... they should be level matched with a relatively non-peaky response. Thus, I want to eliminate any major peaks with the PEQ filters available in the C-DSP. This is pre-EQ, which a lot of users won't do and may not see necessary, but I have tested with and without, and I'm definitely going to always do this, as it has ALWAYS given me better end results and less issues. So... if this option is desired and to be followed, REW is needed (free download right here on AV NIRVANA) along with a UMIK-1 mic. I place the mic at center of where my ears would typically be located. I do this while sitting in the driver's seat by leaning my head back and placing the mic at the tip of my nose. I've also done it by setting up the mic on a stand and getting it exactly where center of my ears are... both methods seem to work out fine for me with very little difference. So I measure one speaker at a time using the RTA in REW.
I used the Generator in REW and recorded about 5 minutes worth of Periodic Pink Noise to a USB thumb drive to play thru my headunit.
Here are the settings I use for the pink noise...
Here are the settings I used for the RTA...
I then selected each speaker to measure, turning off all the other speakers in the Mixer tab.
I connected my UMIK-1 mic, loaded the calibration file for the mic and placed the mic at the tip of my nose for each measurement... then played the pink noise and used the RTA in REW to record the response, saving it as a measurement to REW.
I play the pink noise, then click the red record button on the RTA and get about 20-30 averages before I stop. Once I have stopped recording, I can then save the current measurement to the REW screen for viewing, smoothing, etc. As you can see below, I got 25 averages and then clicked Save Current.
To show one example.. after measuring the L DOOR speaker and clicking Save Current, the purple response in the below screenshot is what I see in REW. This is not drastic, but some are worse than others. I then go to the PEQ button in the Outputs 1-6 tab (see second screenshot) and add a few filters to get the green response. This allows the level matching and delay to be more precise between each speaker. The results here is from using 3 filters. I could use more and do more, but this is what I chose to do, and I let DL do the rest. The main thing here is to eliminate extremes so that level matching is better. Maybe one day DL can figure out now to correct the frequency of each channel, then do levels and delay for each speaker after they are corrected.
Now I am ready to run Dirac Live on each speaker to get the proper levels and delay. I can also physically measure the distance and convert it to ms... and also check the levels myself and set those, but I've found that Dirac gives me better end results. It might be worth trying both ways to determine the best results. I did it both ways, the DL way is better for me. YMMV.
Next I run Dirac Live following the instructions to get to the measurement part. I only measure the one location, tip of my nose, because the first measurement is what creates the levels and delay settings, and that is all I need for now. Once this is done, I export it to the C-DSP, and then go to the Dirac tab in the C-DSP and grab all the levels and delay numbers. See screenshot below... these are my results that show up in the Dirac tab.
Now I enter these numbers in the Outputs 1-6 and Outputs 7-12 tabs accordingly (I did not measure 5, 6 or 8). Remember, I did not let Dirac measure channels 5 and 6 because I have manually set those. So I only input numbers from the Dirac tab for 1-4 and 7 (for the sub). HOWEVER... I did make one change, and that was to increase all the levels proportionately across the board (other than 5 and 6) to keep from cutting the levels and having to turn up the headunit volume too much... or running out of headunit volume. This was only a 5dB increase for each level setting. It did not effect the response, as the final DL calibration is performed after these settings. These settings simply keep all the speakers level with each other for better blending of each speaker during the calibration. You can see my updated levels below.
Now that I have my levels and I have my delay settings all entered, it's time to run the final Dirac Live calibration.
First, I need to go BACK to the Dirac Channels Configuration and set the channels I want to measure, which will now only be channel 1 for the left side, and channel 2 for the right side. ALL OTHER speakers are set to UNUSED. This MUST be updated or the calibration will try to measure a speaker with no output and create an error in the measurement process.
Next I go BACK to the Mixer tab and set my speakers so that the left speakers and sub play from channel 1 and the right speakers and sub play from channel 2. Remember, I am NOT measuring the rear fill speakers. I will set those manually, and adjust any major frequency anomalies with the PEQ. I don't need those two speakers causing issues with levels and delay because they are set differently anyway. They are turned on in the Mixer, but because I have them set to UNUSED in the Dirac Channels Calibration, they will not be measured.
This is going to create three sweeps during calibration... left, right and left. The subwoofer and all other speakers are measured together. Once finished, the results are seen in the DL software and the target curve can be set as preferred. Below is where I have mine set right now, and I am really liking it a lot. I've tried a couple of different target curves, and it's easy to open up the saved project in DL and make adjustments to the target curve and export to the C-DSP. This is where the remote can come in handy as a temporary tool, loading up to four different slots (Config 1-4) and changing between them to see what sounds best to you.
FWIW... I measure at the tip of my nose first, then at each ear, then right around my face area for the rest of the measurements. I've read where others get a measurement down low, a good bit forward, one in the passenger seat, etc, etc... all kinds of different ways to do it. I might suggest trying various methods for what is best for you. This is where the various results can be setup in the presets for comparison. While we all might like something similar, there may be something we prefer better one way over the other. The ultimate goal is to get what you like.
The results I have right now are superb... and just when I thought it could not get any better than my last truck setup, this is still a step up from it. I believe it's in the tuning, as the equipment in both systems is very similar in quality, but I approached this tune a little differently than my previous truck. As stated early on, this does not mean I want make changes, try other methods and/or modify various options above. This is all in the fun of doing the install and tuning. It's the hobby I'm infatuated with, so it seems it is ever-evolving for me.
Attachments
Last edited: