Make a good measurement system with REW and Raspberry

Thread Starter
Joined
Feb 8, 2018
Messages
279
Location
Italy
Hi john, actually I talk to myself but I was hoping that someone had built something similar in order to exchange some information.
I see that there are many views, but no one comments or asks for any additional information to make a copy of version 2 of the tool.
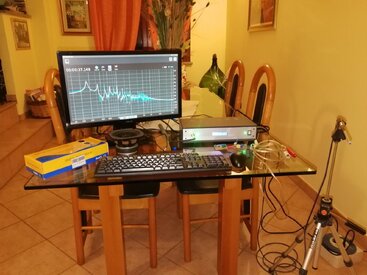
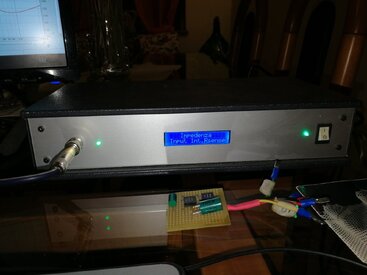
Too bad, however since I started I try to finish with the remaining circuits, power supply and microphone preamplifier.
If you have any suggestions for me I am happy to receive them ..
Thanks
 
Thread Starter
Joined
Feb 8, 2018
Messages
279
Location
Italy
The purpose of my presentation was to show that it is possible to use a Raspberry Pi 3 to perform REW and that its
performances are completely comparable to personal computers and much cheaper.
For this purpose I would like to make videos to show how fast the Raspberry performs REW's RTA function and
the same function on a personal computer.
I saw that on the net no one had had a specific experience, so I thought I'd find someone in the REW forum.
I am pleased to be the only one who has made a complete tool with the Raspberry and with the REW software
I hope that you too can like john and maybe you could open a section dedicated to REW on Raspberry ..
It would be nice, also because this SBC has an incredible support from the community ...
 
Thread Starter
Joined
Feb 8, 2018
Messages
279
Location
Italy
The last audio card tested is the Audio injector Zero.
This card is the twin of the audio injector stereo but with the size of the raspberry Pi Zero, I did not expect different performances, instead, to my surprise this card behaved a lot of the previous version. The problem related to the instability of the response curve at high frequencies has disappeared, while the noise of the board is still a little too high.
This card is supplied with input and output connectors and above all with the GPIO bus of the raspberry to be welded and therefore those wishing to try it must make good welds.
The card is supplied without the GPIO connector that must be purchased separately, despite the sizes that can be copied with the raspberry zero, it can easily be connected to the later versions Pi3 Pi3 + and also Pi4.

 
Thread Starter
Joined
Feb 8, 2018
Messages
279
Location
Italy
As you have seen, I have tried several sound cards for the raspberry, but none of them fully satisfies me to the point that I am seriously considering designing a card on my own, but for the moment I still have many things to improve on version 3 of the instrument and I don't have time to make a sound card.
If I had to choose one, perhaps I would choose the last one presented (Audio injector zero), it doesn't have important performances but it is inexpensive easy to configure, it supports the sampling frequency at 96Khz and the I2S bus mode in Master mode (Clock on board) while the answer extends from about 10Hz to 30 / 35Khz. They look like decent performances, but some are not as good as the noise level around -80db and the total harmonic distortion THD around 0.020%.
Given the cost of about $ 20, to start with, I wouldn't think about it much and I would use this .... Let me know if you use it ...
 
Thread Starter
Joined
Feb 8, 2018
Messages
279
Location
Italy
Here are the measurements made with the 2 version of the meter using the Audioinjector zero card, I carried out the usual loop response curve from 4Hz to 30Khz and the four impedances at 10, 111, 150, 300 ohm so as to verify the accuracy of the gaming system. I hope you can also be useful for a comparison with your measurement system.
Remember that this is not a professional system but a self-made system, but in spite of everything it has some features that are very valid and come close to a professional system.
Thanks
 

Attachments

  • Risposta in frequenza.mdat
    3.5 MB · Views: 22
  • Impedenza 10ohm.mdat
    1.9 MB · Views: 15
  • Impedenza 111ohm.mdat
    1.9 MB · Views: 12
  • Impedenza 150ohm.mdat
    1.9 MB · Views: 11
  • Impedenza 300ohm.mdat
    1.9 MB · Views: 13
Thread Starter
Joined
Feb 8, 2018
Messages
279
Location
Italy
Electronic switching section

I am attaching the wiring diagram of the switching section of the instrument version 2.0 which differs from the scheme adopted by the Arta application note for the presence of switching relays. The use of relays allows easy modification to control switching to a software-controlled control system. In fact, this change was implemented in the 3.0 software version of the tool, but I thought it was interesting to propose it as an alternative to the one suggested by ARTA.
25894


If you have difficulty or want to give your suggestions, write well.
Thanks
 
Thread Starter
Joined
Feb 8, 2018
Messages
279
Location
Italy
power supply

The power supply system is composed of several voltages, for the power amplifier part a non-stabilized dual voltage of about +/- 24Vdc was chosen which is more than sufficient to supply the LM3886 amplifier which at most delivers 4W at the lowest load impedances . For the Preamplifier section a dual voltage of +/- 12Vdc was chosen and for the Raspberry I used a switching stabilizer of 5Amp LX4005. The switching circuit section uses a separate 12Vdc 1 Amp Max regulator.

Thanks
25895
 
Thread Starter
Joined
Feb 8, 2018
Messages
279
Location
Italy
Microphone preamplifier
The last circuit we need to complete our instrument is the microphone amplifier. This circuit is used to amplify the weak signal generated by the condenser microphone and make it compatible with the sensitivity level of the sound card's Line input. The gain level must also be corrected to use all the dynamics of the measurement microphone, so it depends on the type of microphone used; moreover, since the measurement microphones are powered by a voltage, this changes according to the type of microphone.
In most cases, a voltage called phanom is used, which varies from + 24Vdc to + 48Vdc, but voltages much lower than about +/- 9Vdc are often used.
Our preamplifier uses a negative voltage of about -8Vdc as it is built to work with a modified electret microphone of the Panasonic WM61A modified to improve its dynamic and distortion characteristics.
The cost of this solution is really very low, and the microphone is very powerful, on the net it is possible to find how to modify the original capsule.

Useful links
Change capsule

Applications with original capsule
25915
 
Thread Starter
Joined
Feb 8, 2018
Messages
279
Location
Italy
Microphone preamplifier diagram

This is the last circuit of our instrument, the attached diagram amplifies the output level of the microphone which is around 7/8 mV with a sound pressure level of 94db.
The circuit has two settings, the first and the one of the capsule supply voltage which can be adjusted in the range of about -8 / -9Vdc the second adjusts the preamplifier
output level so as not to saturate the input of the audio card.
As I told you this is the last circuit, I hope not to have bored you and I would like some of you to make this instrument.
Thanks for following me, I remain at your disposal for any kind of clarification.
25919
 
Thread Starter
Joined
Feb 8, 2018
Messages
279
Location
Italy
I want to clarify that the measures I have attached are all related to version 2.0 of the instrument and with Audioinjector Zero sound card.
Clearly who should decide to start building the system must be an electronic expert, I do not recommend to those who have no practice
in the field to start building it, also because it could be dangerous and I do not take any responsibility.
For those who are experts in electronics there are no particular problems of implementation, for example the circuit can be easily built on
a matrix board, or for the more experienced it is possible to design the whole project with Kicad and carry out the circuit unraveling to realize
the circuit final printout.

Let me know if you can make a working tool.
 

Bernard

Member
Joined
May 22, 2017
Messages
120
Let me know if you can make a working tool.
For myself, not at all Antonio. I have two left arms.
Thanks to John's explanations, I have just come to understand how RTA works and still I'm not sure ... So making a Raspberry is beyond my abilities. Now that you have started, you have to go all the way. Even if it's only for your own satisfaction.
I'm sure there are many people who say "Ah, if I could do the same thing."
It takes a lot of curiosity, thinking, time, tools, know-how, and patience.
Ciao !
 
Thread Starter
Joined
Feb 8, 2018
Messages
279
Location
Italy
Thanks Bernard for the encouragement to continue, but perhaps the subject has aroused a lot of curiosity but it does not seem to me that there are many people who consider it a serious or noteworthy project.
I have been trying for many years to build a REW machine that can be built by enthusiasts, and I can assure you that it works very well if you choose the right components. REW run very well on the Raspberry and so I thought I'd make it an integral part of the tool.

Ciao
 
Thread Starter
Joined
Feb 8, 2018
Messages
279
Location
Italy
Version 3.0 of the tool
The 3.0 version was built in 2017 and implements several improvements, this is the first version that includes all the electronics in a single case, is completely managed by software and uses REW analysis software while managing and controlling the instrument a software that I made using the Gambas programming language.
In addition to the Raspberry, the system also includes the arduino micro-controller for software management.
Of this version I don't attach any scheme because it is quite more complex than version 2.0, I limited myself to describe the new features and some measures.
You can preview it in the picture of my profile.
 
Thread Starter
Joined
Feb 8, 2018
Messages
279
Location
Italy
The improvements of version 3.0 are:
High precision electrical resistance measurement from 0 to 20 ohms
High impedance buffer for input signals.
Line out generator signal
External input for frequency response measurements
Control of supply voltages including microphone phantom voltage
Complete control of the instrument functions
LCD display to view the instrument settings
 
Thread Starter
Joined
Feb 8, 2018
Messages
279
Location
Italy
The electrical resistance measurement is based on the amperometric volt system, it uses a 100mA constant current generator and voltage measurement across the resistance through a 15 bit resolution A / D converter. The electrical resistance is given by the voltage divided by the current of the constant generator, in this way the resistance measurement reaches high precision depending on the precision of the constant current generator.
The resistance is displayed on the LCD display and displayed by the application by subtracting the resistance of the connection cable.
 
Thread Starter
Joined
Feb 8, 2018
Messages
279
Location
Italy
This version looks like the attached photo, as you can see it is all enclosed in a single case and requires only a monitor of a keyboard and mouse.
Instead of the monitor you can also use a TV with HDMI input or if you have a VGA monitor you can use an HDMI to VGA converter.
26019

In the first image you see the front side tool with no mechanical command as it is all managed via software.
The microphone connection is the only one available on the front side, the rest of the connections are all on the back side.
On the display you can read that this analyzer has been provisionally called R-Audio as a tribute to Raspberry and to the
REW software both begin with R, while version 1.0 refers to the instrument management software and not to the hardware
version which as I said is the 3.0.
Thanks for your attention
 
Thread Starter
Joined
Feb 8, 2018
Messages
279
Location
Italy
The microphone used was built by an Italian company and uses a Panasonic condenser capsule powered at -9Vdc. The microphone is supplied with a calibration file so as to have a frequency response of 10: 20Khz +/- 0.5db max 134db SPL. The design of this microphone has already been previously and it is also possible to self-build it with the only limitation of not being able to generate the calibration file. The calibration file can be created only if we have a reference sample microphone, in which case the calibration file can be created for the difference in response between the two.
 
Thread Starter
Joined
Feb 8, 2018
Messages
279
Location
Italy
Current The microphone is sold together with its preamplifier but R-Audio does not need it because it is already integrated.
26021

Soon I will show you the complete system and some measures with the stable version 5.19 of REW.
 
Thread Starter
Joined
Feb 8, 2018
Messages
279
Location
Italy
Here is the test set I normally use. As you can see I use the Panasonic capsule microphone, a keyboard and mouse monitor and of course my audio analyzer in version 3.0. This tool is built with Raspberry version Pi3 and operating system Xubuntu version 16.04 and works very well.
 

Attachments

  • IMG_20191022_195356.jpg
    IMG_20191022_195356.jpg
    232 KB · Views: 59
  • IMG_20191022_195909.jpg
    IMG_20191022_195909.jpg
    172.9 KB · Views: 58
Thread Starter
Joined
Feb 8, 2018
Messages
279
Location
Italy
Here's how the screen image looks like once the R-audio application has started.
26195


On the right we can see REW in version 5.19, on the left the R-Audio application shows four buttons at the top that allow you to select instrument settings for measuring electrical resistance, SPL response impedance and response from the input of line.
The voltage values of the analogue section +/- 12Vdc of the Microphone -8.20Vdc of the switching section voltage +12 Vdc and of the CPU voltage 5.0Vdc are displayed below.
There is also a green square that indicates that all the instrument's power supplies are within tolerances, just if a value is out of specification that the indication turns red and the wrong value turns red.
 
Thread Starter
Joined
Feb 8, 2018
Messages
279
Location
Italy
Resistance and impedance measurements.
The instrument measures resistances from 0 to 20 ohms with good precision, this is the measure of a resistance of 10ohm 0.5%
26201

Inserisco anche le misure di impedenza della stessa resistenza da 10 ohm 0,5% e delle resistenze 111,070ohm 0,05% 150ohm 0,05% e 300 ohm 0,05%.
Soon the SPL response and response from line in input measures will be included.

Grazie !!!
 

Attachments

  • Resistenza_10ohm.mdat
    1.4 MB · Views: 11
  • Resistenza_111ohm.mdat
    1.4 MB · Views: 10
  • Resistenza_150ohm.mdat
    1.4 MB · Views: 10
  • Resistenza_300ohm.mdat
    1.4 MB · Views: 10
Thread Starter
Joined
Feb 8, 2018
Messages
279
Location
Italy
Before the answers I wanted to make capacity and inductance measurements through impedance measurement.

Capacity
Not having precision values, I measured two capacities with a LCR Tester BM4070 instrument, the values found on the BM4070 are 10.36uF and 2.37uF while the values measured by R-Audio are 10.2uF and 2.34uF respectively, it is also measured also the series resistance of 13,7mohm and 558mohm.
 

Attachments

  • Condensatore_10.36uF.png
    Condensatore_10.36uF.png
    80.4 KB · Views: 19
  • Condensatore_10.36uF.mdat
    944.9 KB · Views: 10
  • Condensatore_2.37uF.png
    Condensatore_2.37uF.png
    85.8 KB · Views: 15
  • Condensatore_2.37uF.mdat
    944.9 KB · Views: 10
Thread Starter
Joined
Feb 8, 2018
Messages
279
Location
Italy
Inductance

Measure two inductances with LCR BM40 of 0.253mH and
0.971mH, measurement taken by R-Audio 0.257mH with series resistance of 549mohm and 0.978mH and resistance 600mohm.
 

Attachments

  • Induttanza_0.253mH.png
    Induttanza_0.253mH.png
    94.6 KB · Views: 20
  • Induttanza_0.253mH.mdat
    944.9 KB · Views: 10
  • Induttanza_0.971mH.png
    Induttanza_0.971mH.png
    104.6 KB · Views: 16
  • Induttanza_0.971mH.mdat
    944.9 KB · Views: 11
Thread Starter
Joined
Feb 8, 2018
Messages
279
Location
Italy
SPL response

Effect of the frequency response measurement of the Sipe AB130 / 45 pp8 loudspeaker with a low pass LC filter cell consisting of a 0.971mH inductance and a 10.2uF capacitor. From the curve we can see a pronounced peak at around 1,1Khz dependent depending on the lack of a flat mounting surface of the speaker, but it is also possible that the filtering cell has a factor of merit that is too high and needs to be decreased.
To check this, the only way is to trace the response curve at the ends of the loudspeaker after the filter cell.
R-Audio allows to measure the response from the line input simply by selecting the Risposta button, in this way by performing the SPL measurement from REW, instead of sampling the signal from the microphone, the line-in signal is sampled directly.
 

Attachments

  • Risposta_Sipe_con_cella.jpg
    Risposta_Sipe_con_cella.jpg
    46.7 KB · Views: 19
  • Impedenza_Sipe_con_cella.jpg
    Impedenza_Sipe_con_cella.jpg
    46.9 KB · Views: 21
Thread Starter
Joined
Feb 8, 2018
Messages
279
Location
Italy
Frequency response

I plotted the response measure before the red curve filter and after the green curve filter. The red curve demonstrates the linearity of the response of the system, while the green curve highlights the response of the filter and in particular we can see that at 1.4Khz there is a very slight exaltation of the response but nothing comparable to the exaltation of the response of the speaker that presents this exaltation mainly due to the lack of the normalized acoustic panel. The cut-off frequency is around 2.4Khz, the level decreases up to the 9Khz frequency then it tends to rise probably due to the increase of the loudspeaker impedance due to the inductance of the moving coil.
To correctly display the frequency response from the line-in input I had to turn off the microphone calibration, which is why I asked John to add the Response measure in addition to SPL and Impedance.

With this post I finished the presentation of the R-Audio 3.0 measuring instrument, I hope I haven't bored you, even though my hope was to compare myself with someone of you on a similar project. I am available to those who would like to ask for some clarification. We look forward to the presentation of version 4.0 which has been in an advanced stage of design for more than a year.
Thanks for your attention ....

Un saluto a tutti voi
Antonio Giovanni Di Motta da Roma
 

Attachments

  • Risposta_Sipe_Filtro.jpg
    Risposta_Sipe_Filtro.jpg
    87.3 KB · Views: 29
Top Bottom