chrapladm
Moderator
Thread Starter
- Joined
- Apr 14, 2017
- Posts
- 376
Heavy on the pictures.....warning.
So it finally begins. I have so many builds that I have talked about over the years and have most the parts for but not quite enough money to finish. Sadly this has been ongoing for the most part of seven years. So after getting a new job I am finally able to start some of my long awaited projects. I have been rocking my straight line arrays for about 9 years. Definitely lacking in a lot of areas but have been good for a while. But time to upgrade.
I have always loved horn loaded mids and have always been a big fan of JBL's. I was looking at building a 4722 but space became an issue. I thought about maybe doing a single 15 and then using the bottom 15/18 as a sub. BUT that never quite worked.

So I looked at a few other options. Smaller 2/3 way setups and a few other options. And since I have a small collection of parts sitting on a shelf I decided to build something using some of those parts. So with that being said I decided to go with the JBL AM7315.
Now mine wont be as pretty but I will do what I can to have a nice looking setup. I will be using a different 15 because I had those already. I am also using the JBL 2453H-SL for the CD. I built the factory high and mid passive XO and added a simple section for the bass. The factory setup was meant to have an active 2 way setup. I just made it a single channel passive setup to use with my AVR.
I also did not build the same port configuration as in the picture. I made the setup have enough port area to utilise a higher excursion 15 if I upgrade in the future and thats about it. I had a friend I meant online on the Australia HT forum CNC the build for me. I seem to be gone a LOT so I figured I would let someone else do the cutting for me. Not usually my thing but I just dont have the time. Big huge thanks to him for that. He spent a lot of time working this into CAD and getting everything looking right and working.(Thanks Darren!!) I also was getting ready to build the XO but found out I could just have someone else build them for me for not much more money. So I went ahead with that plan also.
There were a LOT of parts I did have to glue and wait and then glue and wait. The ports were multi-layered so I learned how to build those the most efficient way after completing one.


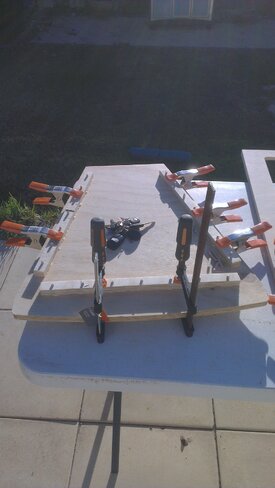
So these guys became my best friend. I think I used about 150 or so of them.
Here is the top/bottom being pegged with the guide stops for the front and sides.
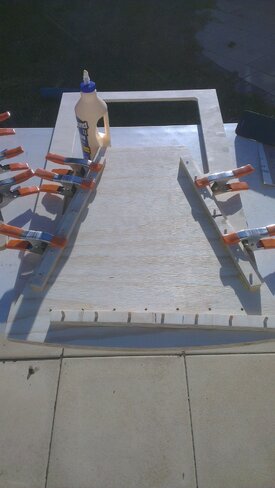
I then realised I was going to need more little clamps. So I went and got some 2" clamps and then got back to building the ports. There were four ports on each baffle. Each had nine layers of ply.")
Then I added the trim ring. The woofer was recessed into the 17mm plywood so a ring was added.
Then when some ports were done I glued them to the baffle. And continued on building ports.
Here I am gluing in 2 filler pieces for the bottom
Here is a finished baffle with ports. And a picture of the baffle from behind.
Then after gluing the baffle on to the bottom piece and having the PL adhesive ready to go I decided to quickly put the sides on. So in the picture you can see the sides are on and the back piece is not on yet.
Then I quickly predrilled the back and PL'd it on with screws. Right before I glued the back section on I glued the large brace in the middle. That brace sits on the top port shelf and connects the sides and back. And here you can see one completed exterior cabinet. Still have to add some more bracing inside.
So it finally begins. I have so many builds that I have talked about over the years and have most the parts for but not quite enough money to finish. Sadly this has been ongoing for the most part of seven years. So after getting a new job I am finally able to start some of my long awaited projects. I have been rocking my straight line arrays for about 9 years. Definitely lacking in a lot of areas but have been good for a while. But time to upgrade.
I have always loved horn loaded mids and have always been a big fan of JBL's. I was looking at building a 4722 but space became an issue. I thought about maybe doing a single 15 and then using the bottom 15/18 as a sub. BUT that never quite worked.
So I looked at a few other options. Smaller 2/3 way setups and a few other options. And since I have a small collection of parts sitting on a shelf I decided to build something using some of those parts. So with that being said I decided to go with the JBL AM7315.
Now mine wont be as pretty but I will do what I can to have a nice looking setup. I will be using a different 15 because I had those already. I am also using the JBL 2453H-SL for the CD. I built the factory high and mid passive XO and added a simple section for the bass. The factory setup was meant to have an active 2 way setup. I just made it a single channel passive setup to use with my AVR.
I also did not build the same port configuration as in the picture. I made the setup have enough port area to utilise a higher excursion 15 if I upgrade in the future and thats about it. I had a friend I meant online on the Australia HT forum CNC the build for me. I seem to be gone a LOT so I figured I would let someone else do the cutting for me. Not usually my thing but I just dont have the time. Big huge thanks to him for that. He spent a lot of time working this into CAD and getting everything looking right and working.(Thanks Darren!!) I also was getting ready to build the XO but found out I could just have someone else build them for me for not much more money. So I went ahead with that plan also.
There were a LOT of parts I did have to glue and wait and then glue and wait. The ports were multi-layered so I learned how to build those the most efficient way after completing one.


So these guys became my best friend. I think I used about 150 or so of them.
Here is the top/bottom being pegged with the guide stops for the front and sides.


I then realised I was going to need more little clamps. So I went and got some 2" clamps and then got back to building the ports. There were four ports on each baffle. Each had nine layers of ply.


Then I added the trim ring. The woofer was recessed into the 17mm plywood so a ring was added.

Then when some ports were done I glued them to the baffle. And continued on building ports.


Here I am gluing in 2 filler pieces for the bottom

Here is a finished baffle with ports. And a picture of the baffle from behind.


Then after gluing the baffle on to the bottom piece and having the PL adhesive ready to go I decided to quickly put the sides on. So in the picture you can see the sides are on and the back piece is not on yet.


Then I quickly predrilled the back and PL'd it on with screws. Right before I glued the back section on I glued the large brace in the middle. That brace sits on the top port shelf and connects the sides and back. And here you can see one completed exterior cabinet. Still have to add some more bracing inside.


Attachments
Last edited: