


mechman
AV Addict
More
- Preamp, Processor or Receiver
- Pioneer VSX-832
- Streaming Subscriptions
- HBO Max, YouTubeTV, Hulu, Netflix, Disney+
- Front Speakers
- Definitive Technology Studio Monitor 55s
- Center Channel Speaker
- Definitive Technology CS8040
- Surround Back Speakers
- Definitive Technology DI6.5R
- Other Speakers
- Apple TV 4K
- Video Display Device
- LG OLED65C7P
- Remote Control
- Logitech Harmony 650
DIY Video Calibration How-To using CalMAN
This thread will be a DIY display calibrations walk through/how-to using SpectraCal's CalMAN calibration software. Before we get started I think it's best if we discuss/describe/define our goal or at least what should be our goal in calibrating our display. Rather than put my own words and keyboard to work on this I'm just going to quote the folks at CinemaQuest which is located here. I really don't think that anyone states it better than Alan Brown does and I would be doing him a disservice by attempting to do so without acknowledging his article, so here it is:
What is Video Display Calibration?
The foundational and primary goal of display calibration is image fidelity (faithfulness to the original program). Video is a mass communication medium. The objective of any communication medium is to convey an original message as accurately and completely as possible. Any alteration of the message becomes a distortion of the original intent. Example: the parlor game where a circle of people pass a whispered message, delivered to the first person in the circle, then whispered to the next, on around the circle, and finally the last person announces what he thinks the message was. Invariably, each person alters the message slightly until the final recipient announces a garbled version that typically bears little resemblance to the original.
The video industry is governed and guided by standards, engineering guidelines, and recommended practices, defined by organizations such as: the Society of Motion Picture and Television Engineers (SMPTE), the International Organization for Standardization (ISO), the International Telecommunications Union (ITU), the Advanced Television Systems Committee (ATSC), etc. These standards and practices are intended to encourage and preserve: signal, equipment, and program accuracy, integrity, unity, consistency, and repeatability, all along the chain from program production, through post-production, to exhibition/broadcast/tape/DVD/etc., and finally to the audience (consumer). If at any step along this path, industry standards are deviated from, the program can become distorted.
Video displays used by program professionals are designed, manufactured and calibrated to tightly adhere to industry standards. They include in their design certain features that allow technicians to adjust them periodically (sometimes each day), using reference test signals, to insure picture accuracy. Such professional video monitors cost up to tens of thousands of dollars for relatively small sized screens. They must perform reliably for years, sometimes operating around the clock.
Consumer displays typically are designed, manufactured and adjusted at the factory to appeal to focus groups and the uninformed masses. Few consumers have ever seen a reference picture displayed on a calibrated broadcast or post-production monitor. Therefore, consumers are left to guess what their TV picture is supposed to look like.
Consumer TVs and projectors cost far less than professional displays. Manufacturers often cut corners to reduce costs in order to compete with one another in the marketplace. They also adjust their products at the factory to attract attention to their TVs on a show floor alongside samples of their competitors' wares. This could be compared to straining one's voice in a shouting match. Such over-accentuated pictures may dazzle the casual shopper but are not representative of correct pictures for regular viewing in the home. Video industry standards and practices are regularly deviated from and ignored by manufacturers. Fortunately, most consumer displays include adjustment features that allow someone who knows what they're doing to make the picture behave closer to proper standards.
Display calibration is simply making adjustments to the video device in order to achieve a more accurate picture. The artists who produce video programs want their intended audience to see what they saw on their calibrated professional monitors. Uncalibrated consumer displays cannot convey faithfully what the program originator intended. A distorted picture is the result. Artistic integrity is lost. Distortion reduces the value of any program and prevents the owner of the equipment from fully enjoying the capabilities of the display device they have purchased. The picture may be "watchable" and even enjoyable to an individual viewer- up to a point. Most consumers are never aware just how much better their programs can look if they were able to experience the picture the originator of the program envisioned.
Some consumers may actually prefer a distorted picture. For more discriminating viewers, there are resources available that help bring correct imaging into their home. Professional results can be obtained from consumer display devices with the right understanding, skills and tools. Reference test signals and simple tutorial programs have become available on DVD for many years to help the consumer make some picture adjustments. These programs are limited, however. The most complete resource for optimizing consumer displays is available in the form of professional calibration services. Such services can be performed by consumers, but only after much study, investment in technical instruments, suitable aptitude, and perseverance. Hiring a trained professional is much less daunting to the average display owner.
In any case, the display owner must keep in mind that the goal of calibration is not to achieve any individual's preconceived notion of what a "good" image should look like. The originator of a given video program is the one responsible for determining how the image is supposed to appear. The goal of calibration is to make the display behave as much like a professional monitor as possible. Ideally, the display should serve as a neutral and accurate communicator of the video signals delivered for the viewer. Only then can artistic integrity, display accuracy, and image fidelity be completely enjoyed. In the end, it's really all about correctly communicating the art.
Items NeededThe foundational and primary goal of display calibration is image fidelity (faithfulness to the original program). Video is a mass communication medium. The objective of any communication medium is to convey an original message as accurately and completely as possible. Any alteration of the message becomes a distortion of the original intent. Example: the parlor game where a circle of people pass a whispered message, delivered to the first person in the circle, then whispered to the next, on around the circle, and finally the last person announces what he thinks the message was. Invariably, each person alters the message slightly until the final recipient announces a garbled version that typically bears little resemblance to the original.
The video industry is governed and guided by standards, engineering guidelines, and recommended practices, defined by organizations such as: the Society of Motion Picture and Television Engineers (SMPTE), the International Organization for Standardization (ISO), the International Telecommunications Union (ITU), the Advanced Television Systems Committee (ATSC), etc. These standards and practices are intended to encourage and preserve: signal, equipment, and program accuracy, integrity, unity, consistency, and repeatability, all along the chain from program production, through post-production, to exhibition/broadcast/tape/DVD/etc., and finally to the audience (consumer). If at any step along this path, industry standards are deviated from, the program can become distorted.
Video displays used by program professionals are designed, manufactured and calibrated to tightly adhere to industry standards. They include in their design certain features that allow technicians to adjust them periodically (sometimes each day), using reference test signals, to insure picture accuracy. Such professional video monitors cost up to tens of thousands of dollars for relatively small sized screens. They must perform reliably for years, sometimes operating around the clock.
Consumer displays typically are designed, manufactured and adjusted at the factory to appeal to focus groups and the uninformed masses. Few consumers have ever seen a reference picture displayed on a calibrated broadcast or post-production monitor. Therefore, consumers are left to guess what their TV picture is supposed to look like.
Consumer TVs and projectors cost far less than professional displays. Manufacturers often cut corners to reduce costs in order to compete with one another in the marketplace. They also adjust their products at the factory to attract attention to their TVs on a show floor alongside samples of their competitors' wares. This could be compared to straining one's voice in a shouting match. Such over-accentuated pictures may dazzle the casual shopper but are not representative of correct pictures for regular viewing in the home. Video industry standards and practices are regularly deviated from and ignored by manufacturers. Fortunately, most consumer displays include adjustment features that allow someone who knows what they're doing to make the picture behave closer to proper standards.
Display calibration is simply making adjustments to the video device in order to achieve a more accurate picture. The artists who produce video programs want their intended audience to see what they saw on their calibrated professional monitors. Uncalibrated consumer displays cannot convey faithfully what the program originator intended. A distorted picture is the result. Artistic integrity is lost. Distortion reduces the value of any program and prevents the owner of the equipment from fully enjoying the capabilities of the display device they have purchased. The picture may be "watchable" and even enjoyable to an individual viewer- up to a point. Most consumers are never aware just how much better their programs can look if they were able to experience the picture the originator of the program envisioned.
Some consumers may actually prefer a distorted picture. For more discriminating viewers, there are resources available that help bring correct imaging into their home. Professional results can be obtained from consumer display devices with the right understanding, skills and tools. Reference test signals and simple tutorial programs have become available on DVD for many years to help the consumer make some picture adjustments. These programs are limited, however. The most complete resource for optimizing consumer displays is available in the form of professional calibration services. Such services can be performed by consumers, but only after much study, investment in technical instruments, suitable aptitude, and perseverance. Hiring a trained professional is much less daunting to the average display owner.
In any case, the display owner must keep in mind that the goal of calibration is not to achieve any individual's preconceived notion of what a "good" image should look like. The originator of a given video program is the one responsible for determining how the image is supposed to appear. The goal of calibration is to make the display behave as much like a professional monitor as possible. Ideally, the display should serve as a neutral and accurate communicator of the video signals delivered for the viewer. Only then can artistic integrity, display accuracy, and image fidelity be completely enjoyed. In the end, it's really all about correctly communicating the art.
To start with, what you will need in order to get started will be a meter (either a colorimeter or a spectroradiometer/spectrophotometer), a computer (preferably a laptop for its portability), a disc with the calibration patterns and the CalMAN software package from SpectraCal.
Meters range anywhere from a couple hundred dollars to well over $20,000. For our purposes, we'll stick to the cheaper tristimulus colorimeters. They are called tristimulus because they have three filters (red, green, and blue) that they use in order to measure the light hitting them. In the past, these filters were not very durable and subject to early breakdown when exposed to high humidity, sunlight, high temperatures, and or a combination of any or all of these. Some of these meters were early Spyder and i1Display 2 meters. This is the reason why we recommend storing your meter in a cool, dry place out of direct sunlight. It's also helpful to keep it in an airtight case or even a Ziploc bag with a desiccant pack. If you are buying a meter for the first time and you want to get a colorimeter, we highly recommend getting a new one. You never know how old a used meter is or whether it has drifted out of calibration over that time. SpectraCal sells the an i1Display for $249. They also sell the C6, which is a i1Display that is NIST certified and comes with pre-loaded display offsets for $795. If you want the more accurate spectroradiometer, your options are an i1Pro2 for $995 or much more expensive options. There are bundles that include the CalMAN software available at a discounted price.
You will need a computer, preferably a laptop for its portability and it will have to have Microsoft Windows installed on it.
You'll also need a disc with the patterns needed for your player. These are available via the internet and can be readily found. The DVE calibration disc also contains most of the patterns needed too. Spectracal has the AVS HD709 images available for download here.
CalMAN is available from SpectraCal. Cost will vary depending upon if you’re buying the software alone or if you're buying one of the packages - meter + software. When you get to the SpectraCal page be advised that you have to enter an email address. And you usually get an email from SpectraCal within a few minutes of submitting the form.
Now that you have everything you need, let's get everything set up!
Equipment Setup
The first thing you should do is to turn your display on. I've never seen a hard fast rule for this but I always like to let my displays warm up for an hour or so. We’d recommend at warming it up for something like 30-60 minutes. It would also be a good idea to set up your meter at this time as well if you are using it on anything but front projection. A lot of colorimeters are temperature sensitive - meaning that there readings will fluctuate as they warm up. Once they are at a stable temp they tend to give stable readings. Regarding the C6/i1Display Pro, they are not temperature sensitive and do not need to be warmed up with the display. But I would do it as a precaution anyways.
This will be the first screen you should see after firing up CalMAN:
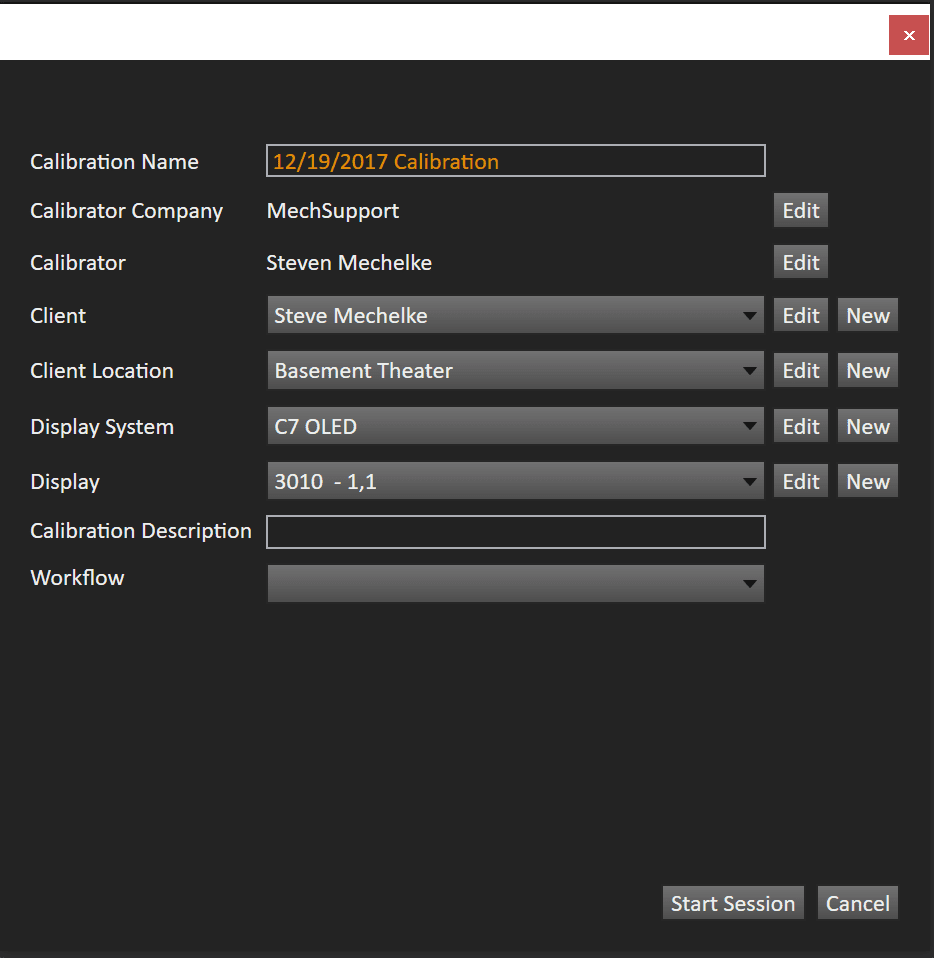
You can enter any useful information here that will help you recall your calibration in the future. Under Workflow, select Home Enthusiast and you will then be taken to the next screen shot several paragraphs down.
Setup for Flat Panels
If you’re placing your meter on your display and it doesn't sit flush, you can use the blue painter's tape to help hold it in place. Just be sure to only adhere the tape to the bezel of your display. The C6 and the OEM/retail i1Display Pro can be used with a tripod mount to get close to the display. I've heard that they don't actually have to be touching the display. But it's always been my thought that if you're going to be within a couple of inches of the display, you might as well put it flush. You'll also want there to be as little ambient light as possible. I use a 6 foot square of black velvet. I drape it over the top back side and over the front leaving enough room to read the displays menu system. Most, if not all, colorimeters have a felt type of padding on them so that they won't harm the display.
Setup for Front Projection
You will need a tripod for this and some sort of holder for your meter. Some meters have this included with them, some don't. For those that don't, I've used something like this device with an i1Display2 in the past and it worked well.
Direct from Projector
As far as setting up the meter for optimal readings, I used to prefer to use a diffusor to get the readings directly from the projector itself. This is ideal if you are certain that your screen is a neutral material and illuminance readings don't matter. Color neutrality means that all colors are reflected back the same as they come from the projector. If you're not sure, ask. I've tested a lot of screen materials over the last several years and chances are I will know if it's close to neutral or not. Make sure you use a diffusor that comes with your meter and never point the meter directly at the projector without it in place! You can ruin your sensor this way! Set the meter up on a tripod facing the projector right in front of the lens.
Direct from Screen
This is the preferred method for calibrating a projector. Again, setup the meter using a tripod. There is no need for a diffusor when getting readings this way so make sure that you have removed it. Setup the meter/tripod as close as you can get to the screen and adjust it so that the meter is at an angle facing upwards. This will keep the meter's shadow that it casts out of its optics. Bring up the luminance screen in CalMAN (bottom of post #2 below) and adjust the meter until the luminance is reading the highest point. Most meters have a specific field of view and CalMAN will use this data to tell you on the "Position Meter" page what the optimal location is for your meter. Draw an imaginary line in the air from the main viewing position to the center of the screen and set the meter up on that line using the distance CalMAN gave you.
Setting up CalMAN
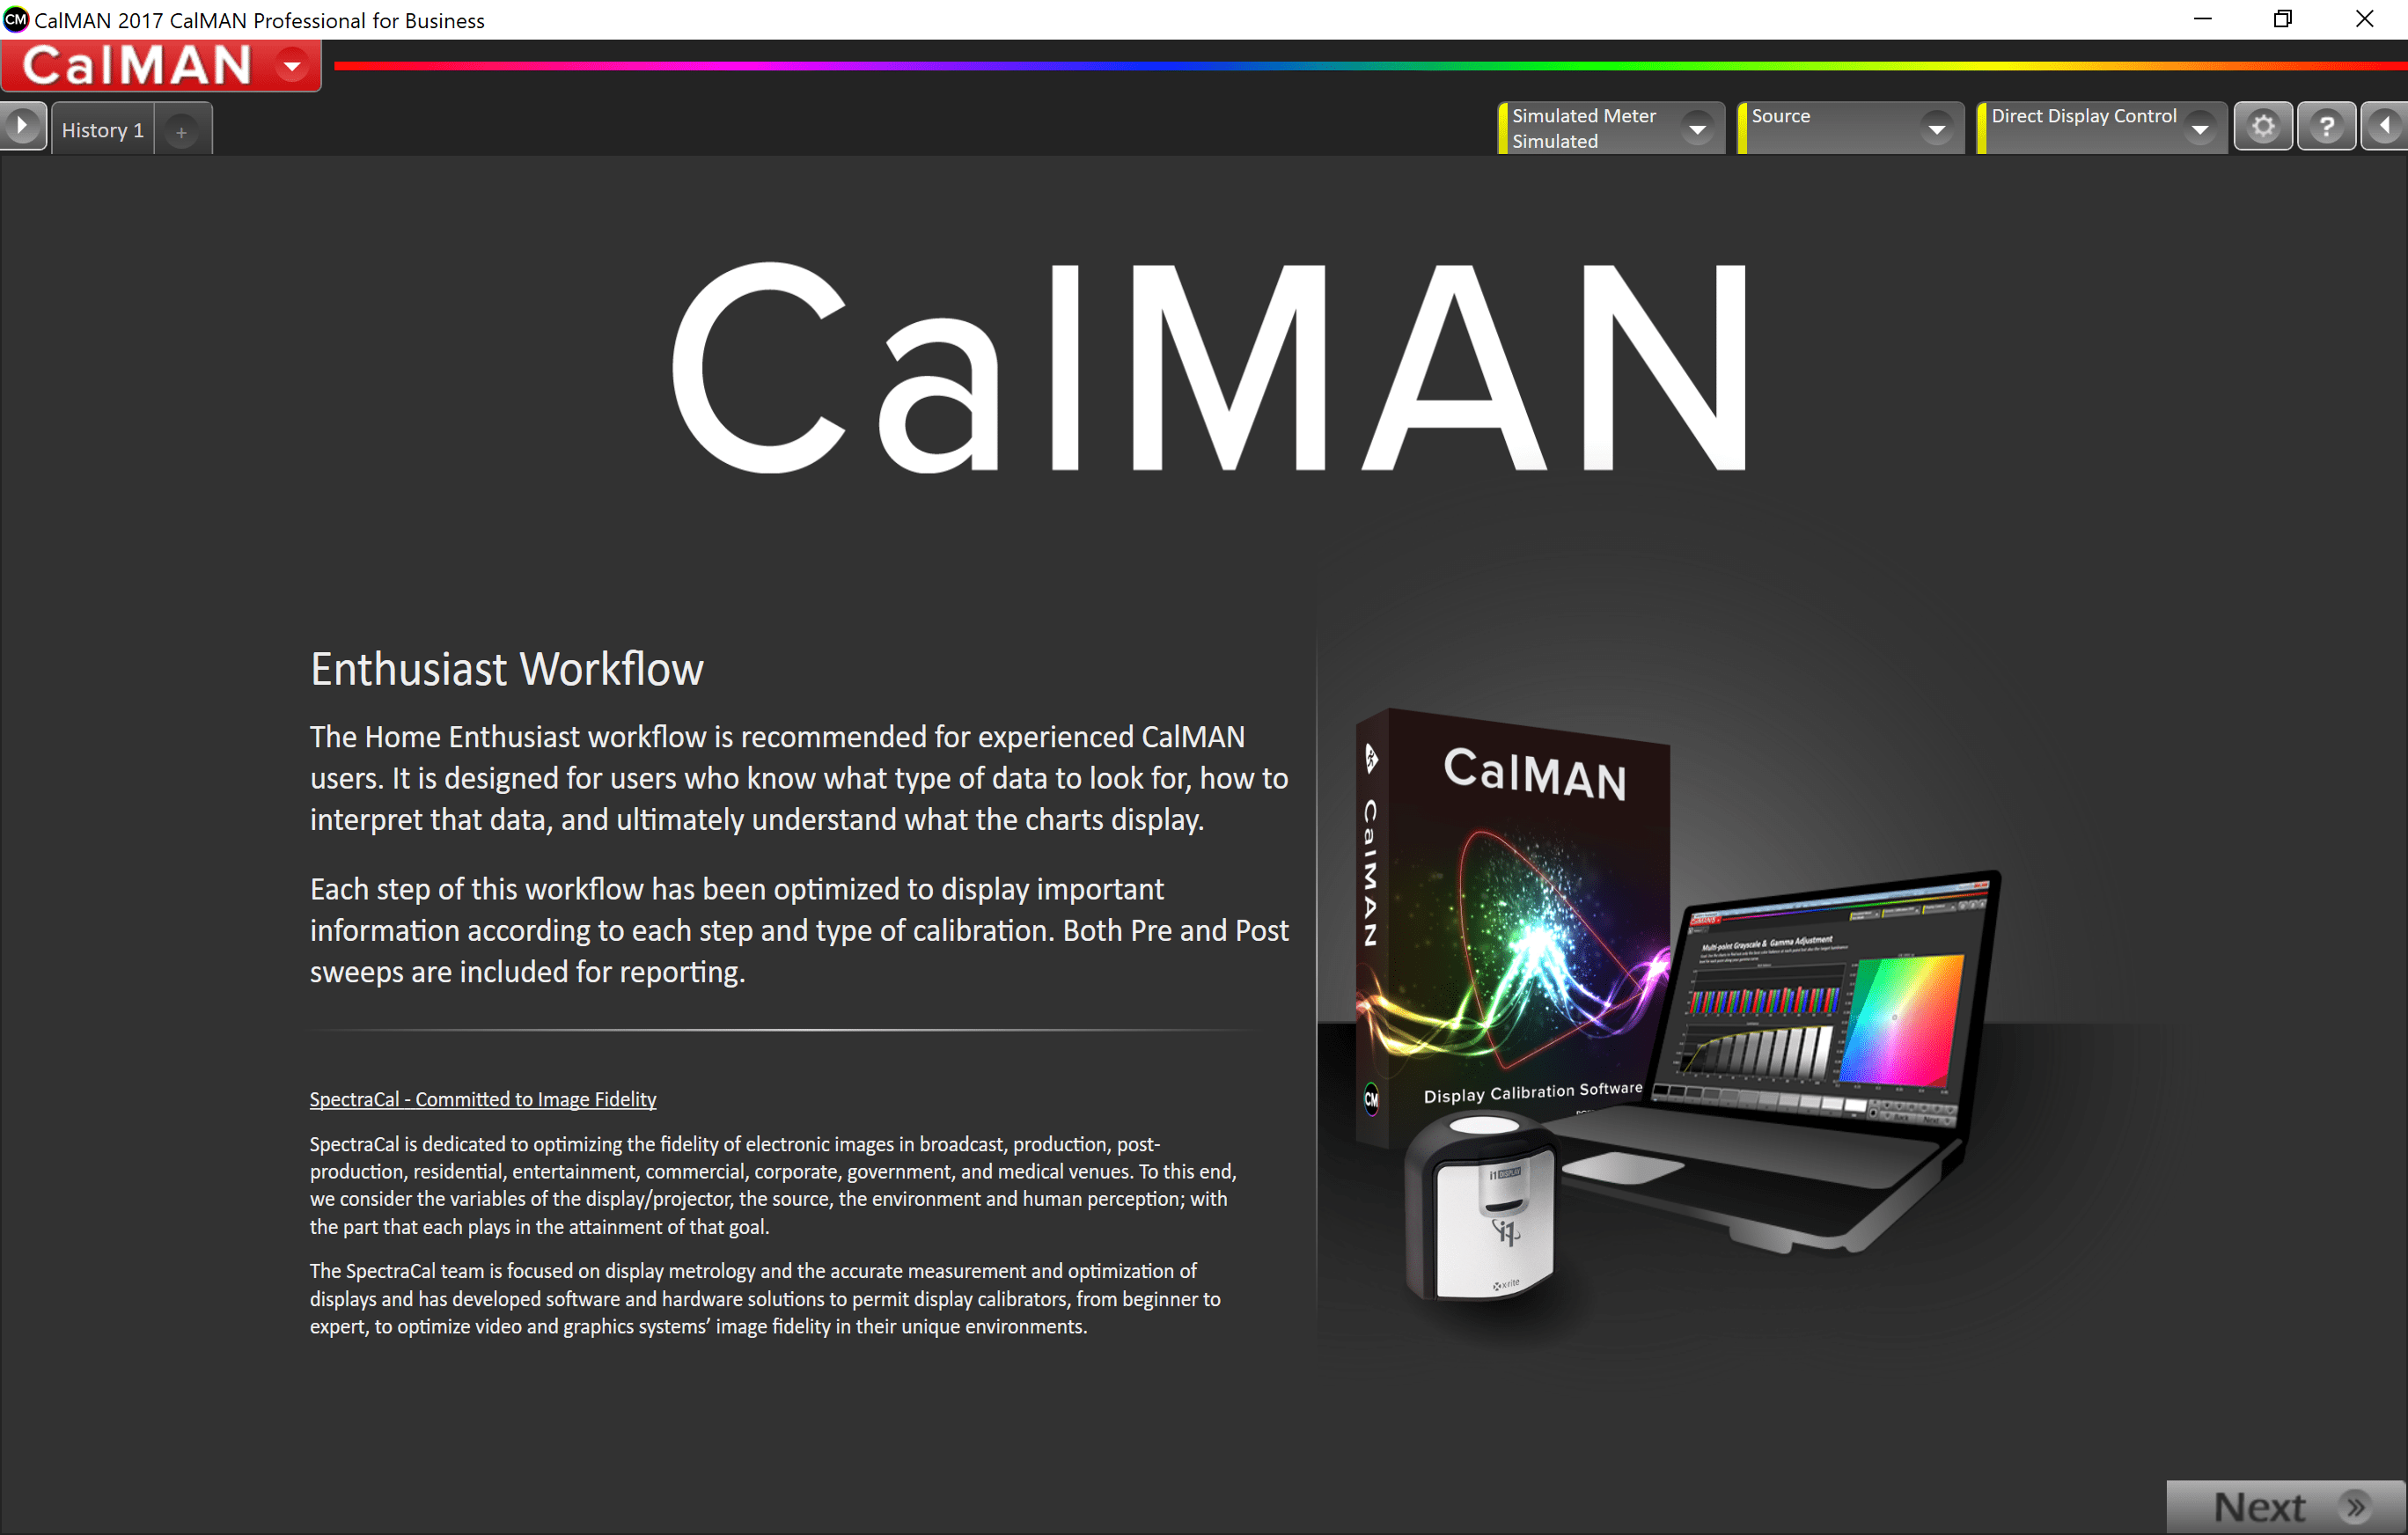
The Home Enthusiast version of CalMAN includes several workflows. A workflow is kind of like a template. You load the workflow for what best suits you and your display. Before going any further, it's probably best if you load up and go through the Home Introduction workflow. It will go over a lot of what I'm going to cover here - the user interface, tabs, workflows, creating workflows, etc.
Now that you have finished the Introduction workflow, it's time to get started. Open the left side tab labeled Workflow. With that open, click on the blue folder. A dialog box will pop up and list a bunch of workflows. Scroll down and open the workflow labeled "Home Enthusiast". They are listed alphabetically.
With the Home Enthusiast workflow open there is a little bit of housekeeping to do before we are ready to calibrate. Hopefully your meter is already plugged in and your version of Windows has loaded the appropriate driver for it. If for some reason it hasn't and you cannot find a driver on your hard drive for your meter, you can download the drivers from SpectraCal at the 'Drivers and Resources' download page located here.
You should now be greeted with the home or welcome screen - first thumbnail on the left. On the right hand tabs click on the settings tab. This should open up the right hand tabs and there should be a list of items - Meter Settings, Meter Initialization, Source Settings, Display Control, Options, Miscellaneous, License, and Logging. Let's go over each of these so that you have a better understanding of what they are.
Meter Settings: This is where you will select your meter and the mode that you will be using it. Hopefully your meter is already listed. If not, you'll want to click on the search button. A box will then open and list a bunch of different advanced meter. Just ignore all the meters it has listed, verify that the 'Com Port' is set to auto and click on the search button again. CalMAN should then find your meter and have it listed under 'Meter'. If it failed to find it again there are a couple of things that could be wrong. I've found that sometimes, especially when changing meters while CalMAN is open, that CalMAN won't always see the new meter. This doesn't happen that often and should never happen to you, but it's usually fixed by closing and re-opening CalMAN. The other thing that could be wrong is that the driver for your meter did not load or isn't installed. See the link two paragraphs above for a download location for drivers.
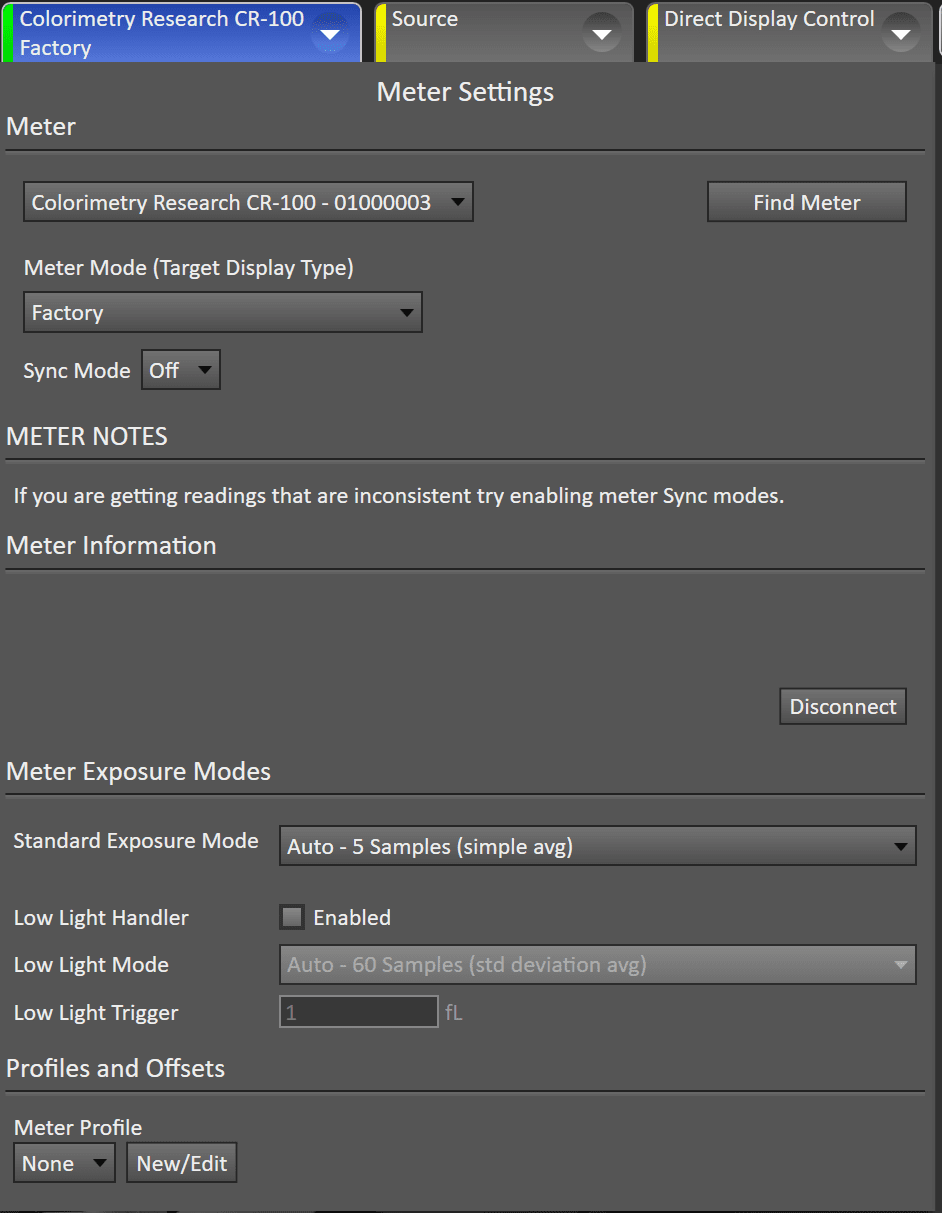
Once your meter is selected you want to select the mode that is applicable to your display - LCD Direct for LCDs, Plasma for plasmas and so on. If you don't know which mode to select post your question here and someone will help you out.
At the bottom there is an Advanced check box. It is unchecked and for our purposes you can leave it unchecked. It contains the low light handler - which is used along with meters that don't handle the lower gray scale well - and meter profiling, which isn't considered DIY video calibration by us, and the hot key dialog. None of those are necessary for our purposes at this point. Depending upon your meter the Low Light Handler may be something that you will need to use in the future. But for now just leave the box unchecked.
Meter Initialization
Some meters require a dark reading to initialize themselves every 15 minutes or so - i1Display 2, i1Pro, Hubble/OTC-1000, etc. If your meter requires initialization, this dialog box will be active and you would click the initialize button on the bottom to accomplish this task. There is another way to do this though and it's a bit quicker in my view. In the upper left of the program you will see your meter listed with a round circle next to it. If you just initialized your meter, this circle will be green with a number in it. The number is the amount of time, in minutes, you have left until you have to reinitialize your meter. If you didn't initialize your meter yet, it will be red. It will turn red when it’s time to re-initialize as well. To initialize your meter, all you have to do is click on that circle at any time and it will open up the Meter Initialization tab. If your meter doesn't require initialization, it will say so here as it does in the thumbnail to the right.
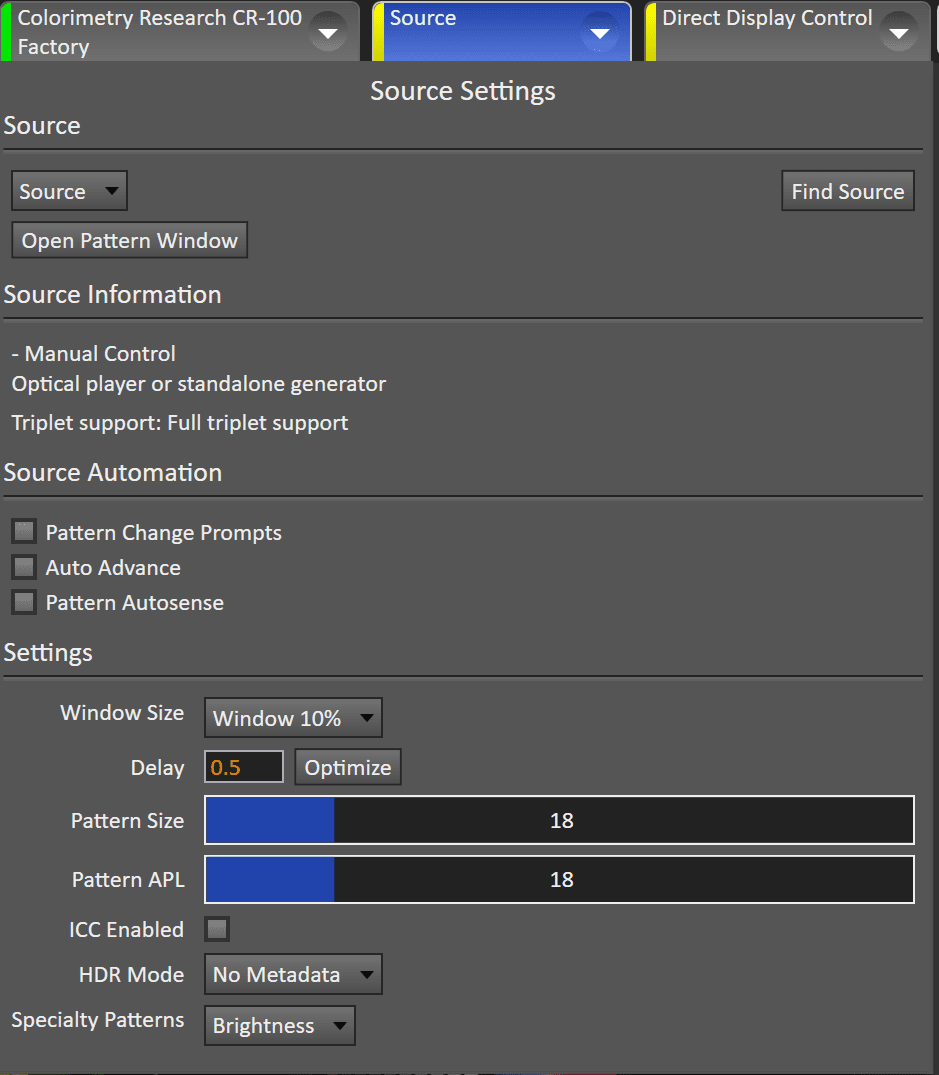
Source Settings
Source Settings refer to where you are getting your pattern images from to calibrate your display. For the DIY'er this should be set to 'Optical player or video generator (manual control)'. The advanced options box should be unchecked. Those options deal with pattern generators and should be left alone.
Display Control
Unless you own a Duo, Radiance, eeColor or one of the various displays that have direct control, this option should be left alone as well. It's probably important to note that careful consideration should be given to go over the options listed for the CalMAN license you are purchasing and making sure that what you want it to do will be covered by your license. Some options are not available under each particular license options. When in doubt, call or email Spectracal and talk to them about it.
Options
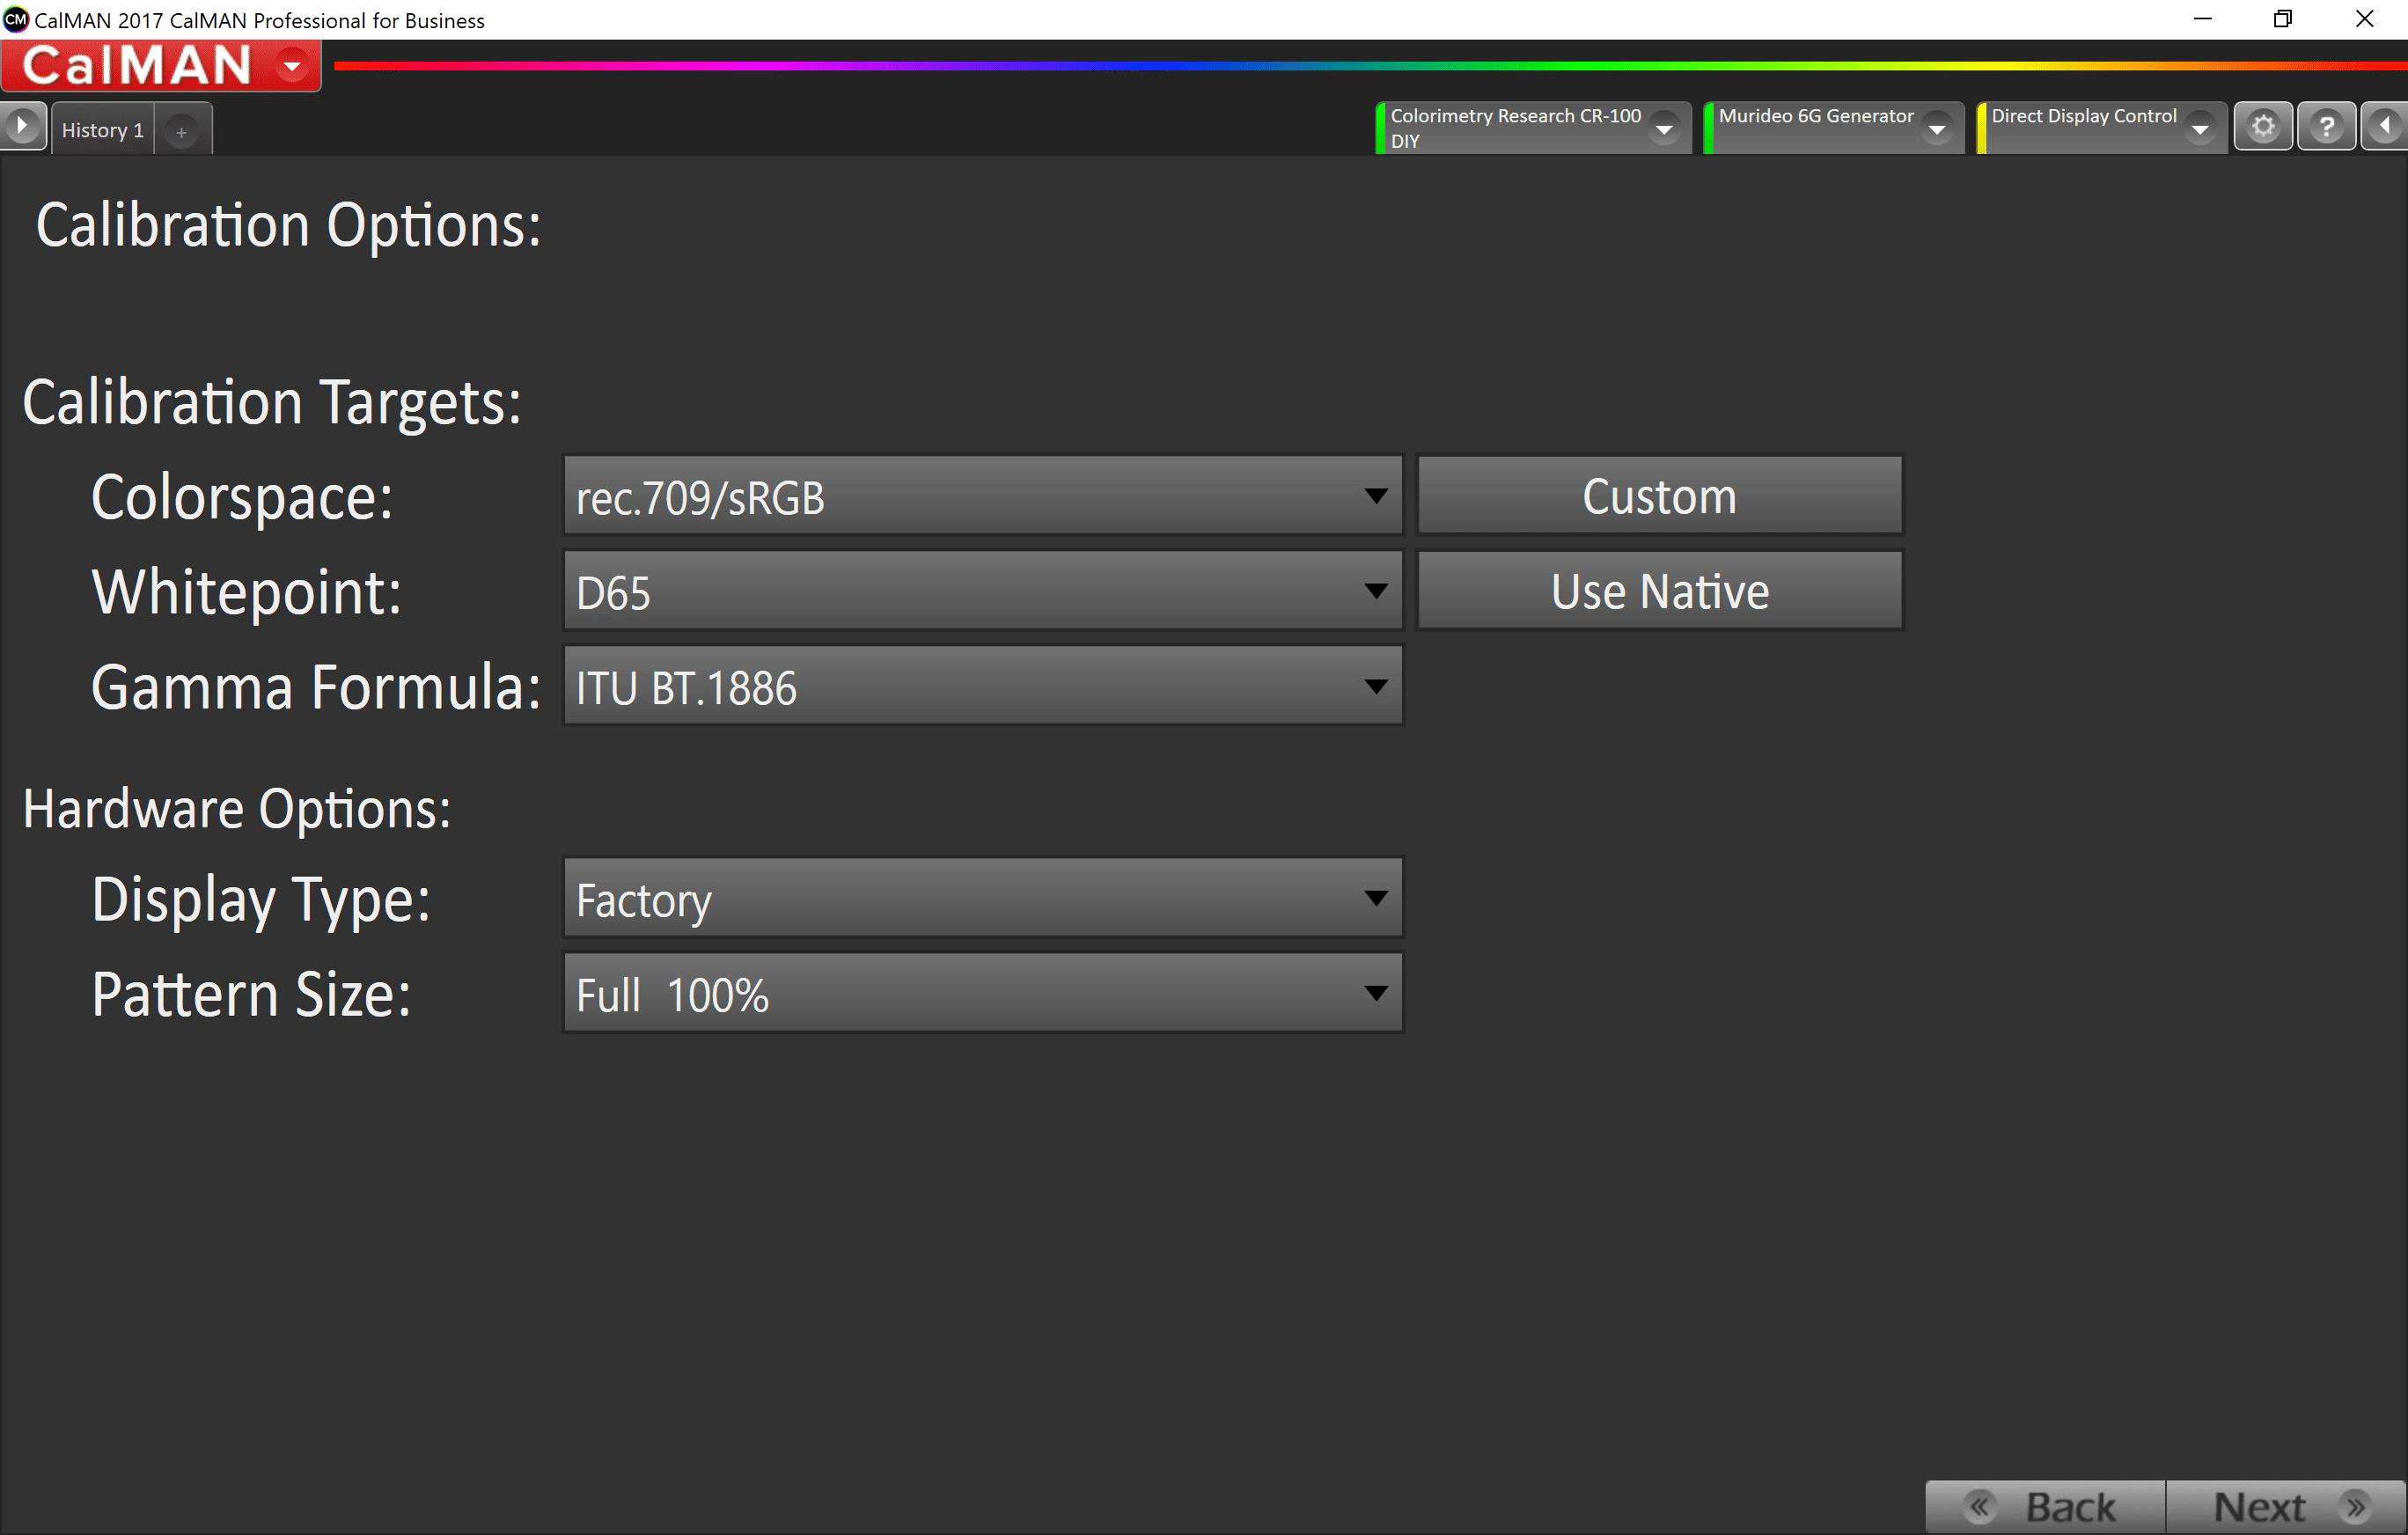
There are several things that we will need to look at under options. Listed first are Colorspace, Whitepoint and Gamma Formula. These should be defaulted at their proper settings - Rec709, D65 and ITU BT.1886 respectively. You can also change your display type and pattern size. If you bought a C6 or some other meter with included offsets, those should be listed under display type. There are generic offsets for some meters as well so be certain to set it to the proper setting.
Under Display Type you can select your Pattern Size. OLEDs, higher end LED/LCDs (such as a full array dimming panel) and plasmas should all use a window pattern. The size of that pattern depends upon the display and the technology behind it's dimming. I would just keep it simple for now and go with an 18% window. You can always go back and redo things later. Edge lit LED/LCDs and projectors should use a Full100% pattern.
Before we go any further, let's go over the button set, what each one does and the pattern disc menus.
CalMAN Action Buttons
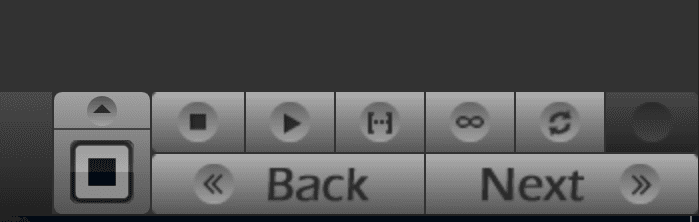
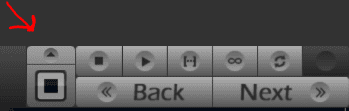
These are the action buttons located above the 'Back' and 'Next' buttons.
The first button is the pattern button. If you are using the pattern DVD linked to earlier, this option shouldn't be available. It should only be available to people using a pattern generator.
The first button to the right of the patter button is the Stop button. If you're taking continuous readings for instance, you would use this button to stop the continuous readings. The next button to the right is the single measure button. It is what you would want to click on when you want a single measure of a certain pattern. The next button is the read series button. It will go through and take readings of every pattern called for on whatever page of the workflow you are on. For instance, on the Pre-Calibration Capture page it will measure all of the grayscale and gamut patterns. The fourth button to the right of the pattern button is the continuous read button. It will read the same pattern over and over until you click on the stop button. This button comes in handy while making adjustments so that you can see the results in real time.
Pre-Calibration Readings
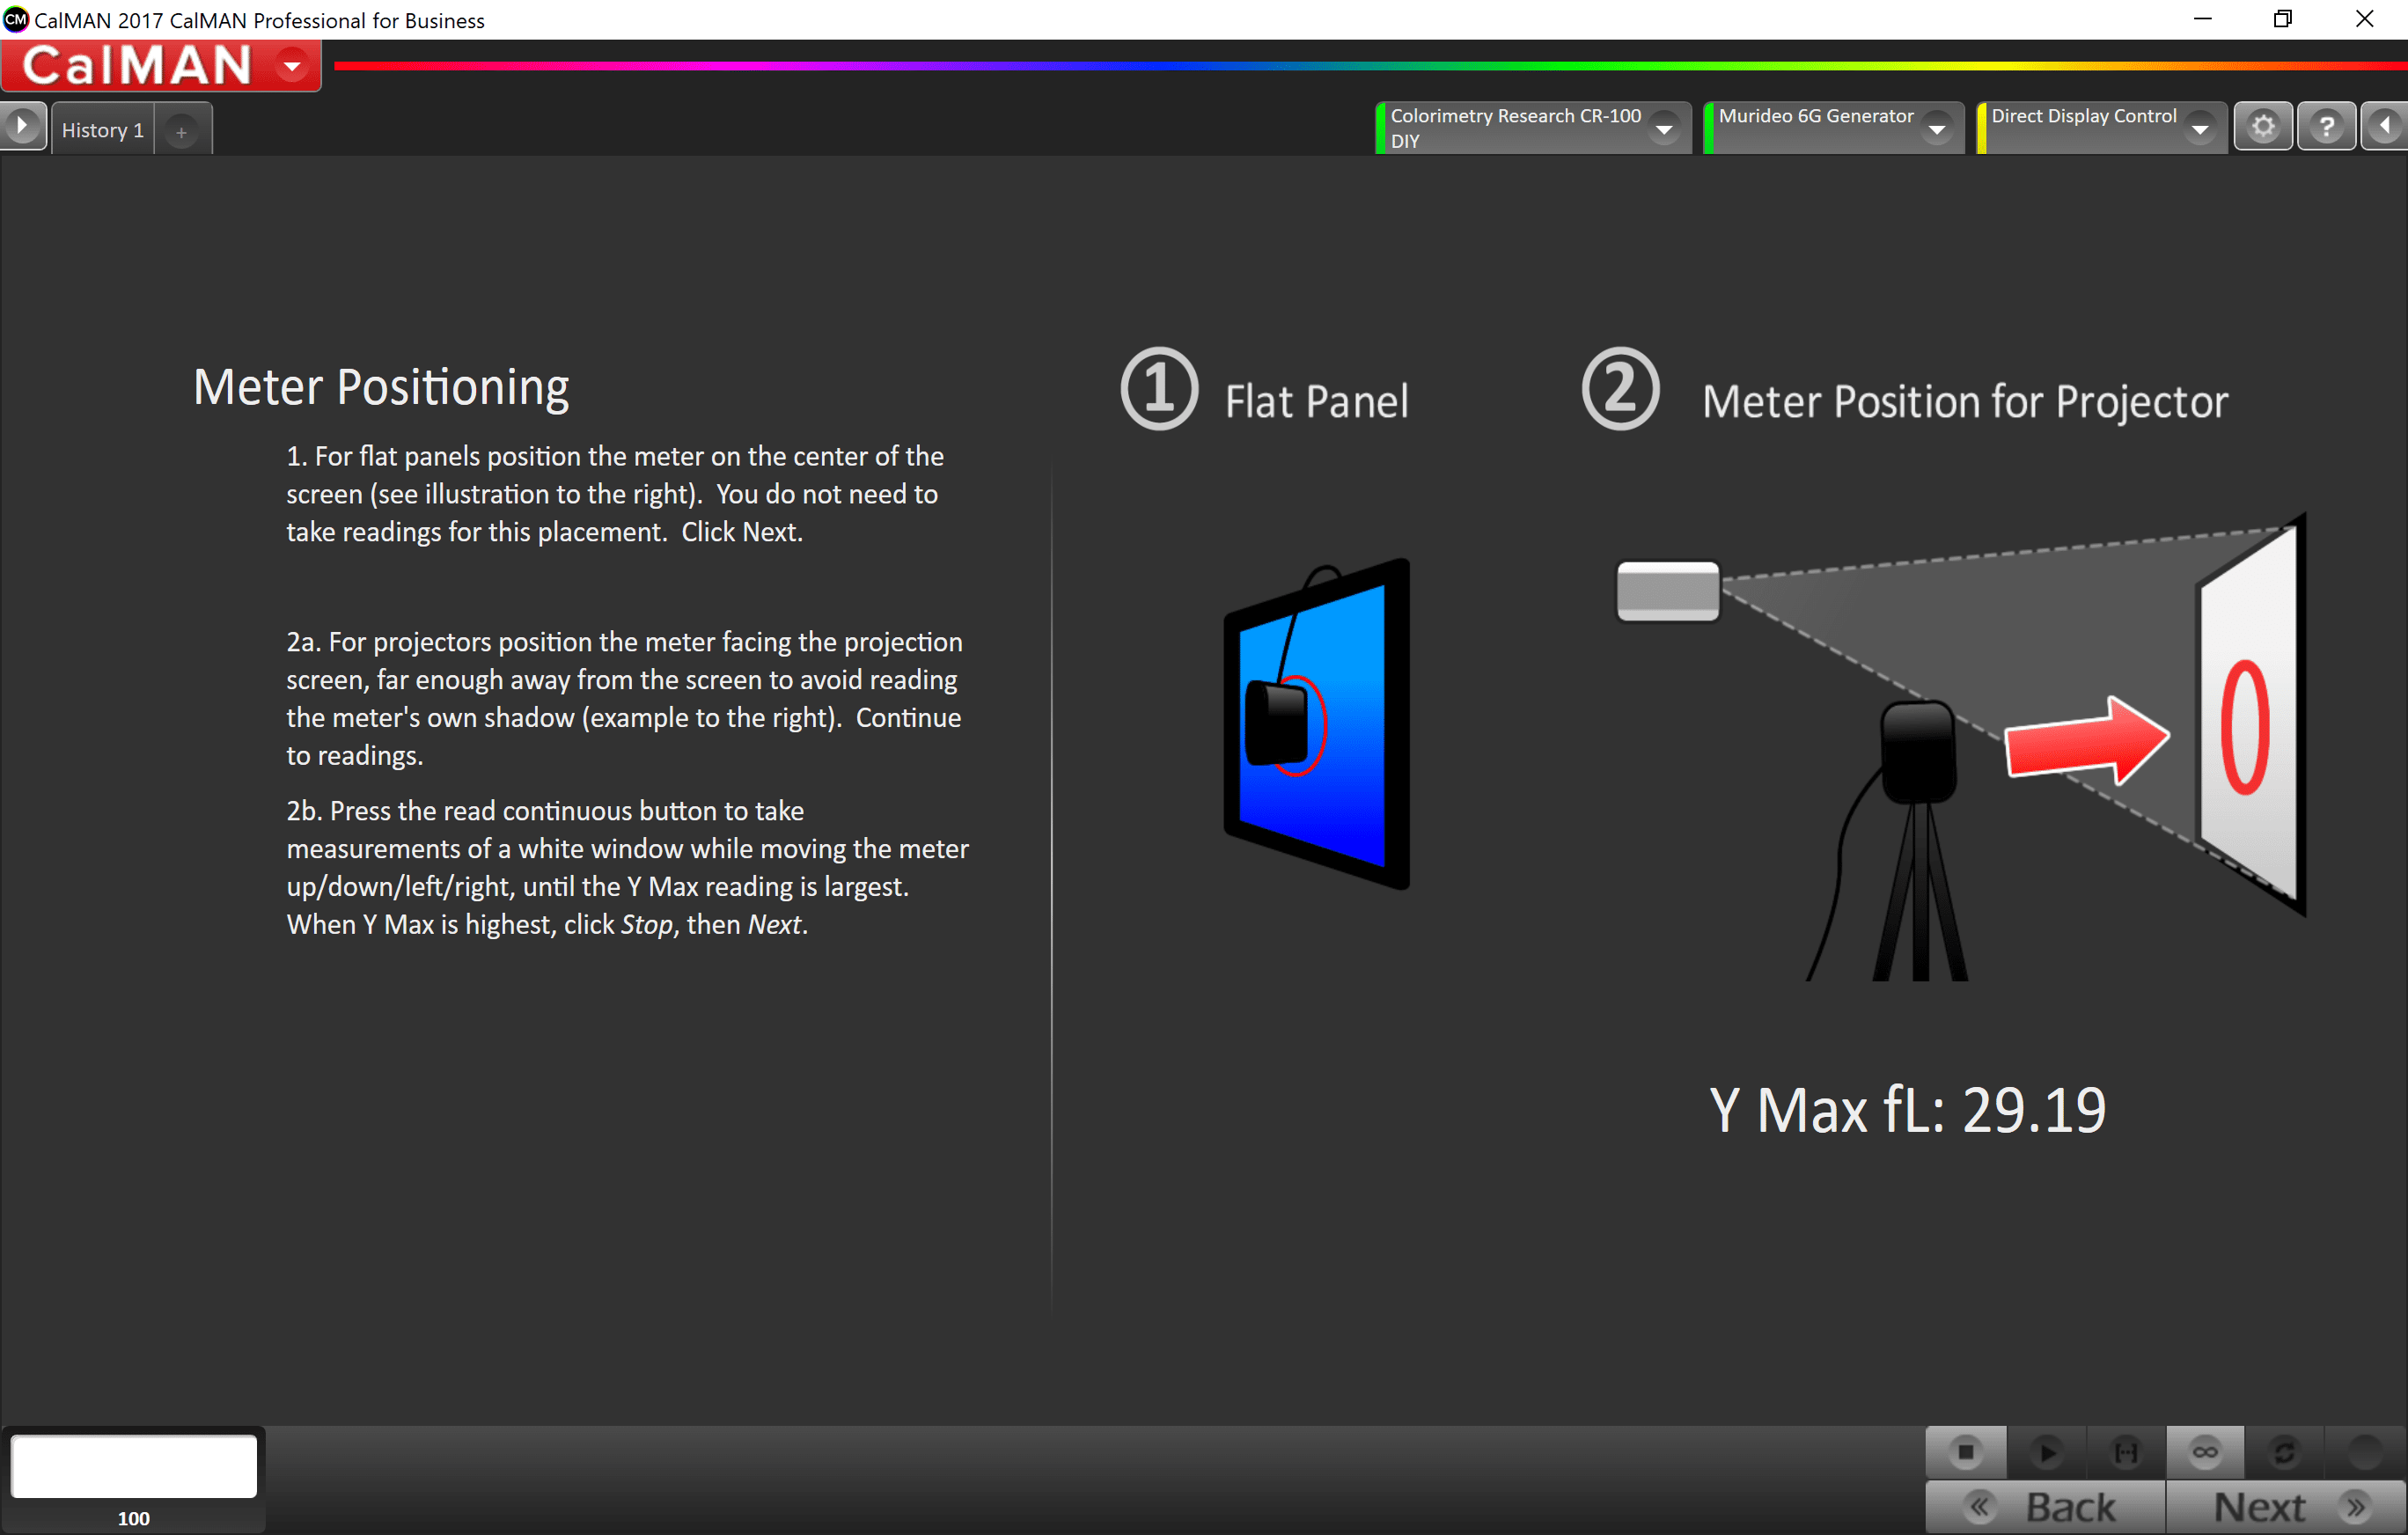
Now that we have everything set up properly within the menu tabs, it's time to hit the 'Next' button. On the next screen you will find the meter positioning screen. I covered this several paragraphs above. In a nutshell, on the display for flat panels and CalMAN will tell you how far away depending upon your meter if you're setup for a projector. Load up a 100% IRE pattern and move the meter until you get the highest Y reading.
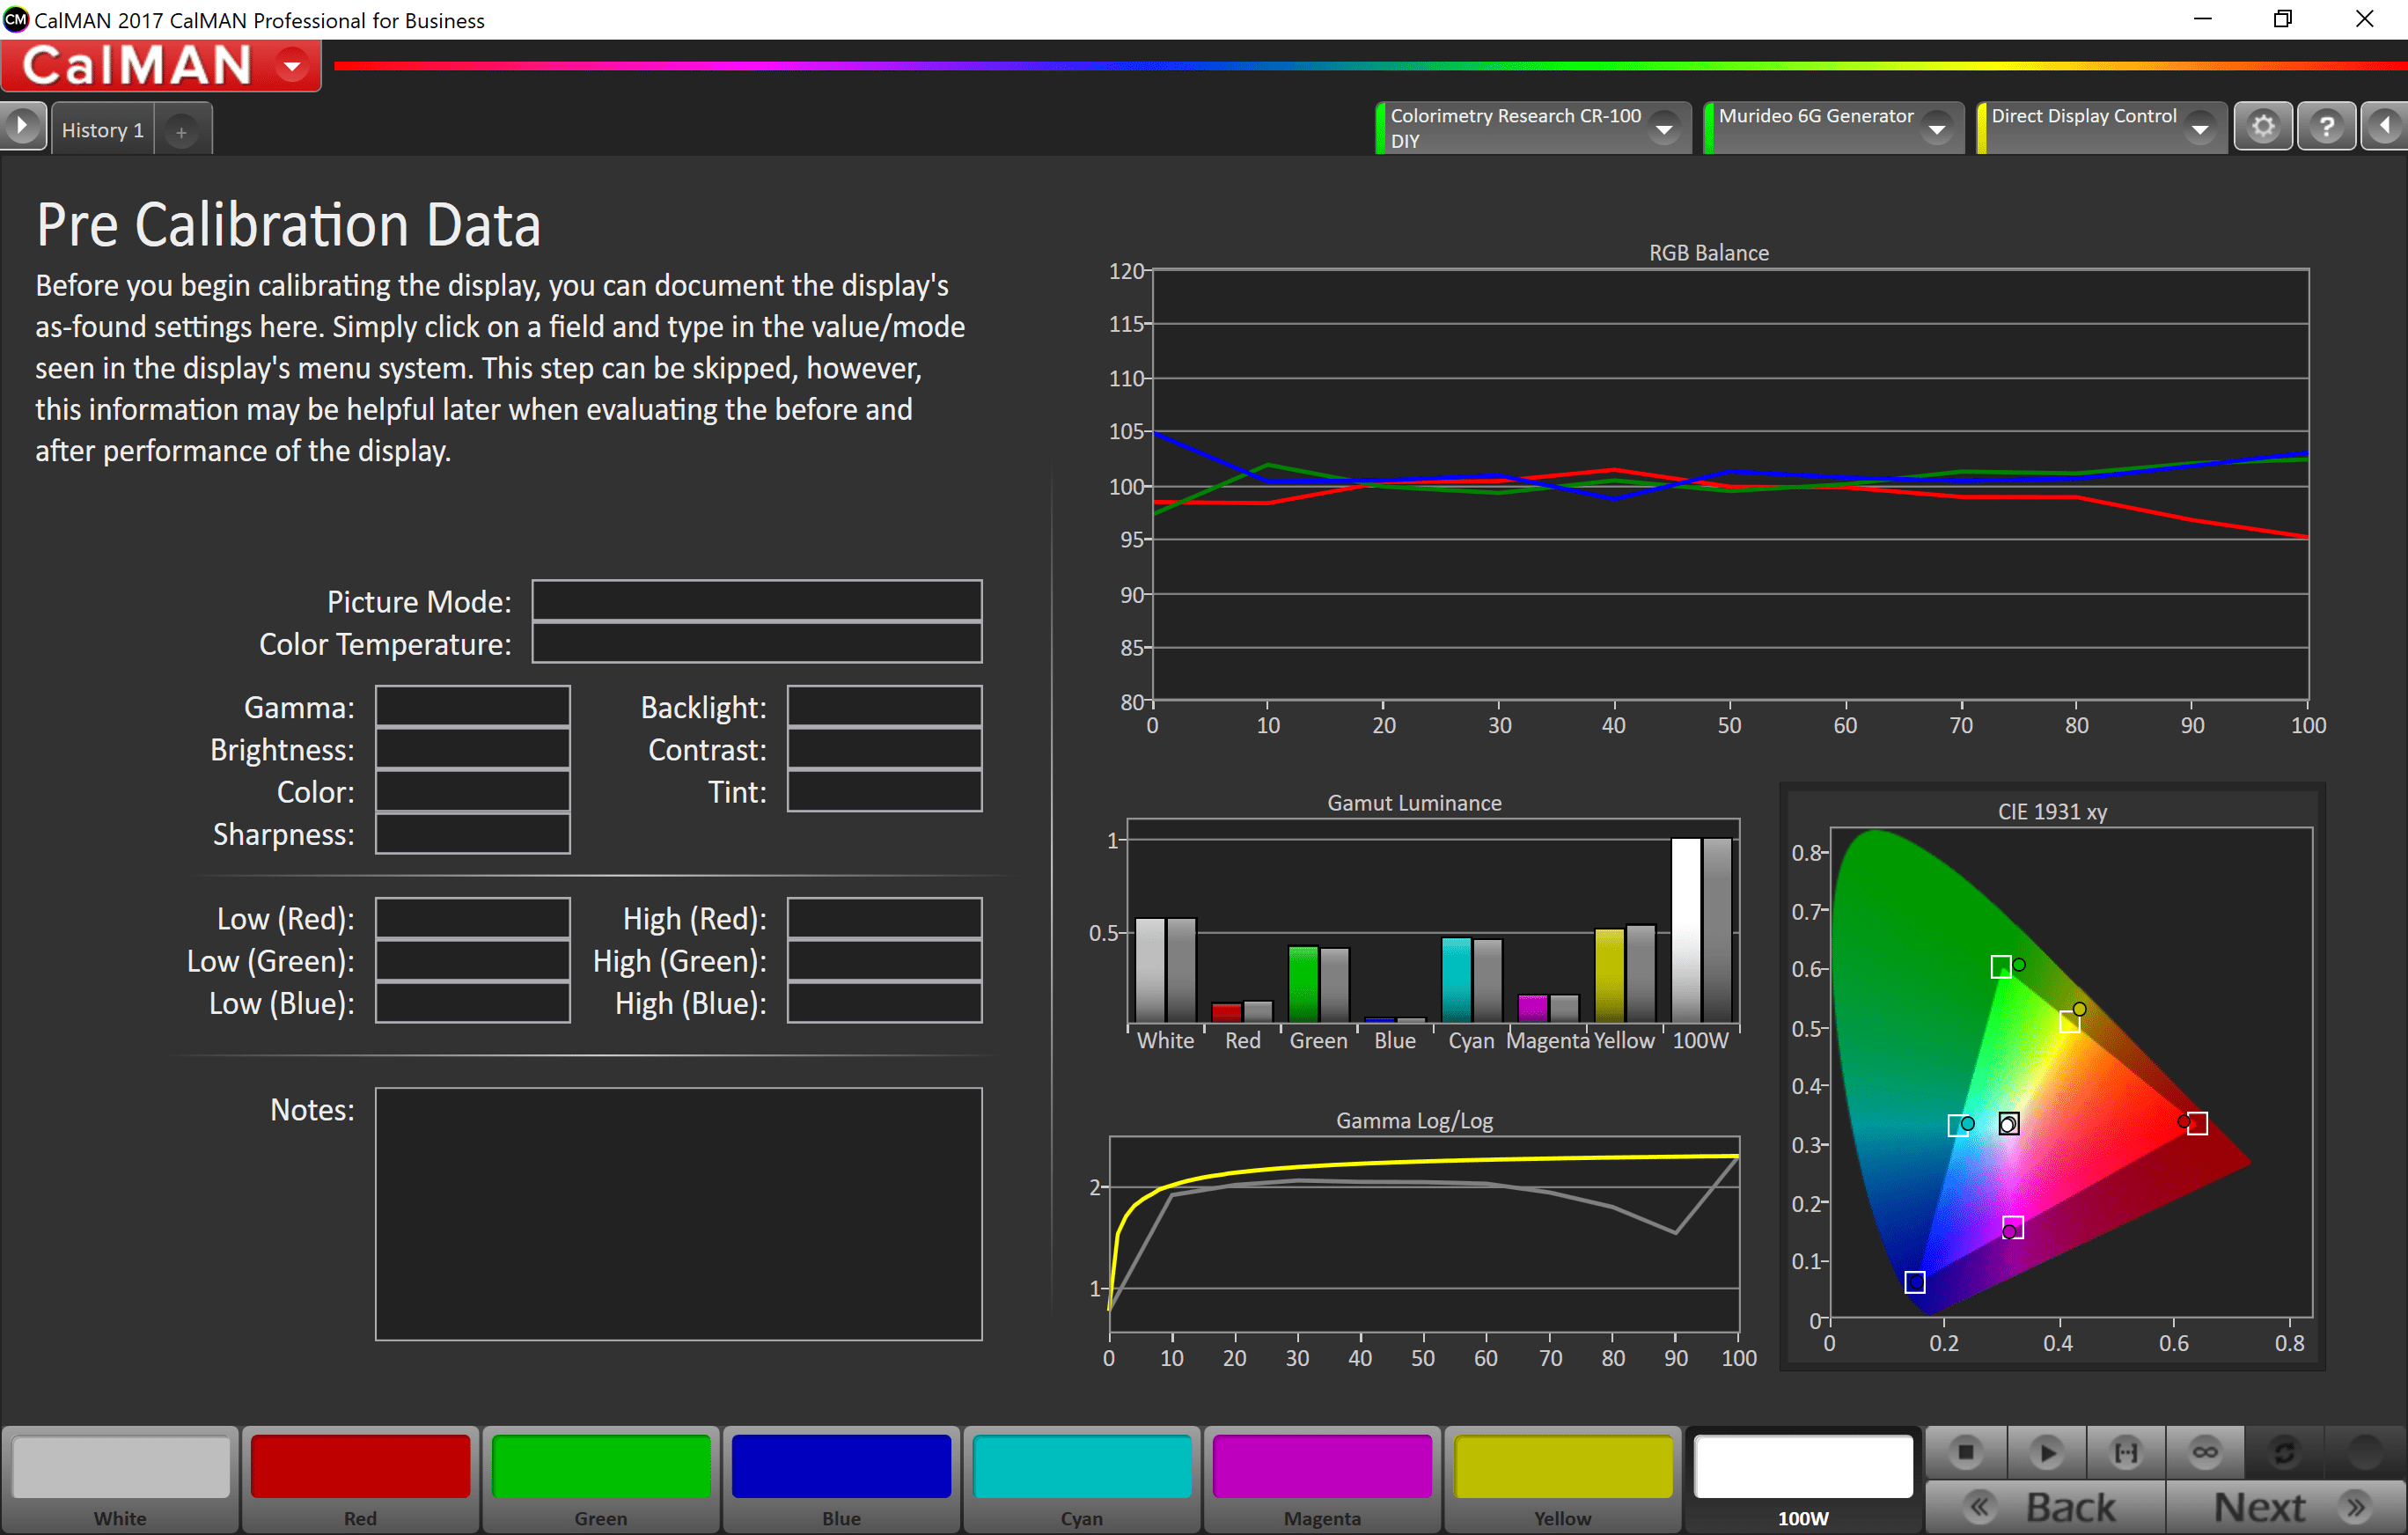
This is the Pre-Calibration Screen. What you should do first is to get all of the current settings that you are using for your display and enter them here. If you double left click on the numbers for each setting a popup window will open and you can enter the current value for each setting. This will be useful for comparison purposes when you are finished. As soon as you enter all of your settings it's time to take your pre-calibration readings.
Load up your pattern disc and set it to show the 100% white pattern - should be located under grayscale patterns. Once it's loaded click on the play button towards the lower right of the program screen. When the reading is finished you will do the same for the following grayscale patterns - 0%, 10%, 20%, 30%, 40%, 50%, 60%, 70%, 80%, 90% - and the following patterns for gamut - 100% white and then 75% gray, red, green, blue, cyan, magenta, yellow. The 0 and 10% grayscale patterns may or may not be needed depending upon what you selected in grayscale options.
Alternatively, if you selected the box for pattern change prompts, you can select the play button with the parentheses around it when you start and it will prompt you for each pattern before it measures. Be sure to have the proper pattern up before clicking ok.
When you are done getting your Pre-Calibration readings, hit the next button on the bottom right side.
Brightness and Contrast
These have been covered here in the 'How to Setup your Display Properly' thread. It should be noted that once you have your Brightness and Contrast set, you should go back to each and double check them to ensure that both are still setup properly.
A brief description - some quotes are directly from Digital Video and HDTV Algorithms and Interfaces - Charles Poynton
The names can be a bit confusing. Brightness actually controls the black level of your display. What this control does is it slides the black to white range of the signal along the power function of the display. Basically it moves the signal, as a whole, lighter or darker. Misadjustment of brightness is a common cause of poor image quality. Set too low and information near black is lost. Set too high will cause your contrast ratio to suffer.
Contrast controls the white levels of your display. This can be labeled Picture on some displays as well. Contrast control affects the luminance that is reproduced for the reference white input signal. It affects the lower signal levels proportionately, ideally having no effect on reference black. In layman's terms, it expands the video signal. You want to expand the signal to the highest level your display can achieve. And don't forget the three rules to setting contrast from Michael Chen - no clipping, no discoloration, and no eye fatigue.
Contrast - expands the lightness and darkness of your signal. Brightness - moves the signal either darker or lighter.
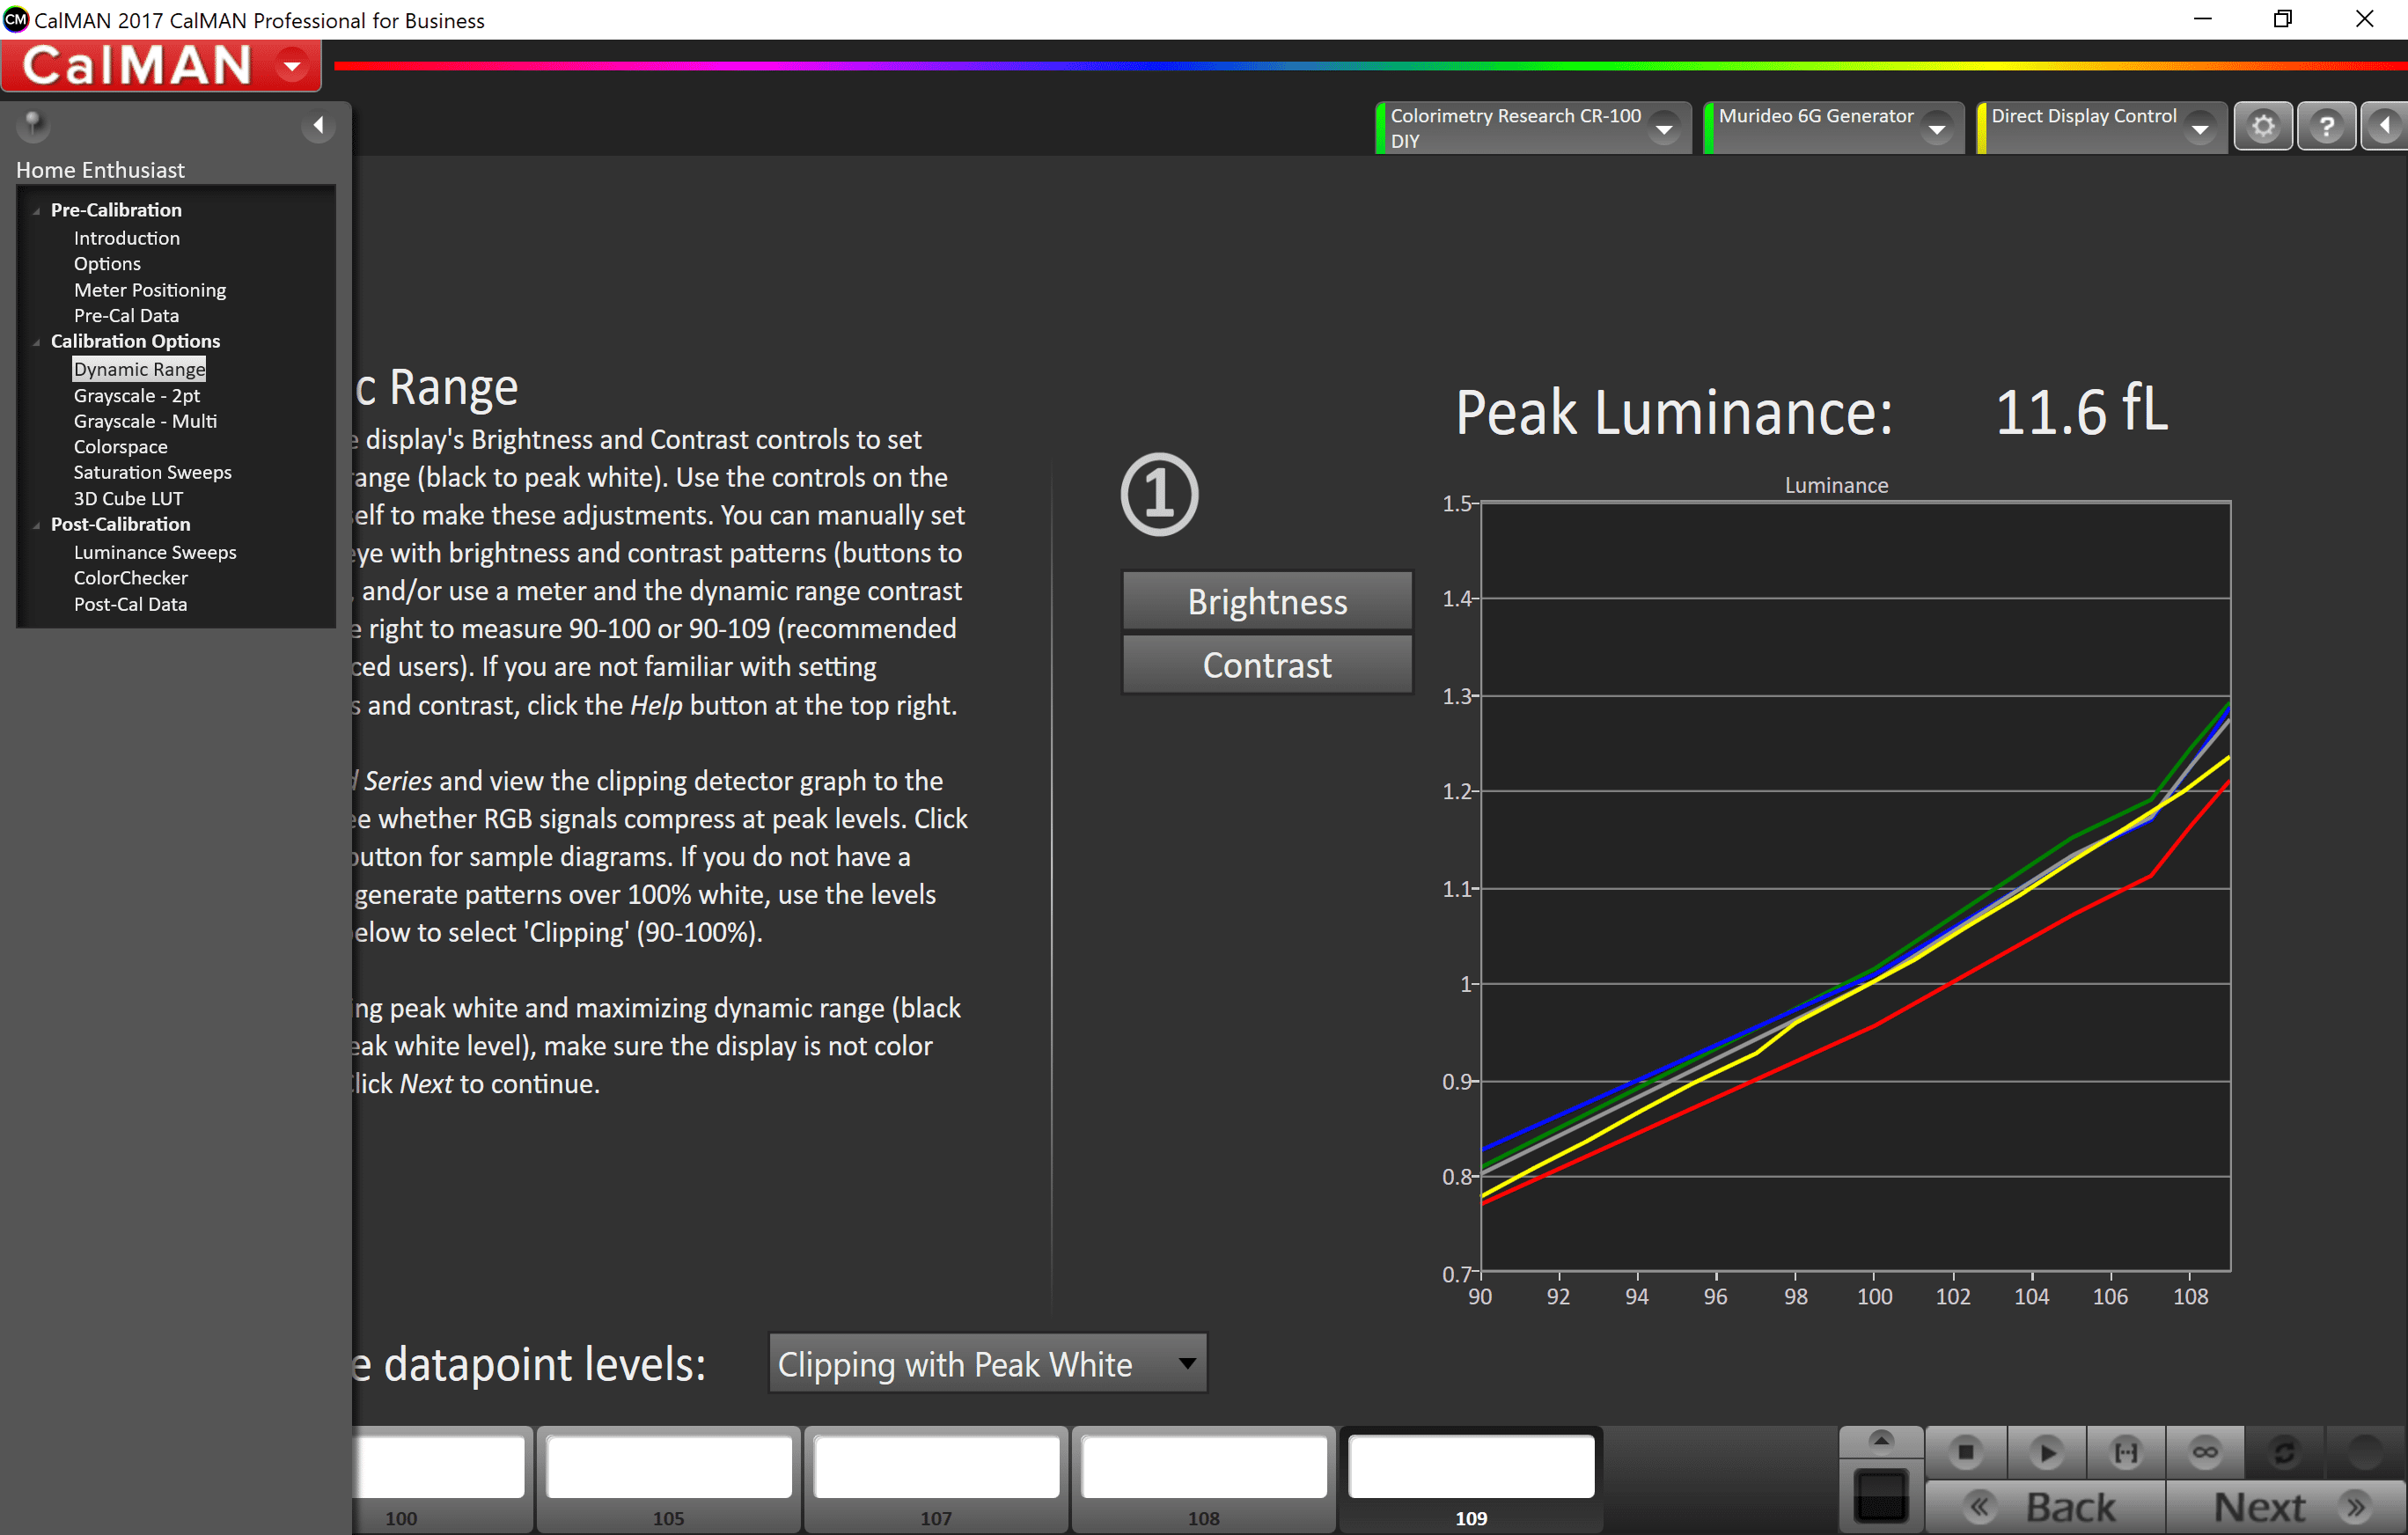
The Dynamic Range screen will tell you if you're clipping whites. You can set this to measure up to a 100IRE pattern or up to Peak White 109IRE pattern.
When you have your Brightness and Contrast set correctly hit the next button to get to the 2 Pt. Grayscale screen.
Grayscale
Grayscale calibration is what many consider to be the most important part of calibrating your display. It involves calibrating black, white and the range of tones in between to be neutral - x=0.3127 y=0.329. Calibrating grayscale must be done with a meter. If your display is really far off on one end or the other, you may be able to detect this by eye. But you won't be able to accurately correct this by eye or even confirm that it is corrected without a meter - human eyes are very poor color meters.
Controls needed for grayscale calibration
For the majority of displays, these are called white balance controls. They are generally located under one of the picture adjustment menu settings and are usually labeled White Balance. Older displays may only have the controls within the service menu. Some do include either a 2 point or even a 10 point white balance control. That is what you would need in order to calibrate your grayscale.
RGB Contrast Controls - these can be labeled as Contrast, Gain, or Drive. These controls are for adjusting the higher end - either the 80 or 70% pattern.
RGB Brightness Controls - these can be labeled Brightness, Cutoff, Cut, Offset or Bias. These are the controls for adjusting the lower end - either the 20 or 30% pattern
If your display comes with a 10 point white balance control, there should be an RGB for each grayscale from 10-100IRE. Best practice with a 10 point grayscale though is to adjust using the 2 point controls and then adjust using the multipoint controls if necessary.
How to measure and adjust:
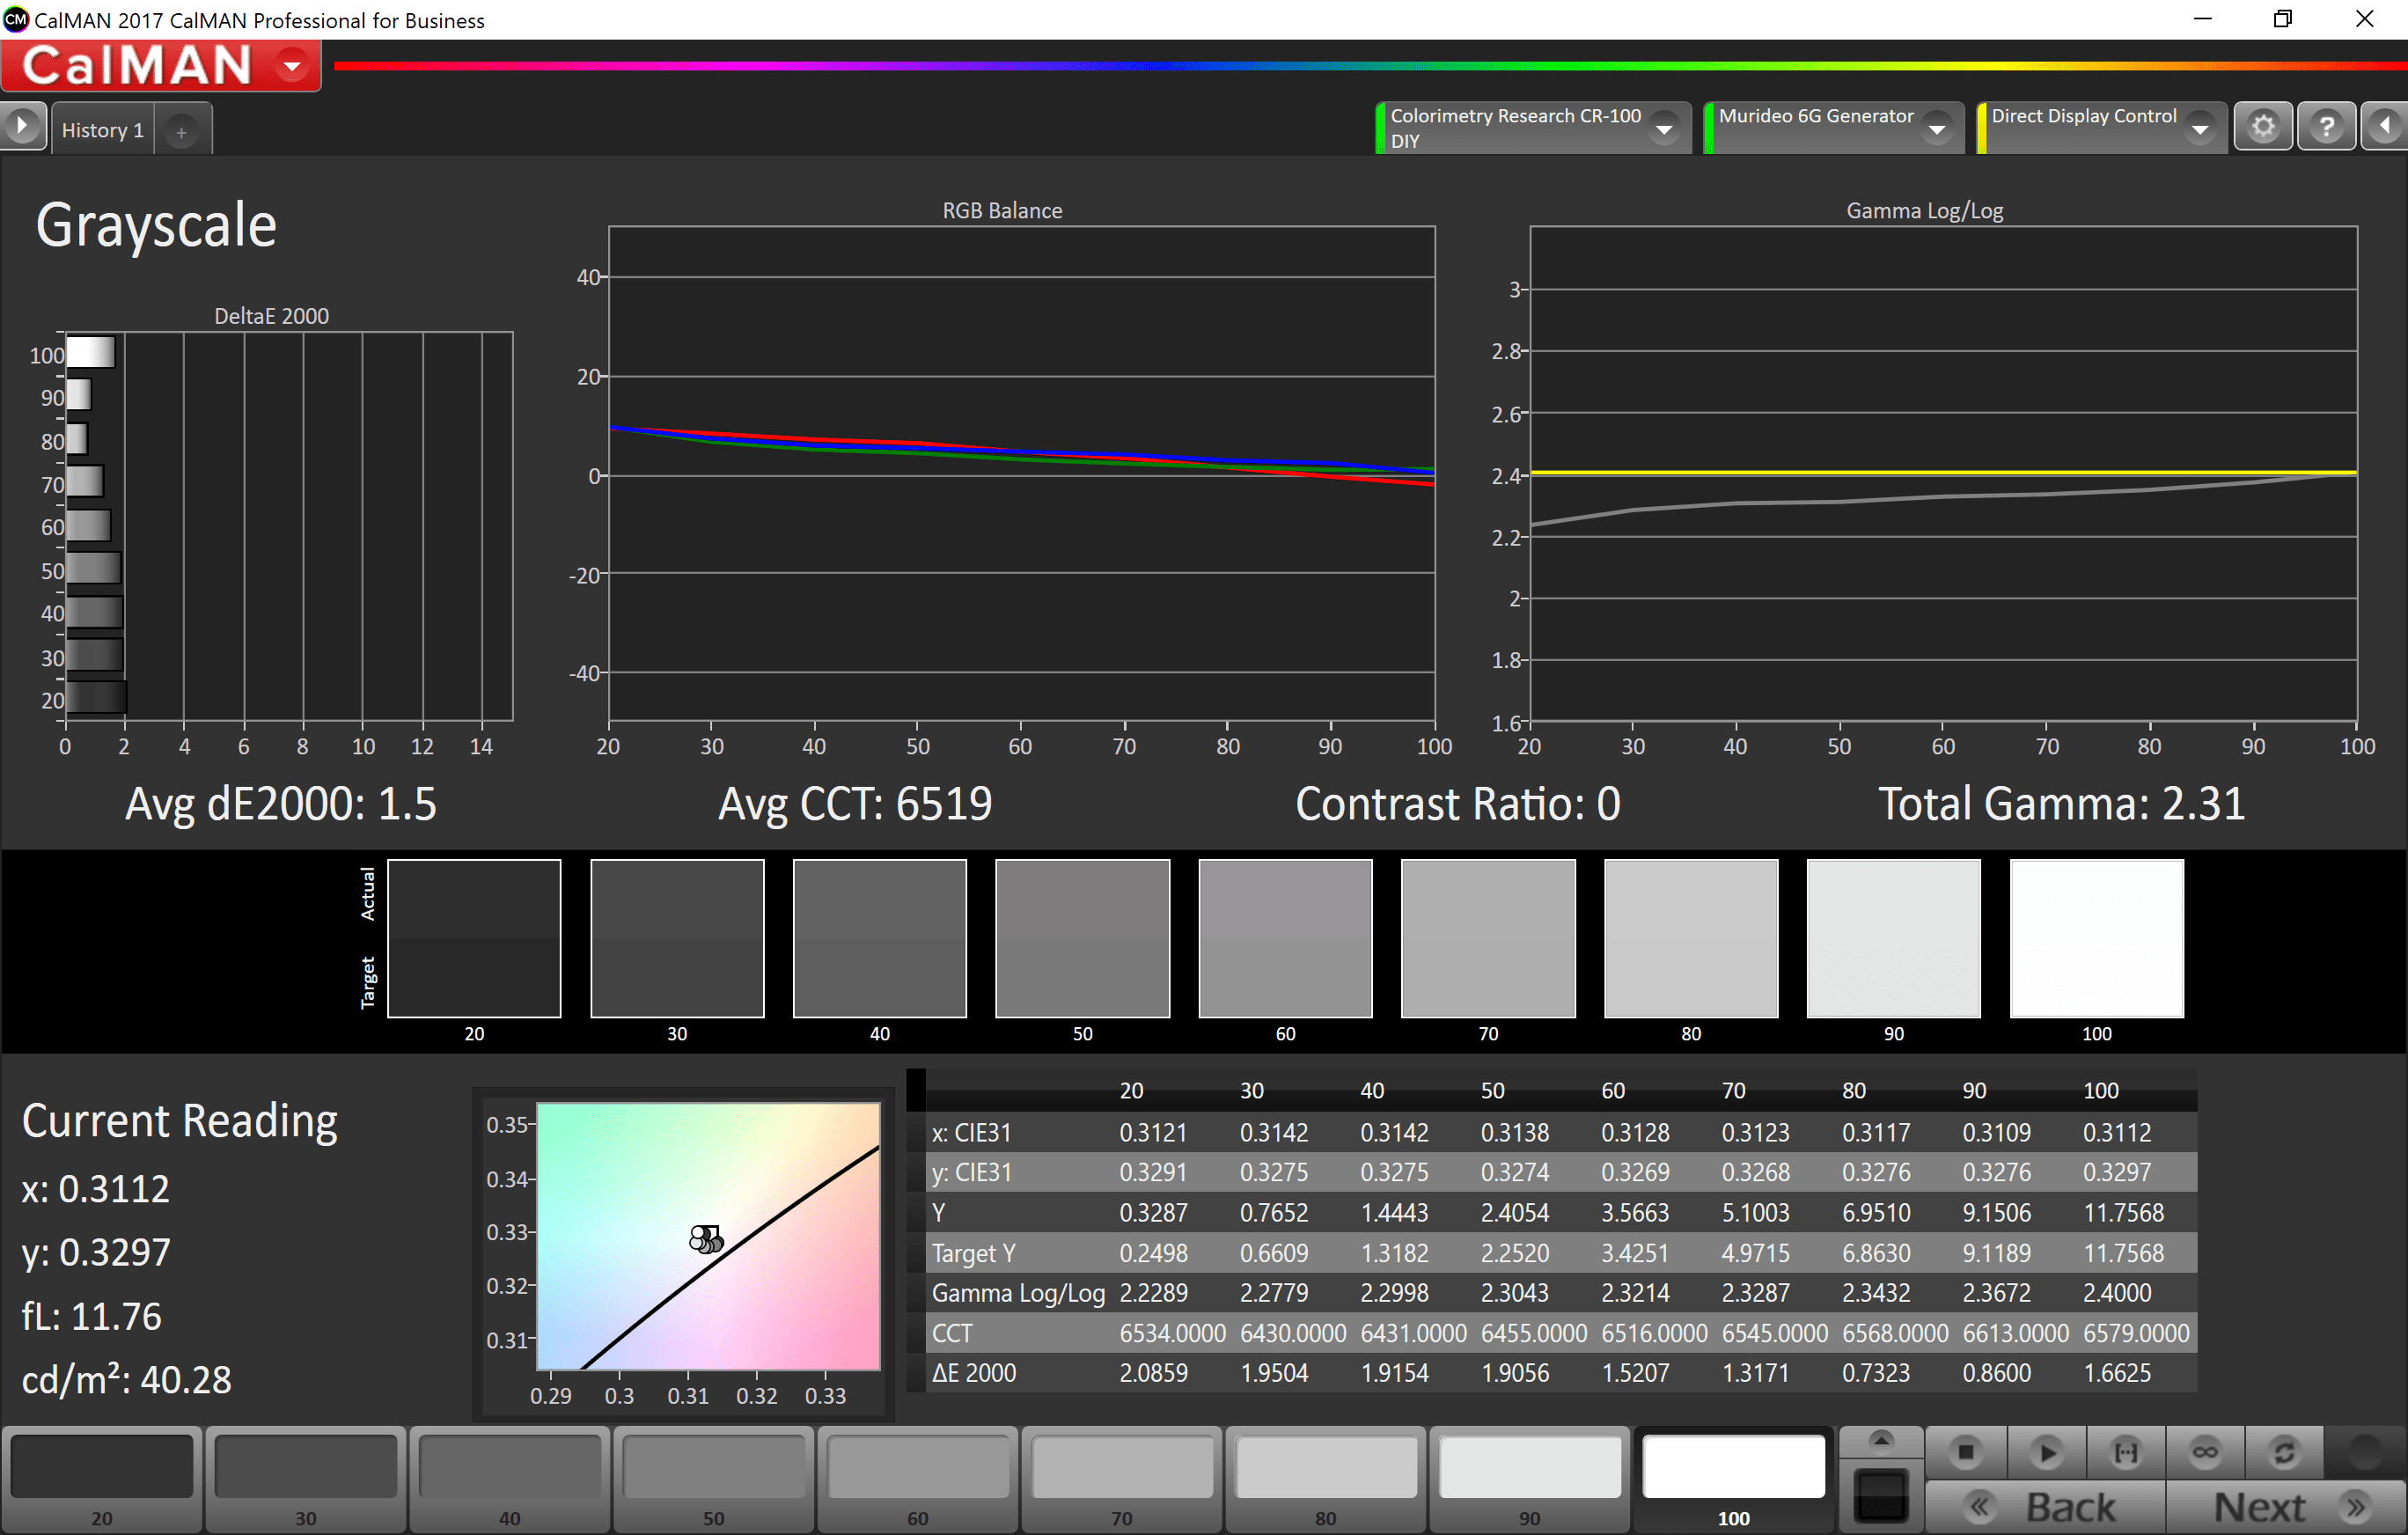
First you will want to do a complete grayscale measurement. It's important to consider the meter that you will be using to measure. If it's a meter that doesn't read the lower light levels all that well, you may want to skip the readings at 0 and 10% or maybe even just 0%. The pattern that starts off for this will be the 100% pattern and then it will go to the lowest percent pattern next and work its way upward. After you have completed the initial readings it's time to adjust your grayscale.
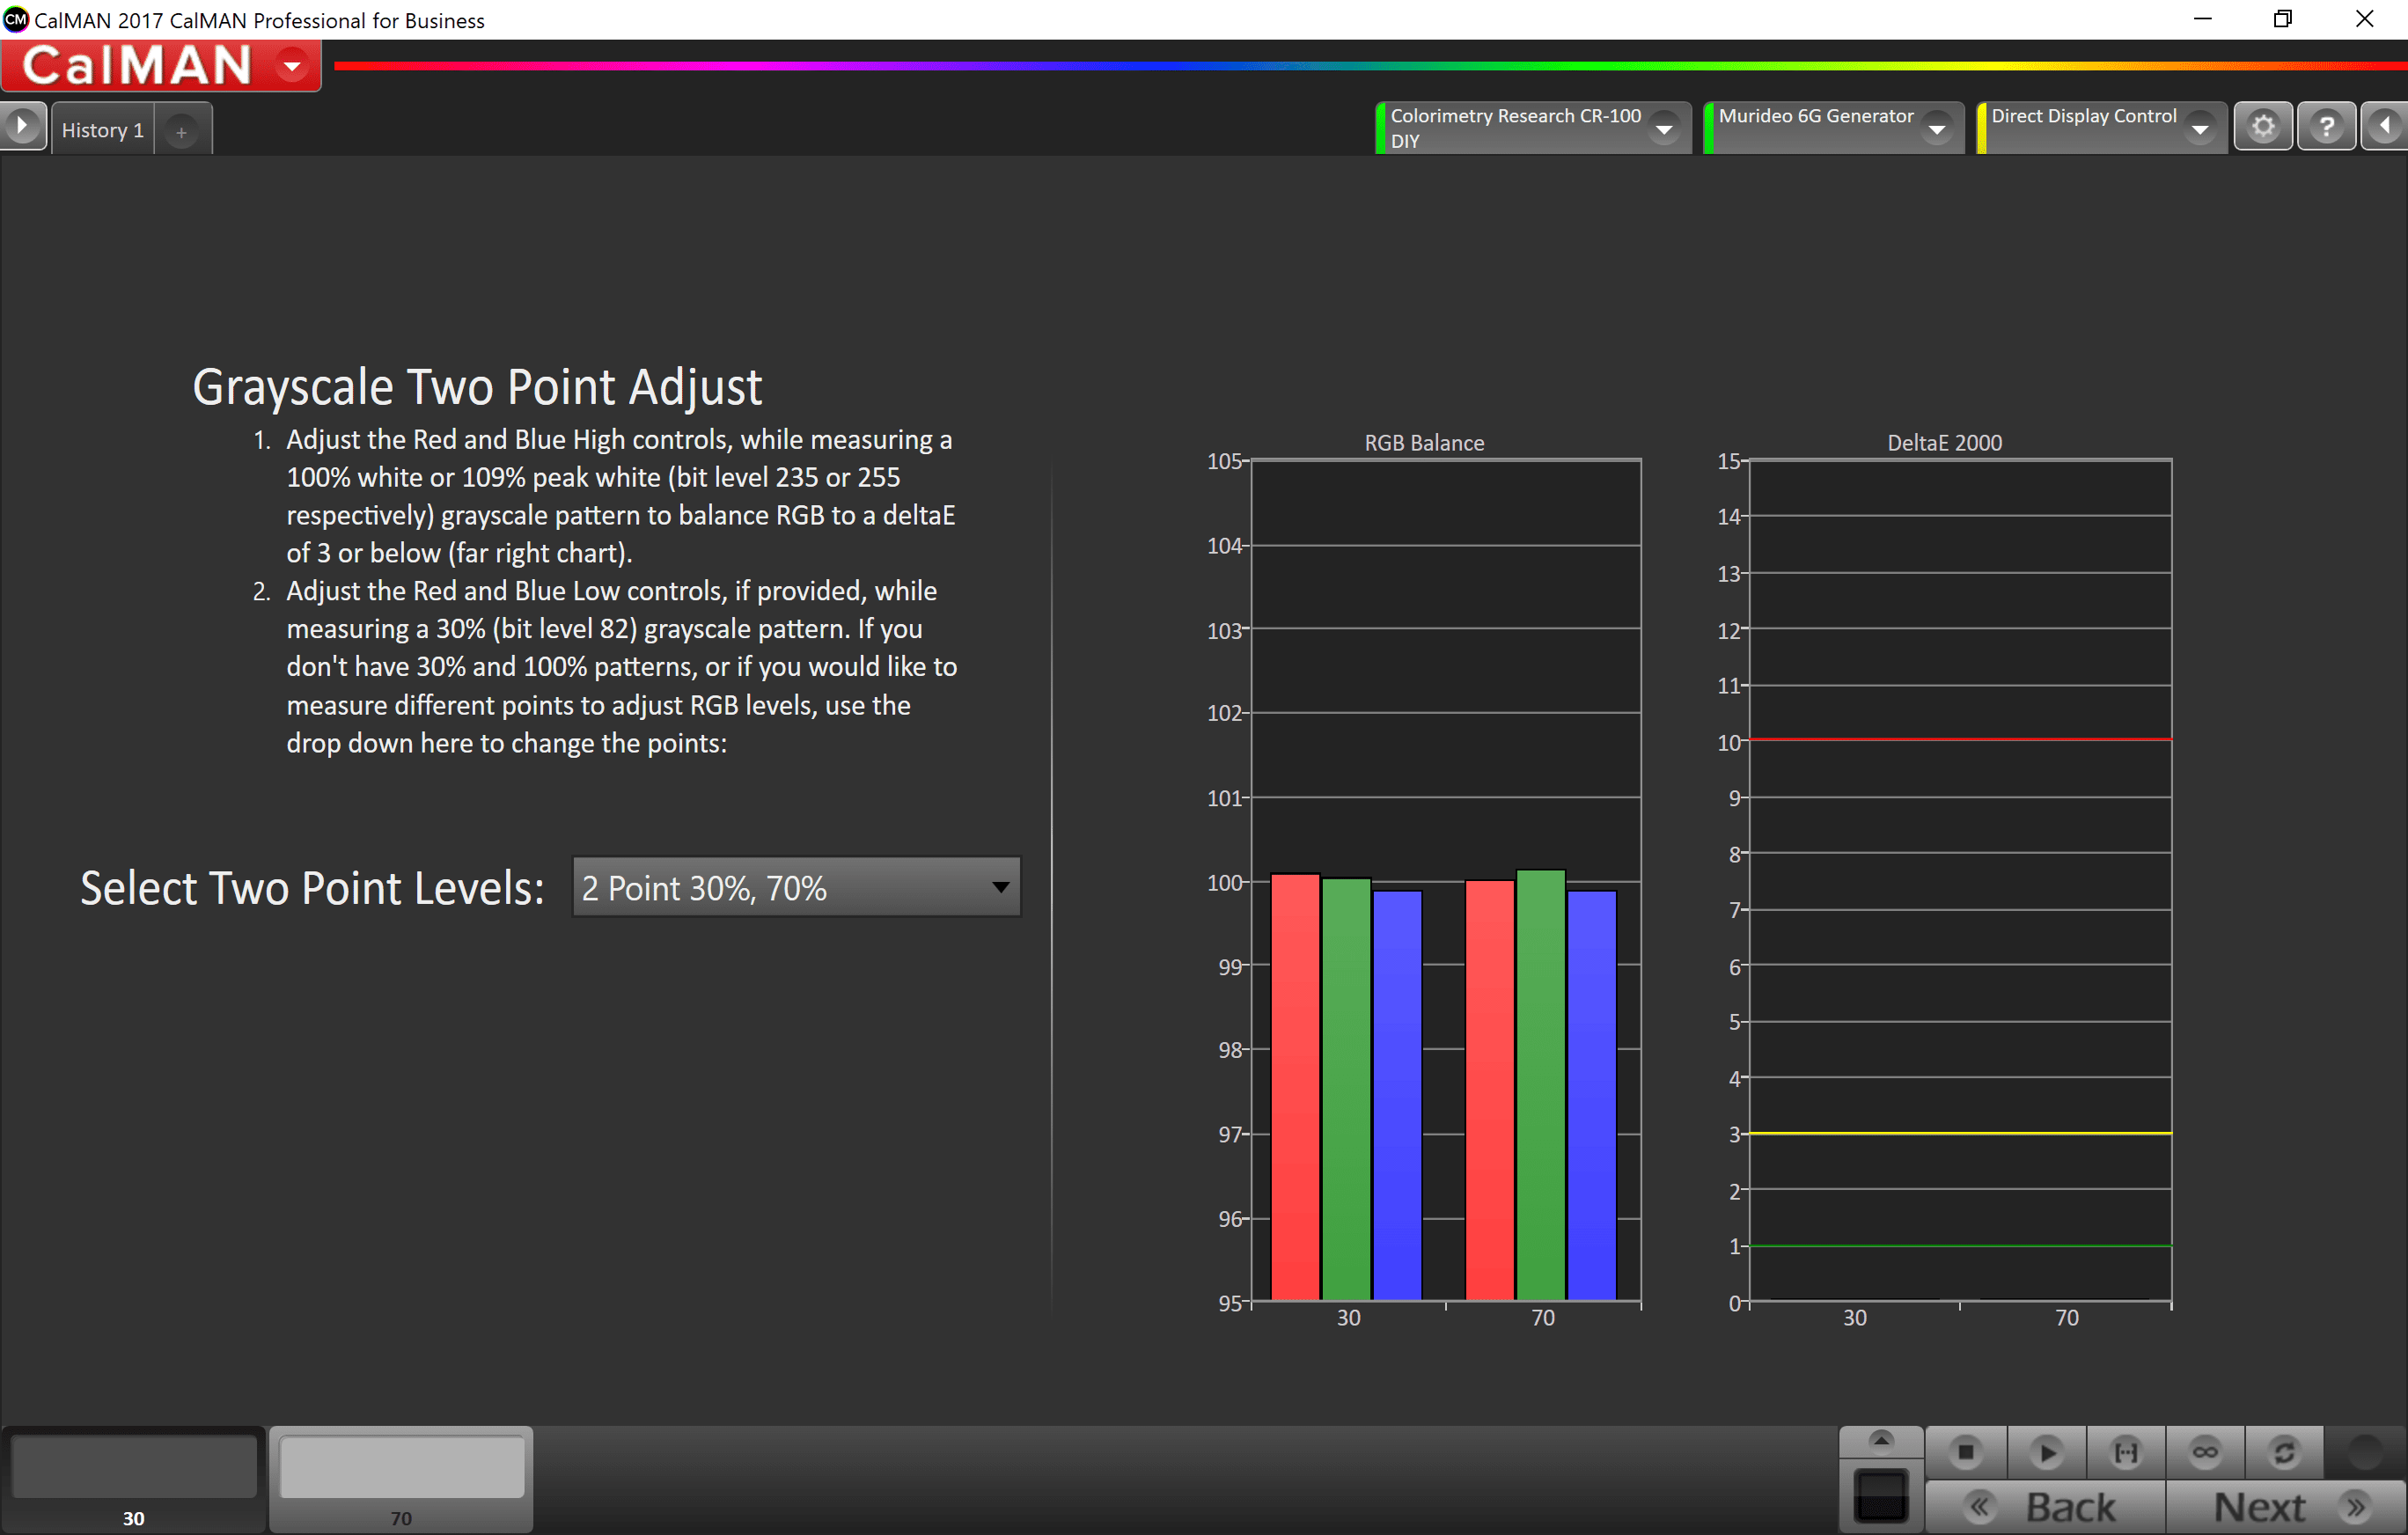
Two Point Grayscale Adjustment - Use the 80/30% patterns to adjust your grayscale. To adjust the the RGB contrast display the 80% grayscale pattern, then click on the value for the pattern that you displayed under the DeltaE 1976 chart.
After you have the pattern displayed and selected within CalMAN, bring up your controls within your display. Make certain that they are not going to interfere with the meter's readings. When you have the controls up, click on the continuous read (infinity - ∞) button. Adjust your control to get Red, Green and Blue to read as close as you can get to 0. When you are satisfied with the settings, click on the stop button (square). Now load up either the 20 or 30% pattern and follow the same steps that you did to adjust the RGB contrast controls for the RGB brightness controls. When you are finished with this adjustment, go back and double check the RGB contrast settings. Make adjustments as necessary. If you make a lot of changes go back and check the 30% reading again as well. Be certain that both the low and high end are still where they should be. It should be noted that most of the time you will have to adjust each of the controls several times as they do have a slight effect upon each other. When you are comfortable with the readings, get readings of all the grayscale values and double check everything again. If everything looks good and all of your DeltaE values are below 3, move on to the next control to calibrate.
Some of the problems that you may see here are that your grayscale tracks well at the low end and the high end but not so well in the middle. There are two trains of thought for this. One is that it would be best to get the middle and the low end calibrated well than the high end (80% and up) for most people as there is usually much more content in the low to middle range than there is in the high end. The other train of thought is to get the middle and upper range calibrated as errors on the low end are much more difficult to detect. Another problem you may encounter is that you may run out of red, green or blue at the high end - usually 90-100%. This was the case for me back in my more inexperienced days with my (now recycled) BenQ W5000. I was always running out of red. It should be noted that red is the common of the three primaries to run out at the high end. This may occur with your display and no increase in the red contrast adjustment will do anything to fix it. The problem is that contrast is set too high. Back off on contrast until red is back at 100%. For me this was only two clicks down on the contrast and it had no effect upon the white balance image.
10pt Grayscale adjustment
If your display has a 10pt White Balance/Grayscale adjustment, just follow the directions above but for all points in the grayscale. It would be wise to skip 0 and 10% as most meters do a poor job of reading in low light. Your eyes are probably better than most meters at that low of a level. If it looks good to your eyes it is probably fine.
Double Check Brightness, Contrast and Luminance
When you are finished calibrating your grayscale, it's important to go back and double check your settings for brightness and contrast. They may have to be re-adjusted a click or two, up or down. Double check your luminance as well as that may need to be adjusted up or down slightly.
Colorspace
The majority of displays on the market now do come with a Color Management System (CMS). If your display does not come with one, you can skip this step and hit the next button on the bottom right.
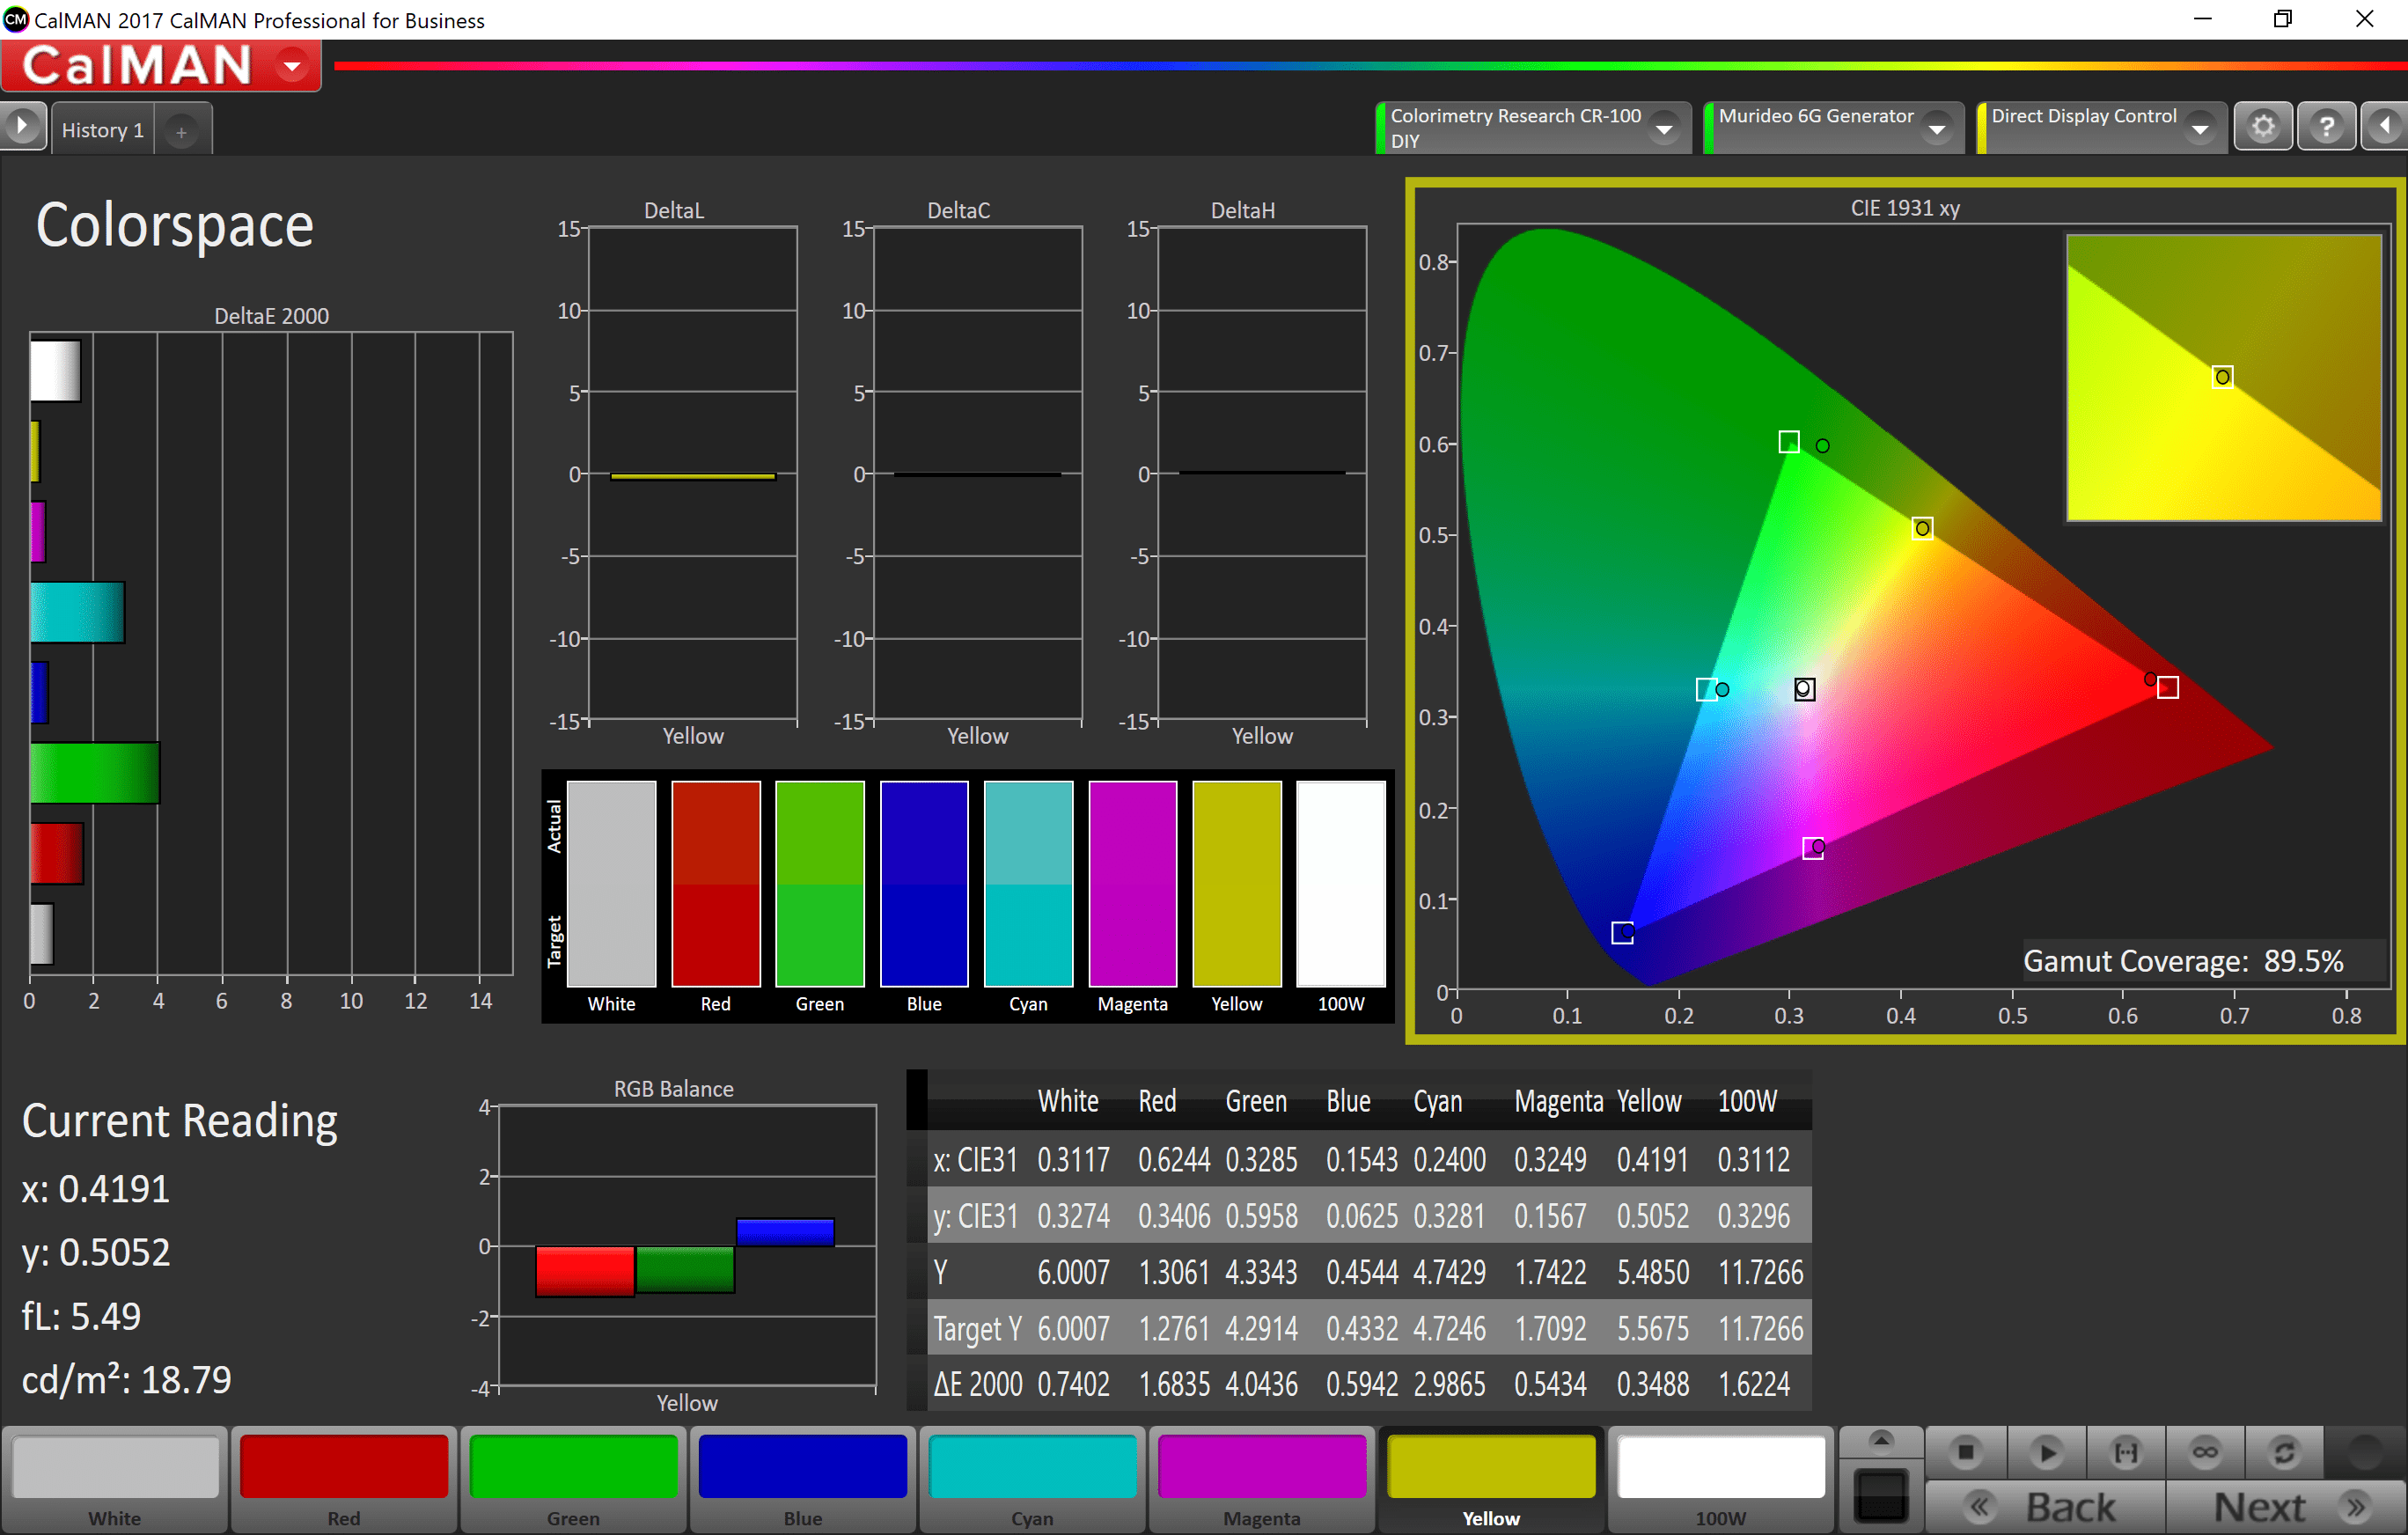
If you do have a CMS on your display this is where you will adjust it. Start off with a 100% White pattern and take a reading. You then move on to 75% White, Red, Green, Blue, Cyan, Magenta and finally Yellow. You measure using the 75% patterns because most, if not all, sources have colors that fall within the 75% of the color points. And some displays, even though they may include a CMS, clip one or more of the primary/secondary colors. The 100% White reading is for calculating the luminance for the primaries and secondaries.
Correction to the color gamut can be achieved in a couple of different ways. Some CMS' include xyY adjustments. These can be adjusted via the measured values table below the Gamut CIE chart. Other displays include HSL adjustments. These stand for Hue, Saturation and Luminance. Hue is, according to dictionary.com, - "the property of light by which the color of an object is classified as red, blue, green, or yellow in reference to the spectrum." If a color's hue is off it could be described as having another color such as bluish-green or yellowish-red. So red's hue control would adjust it either towards yellow or towards magenta. Saturation is the colorfulness of a color - dictionary.com - "the degree of chroma or purity of a color; the degree of freedom from admixture with white." Saturation controls the color towards and away from white. It's important to note that saturation cannot be over-saturated via a CMS - an under-saturated color cannot be fixed. Any color lying outside of the CIE Gamut Triangle would be over-saturated. Any lying on the inside would be undersaturated. Luminance is simply the brightness or luminance of the color.
With a limited CMS the first rule of thumb should be to get the primary color (red, green, and blue) delta L error to a minimum. The second rule is to get the secondary colors (cyan, magenta, and yellow) delta H error to a minimum.
How to measure and adjust:
Bring up a 100% White pattern and click the measure (play) button. You will then measure 75% White, Red, Green, Blue, Cyan, Magenta and Yellow. Depending upon how your CMS is setup, adjust the values accordingly to bring the values to equal the values listed as the Target values in the list below all the charts. Here's what this looks like:
The way to adjust these is to have your display's adjustment menu open and display the pattern for the particular color you want to adjust. Then select that color in CalMAN on this bar - it' on the bottom of the CalMAN screen. You want all of the primaries, secondaries and white at the 0 bar in a perfect world. But that will rarely be the case. Even the top of the line consumer grade displays will have slight errors.
Then click on the continuous measure (infinity - ∞) button and make adjustments as you watch the CalMAN and see how the changes affect your original measurement. When you have everything adjusted properly, make sure to go back and re-measure everything. It may take a few times through to get everything done properly. When you are satisfied, hit the next button on the lower right.
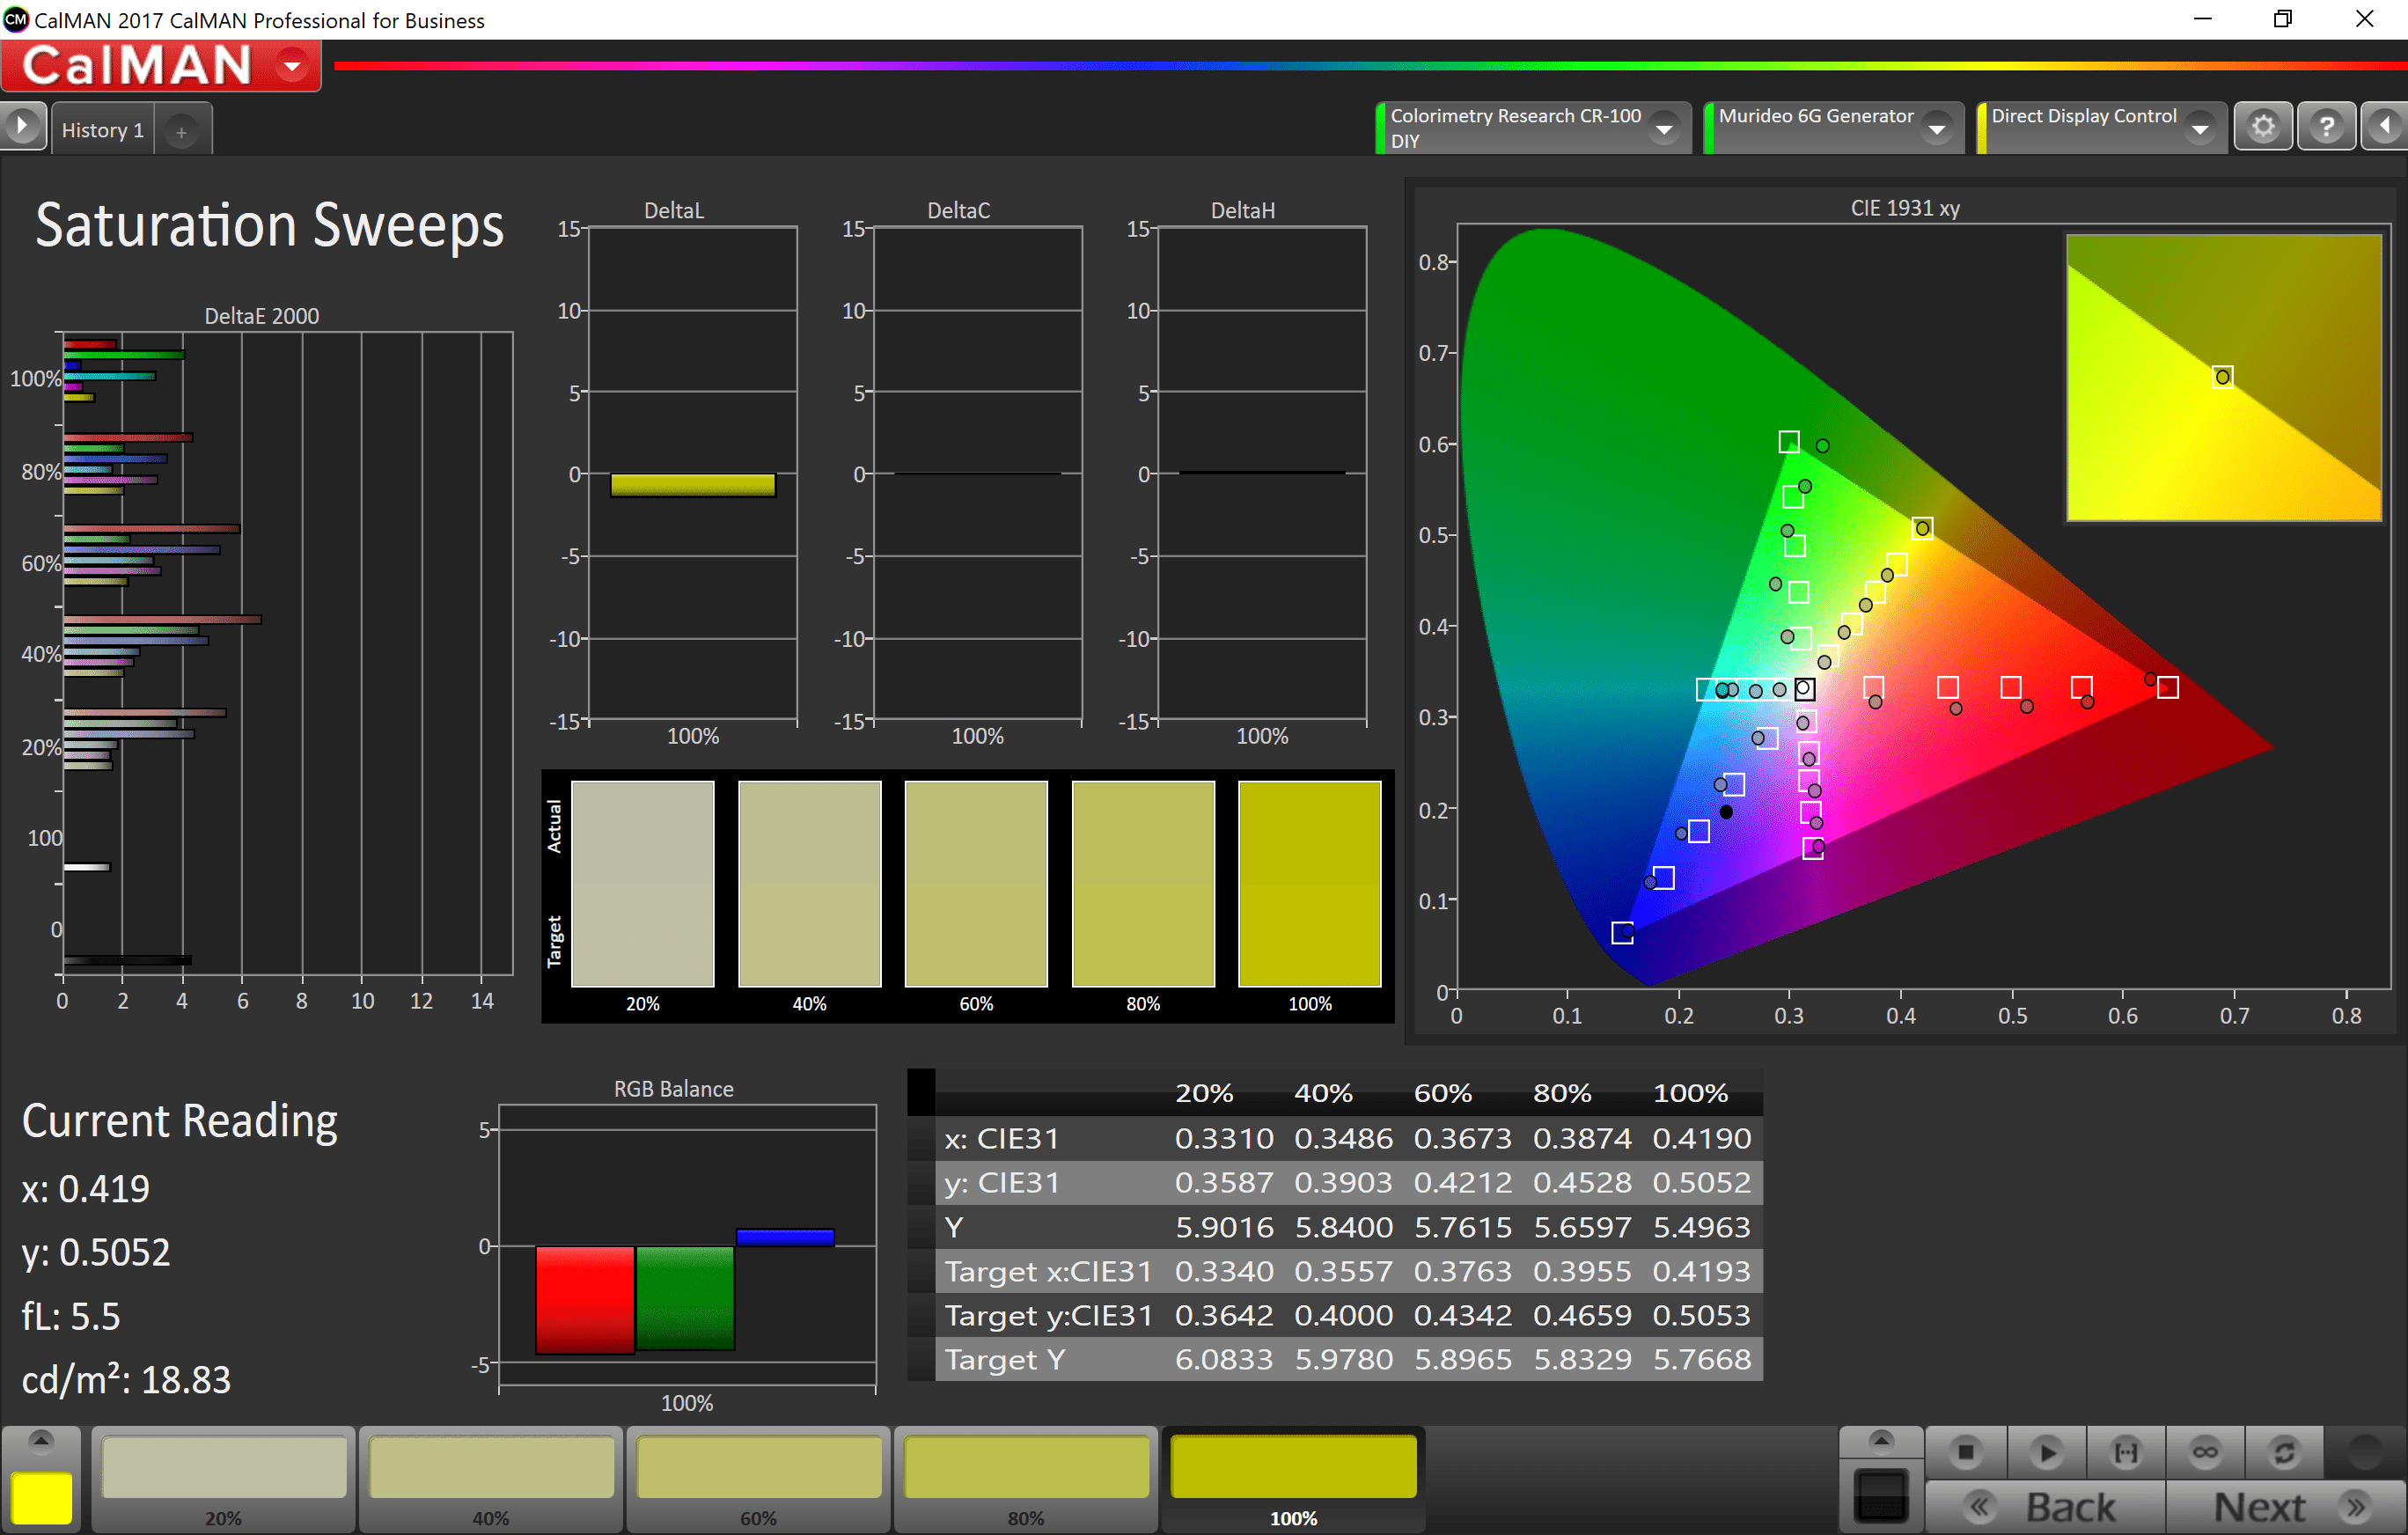
Saturation Sweeps/3D LUT Calibration/Luminance Sweeps
To be honest, I'm not sure why Spectracal included these pages for a home enthusiast. I guess it's for the really enthused enthusiast! The Saturation Sweeps and Luminance would, in theory, be for adjusting Color/Tint controls. But since those controls do a poor job of it, it is best just to leave them alone. 3D LUT Calibration is for those of us owning a 3D LUT box such as the eeColor. That will be for another day.
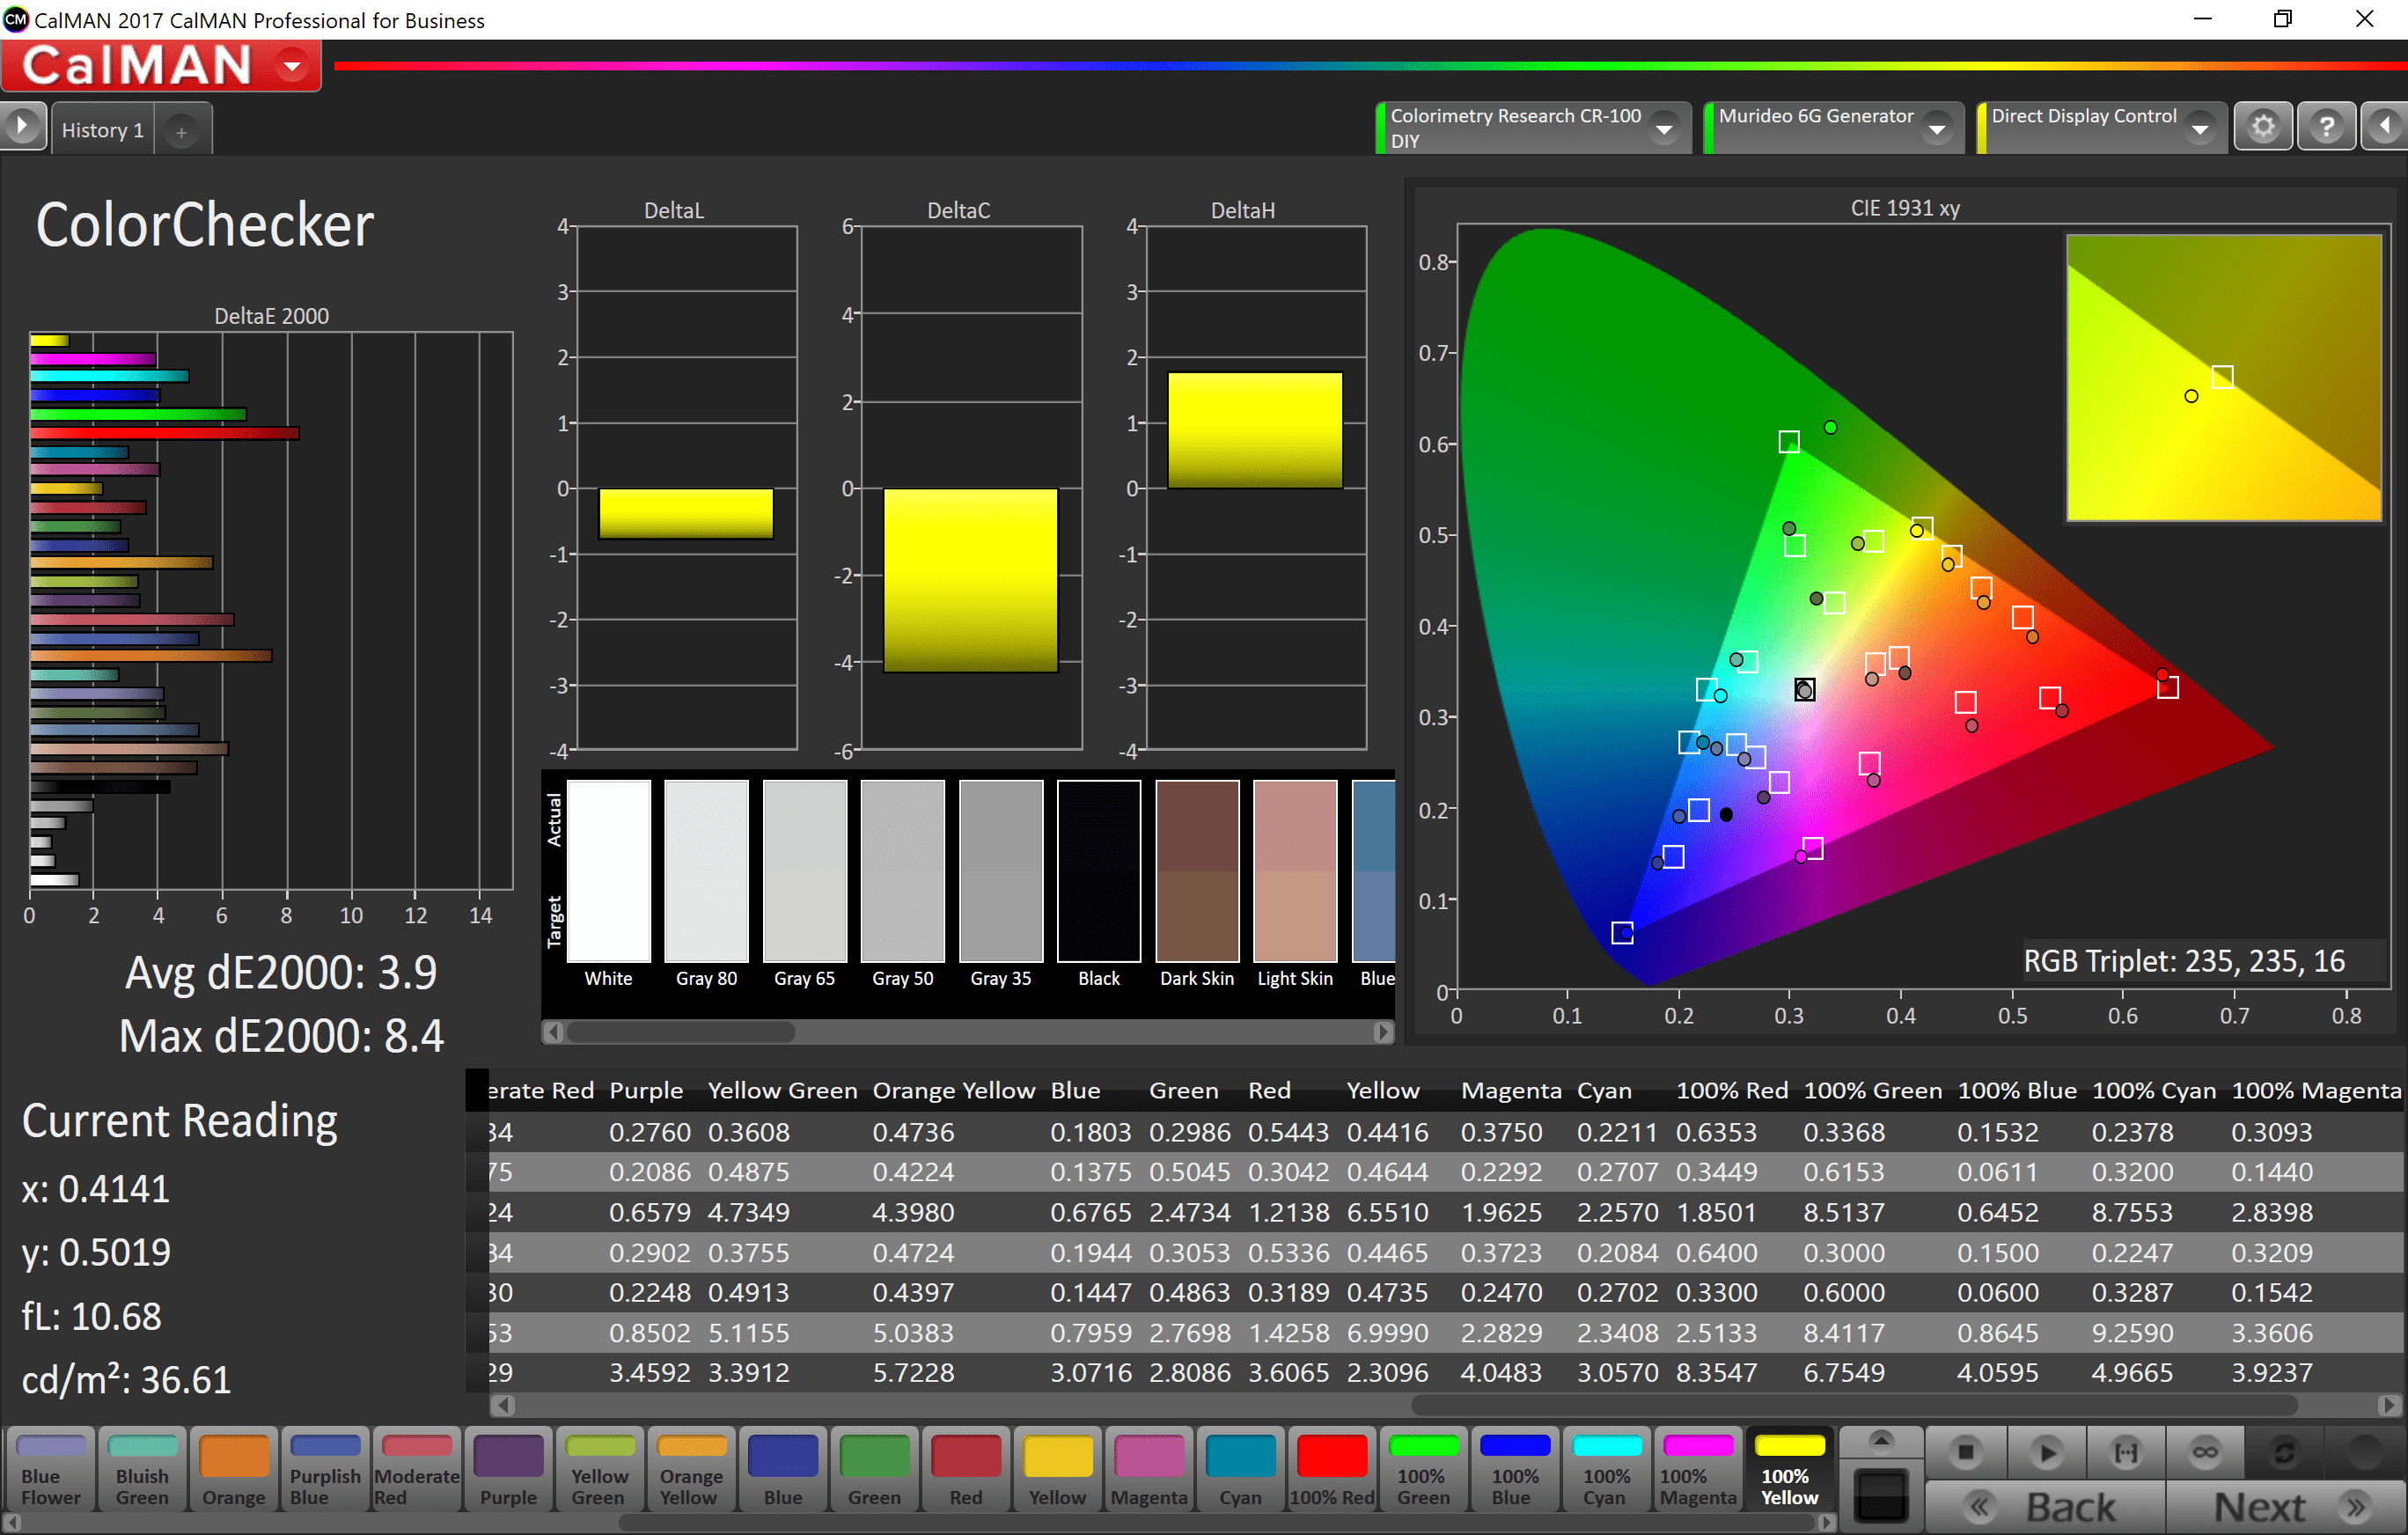
ColorChecker
ColorChecker is exactly what it says it is - a Color Checker. You can see how your display does with various colors.
Post Calibration Reading
This is the final reading that will report how you did. If everything turned out well, your final page of CalMAN should look something like this:
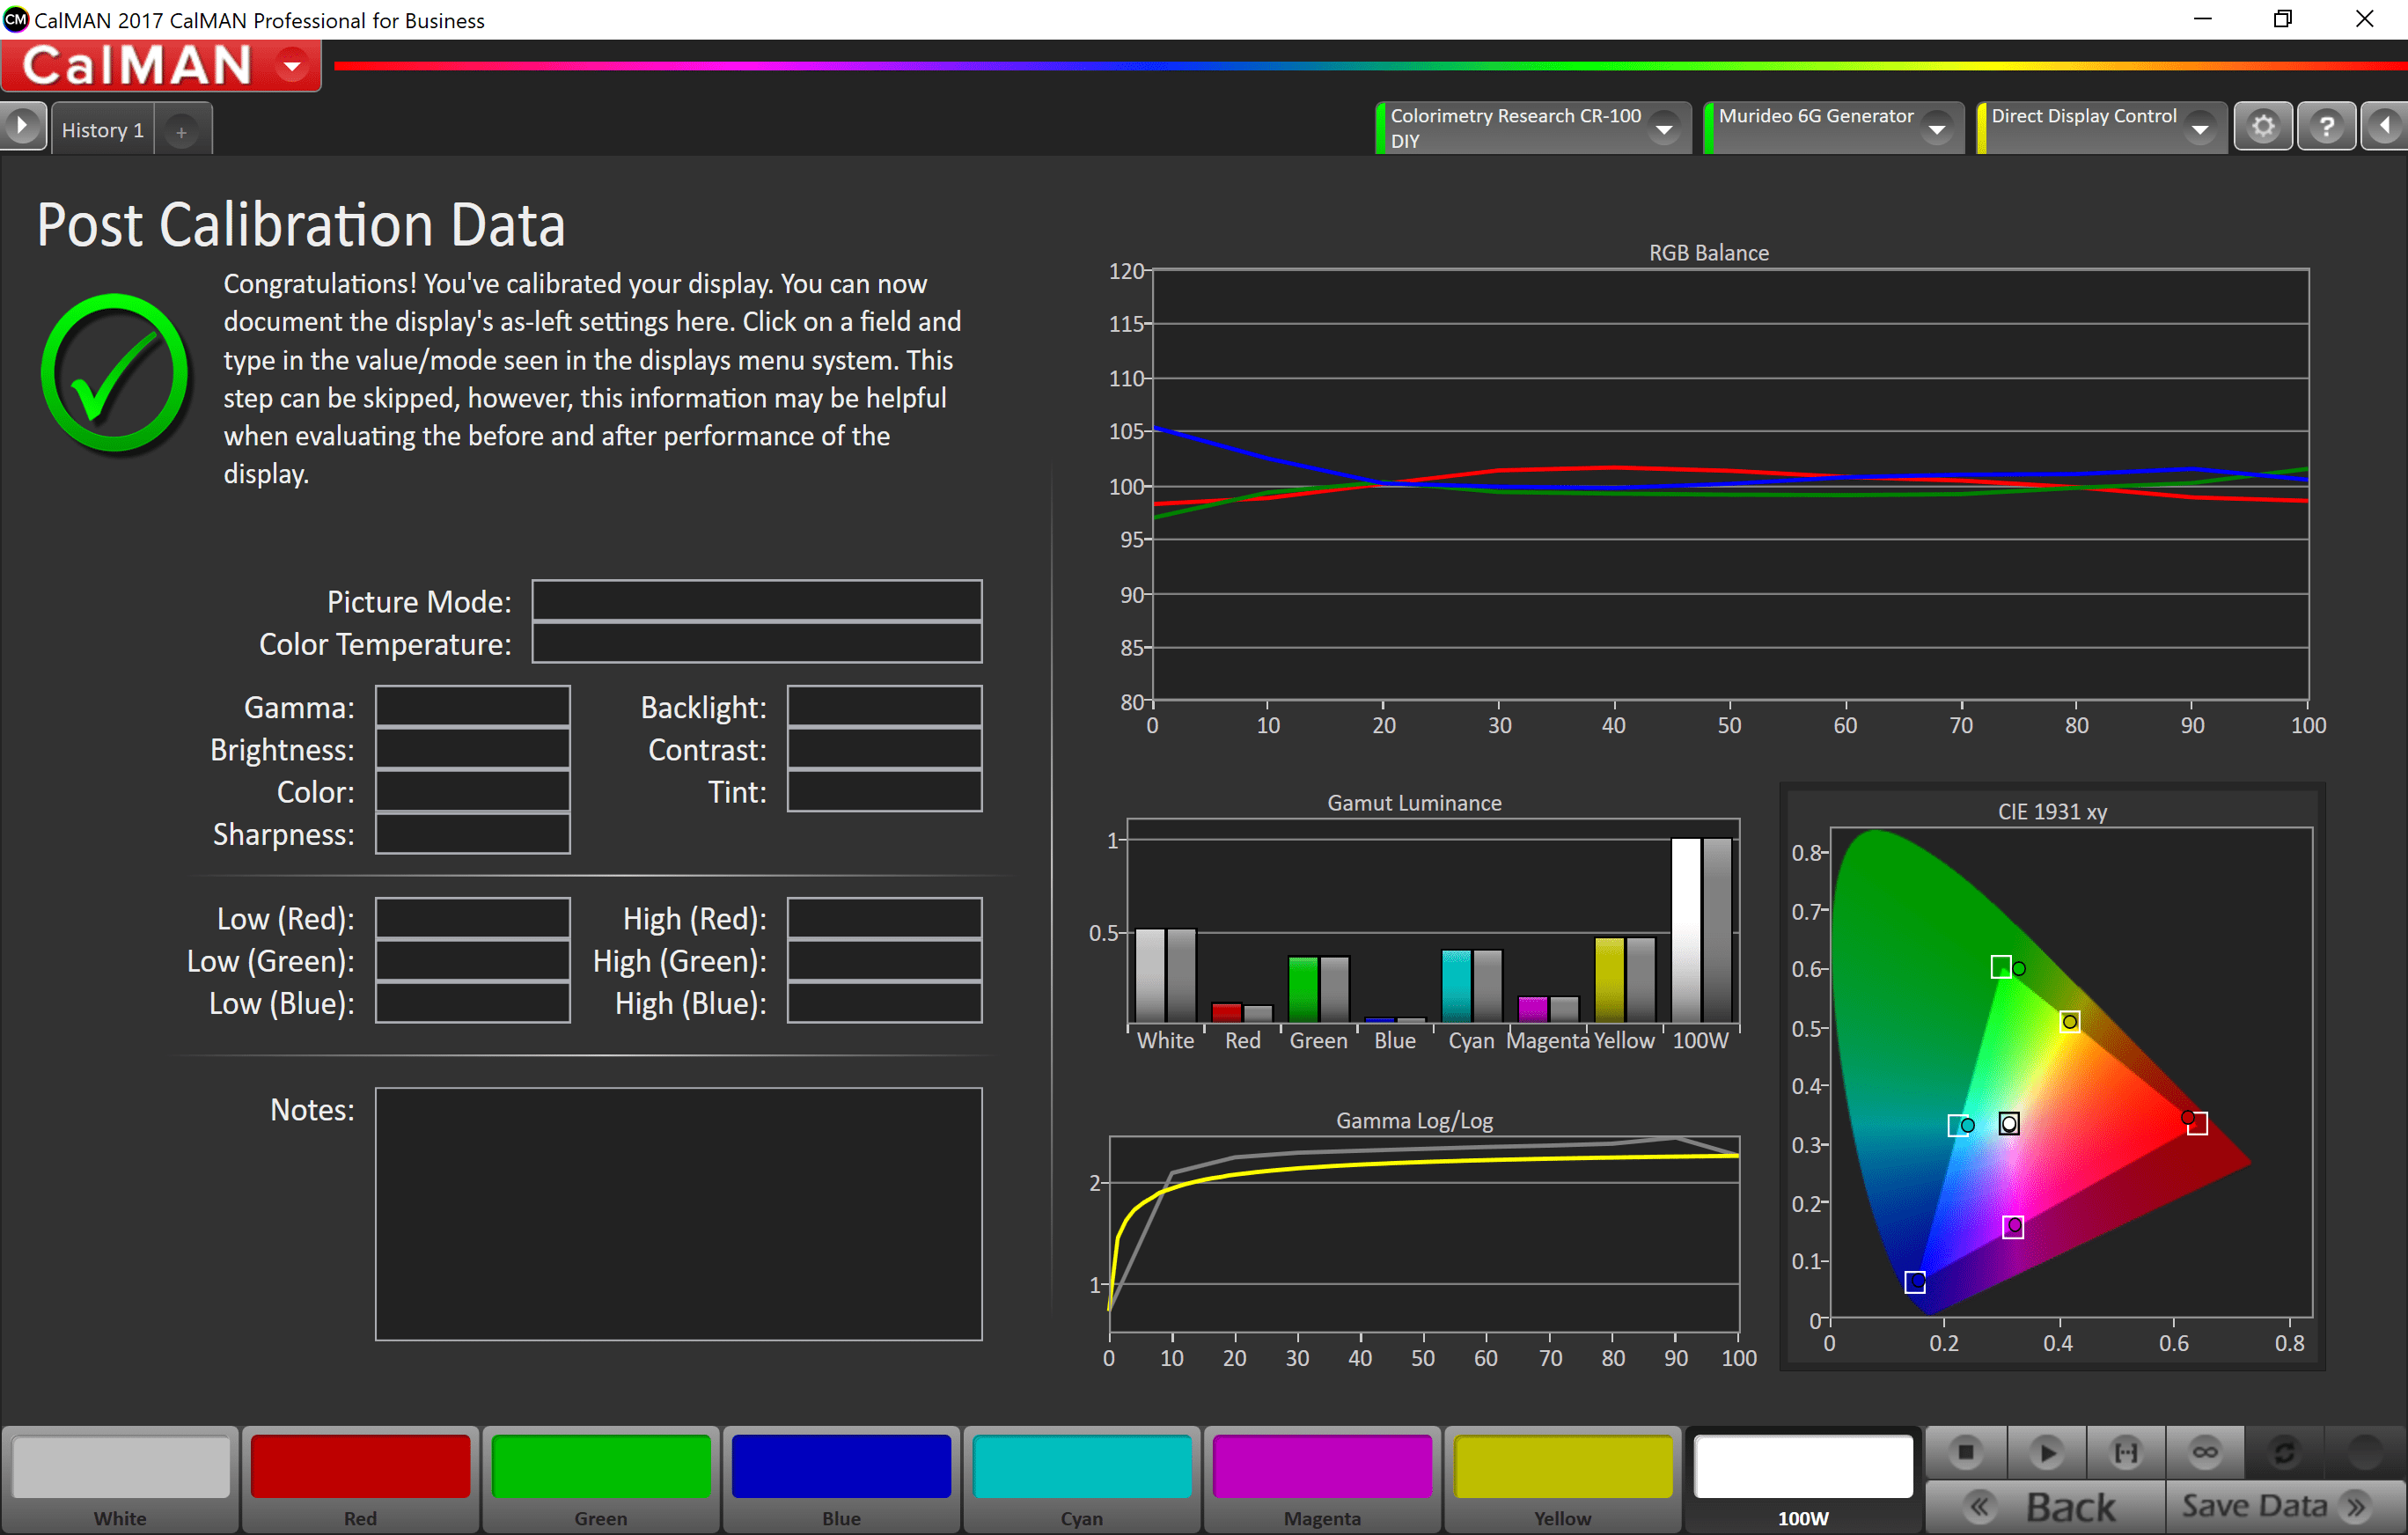
The above image is from my Epson Powerlite Home Cinema 3010 projector in my theater room.
Advanced Calibration Items
Primary and Secondary Colors
Human eyes (the retina to be exact) contain three different color receptors known as cones. They each respond to different spectral response curves (colors). These three receptors combine in different proportions to make up color. These cones are Red, Green and Blue - the primary colors. All color comes from these three primary colors. In equal proportion they create a neutral shade anywhere from black to white - which is the goal of grayscale calibration. In varied proportions, they create color. This is something that some folks have a difficult time grasping, especially if they are coming from a print or art background. In art the primary colors are red, blue and yellow. In print, the primary colors are CMYK or cyan, magenta, yellow and black. These differences are known as color spaces. The only color space we need to be concerned with in video calibration are BT.709 (also known as Rec 709) for the High Definition (HD) format and possibly Rec 601 if you are calibrating for a Standard Definition (SD) format display/source. I could go on and on about this but suffice it to say that the primary colors are Red, Green and Blue.
Secondary colors are simply made using a combination of two of the primary colors - Red + Blue = Magenta and so forth. Your secondary colors are a good example of how well your video decoder works in proportioning the correct amount of each primary to create a proper secondary. The secondary colors are Cyan, Magenta and Yellow.
You can read more on the cones of the human retina here.
You can read more on color spaces here. I highly recommend this article from Stacy Spears and Don Munsil!
Window Patterns vs. Full Field Patterns
Window patterns are small rectangular boxes occupying anywhere from 11-20% of the screen with the pattern inside them. Window patterns were primarily used for plasmas and CRTs in the past but they should also be used for non-full array LED/LCD panels. Projectors, OLEDs and full array LED/LCD should use a full field 100% pattern.
Why 75% Patterns for Color Gamut?
When calibrating your grayscale, any error that needs to be placed (cannot be adjusted out) should be placed at the high end - 100%. If you calibrate color at 100% it will bring up errors elsewhere in the lower levels. Also, there is very little program material with 100% color levels. 75% will match up more closely with your source material.
Meter Profiling
Meter Profiling is the combination of a more accurate meter (generally spectroradiometers) with a faster meter (generally a tri-stimulus colorimeter). Tri-Stimulus Colorimeters are filter based meters that determine color based upon the three filters. The problem with these meters is that they tend to be sensitive to environmental factors such as humidity and temperature, that can accelerate the degradation of their filters. Another factor is that the filters may or may not be in tune with the native RGB of the display. This is where profiling to a more accurate spectroradiometer helps. A spectroradiometer is not filter based so there is nothing to degrade. And it reads the spectrum of the light therefore it cannot be fooled by a display's native RGB. There are different spectroradiometers varying in cost from ~$450 (Colormunki) to over $20K (Minolta CS-2000). The difference between these is the number of samples they will read of the spectrum. More expensive spectros get more samples at a larger wavelength making them even more accurate. The problem with this is that they are very slow. And this is where profiling a colorimeter to a spectro can be beneficial. You get the accuracy of a spectro with the speed of a colorimeter.
Meter profiling is accomplished within the Meter Setup menu which is located under Settings on the right side tab. Check the Advanced Options box and that will open up the Units, Low Light Handler, Profiles and Offsets, and Hotkeys options. Under Profiles and Offsets click on the New/Edit button and it will open up the Meter Profile Window. You can profile your meter in one of two ways. If you have both meters connected to your computer and set up for your display, you can get the readings and create the profile in one pass. The other option is to get the readings one pass at a time for each meter. Either way, your colorimeter will then be profiled to your more accurate spectroradiometer. The patterns needed for this will be the 75% Gray, Red, Green and Blue.
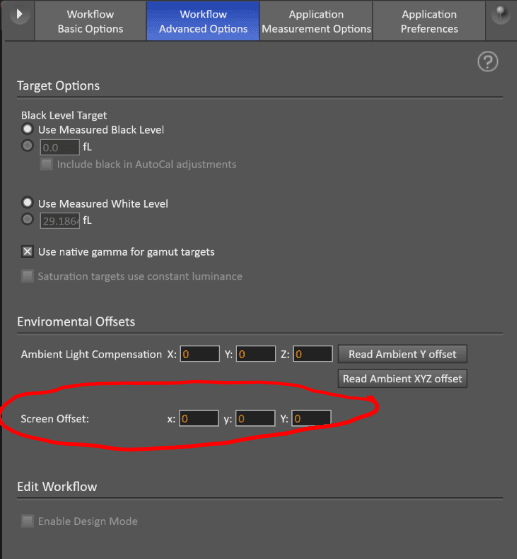
Screen Offset
Screen Offset is for front projection setups. This is for i1Pro or other users who can get a Reflectance (Internal Lamp) reading directly from their screen. It's what I use in order to judge/review screen materials. You can find screen offsets by selecting the cogwheel button in the upper right corner:

and then selecting Workflow Advanced Options. Towards the bottom you will see the screen offset. You would then enter your xyY measures of your screen in these boxes.
")

