Description
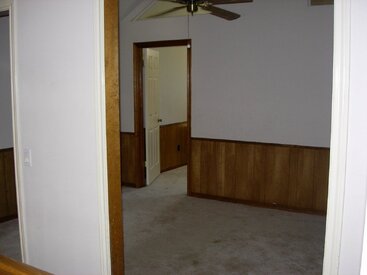
My room is a bit nontraditional that most. This is a overbuilt, over planned, acoustically planned, forever incomplete family room on steroids that is 90% theater room and 10% family room mostly used as a family room for Christmas. For the time being the room is setup backward meaning the seating location to the screen are along the short width of the room and the long end of the rooms have a fireplace on one end and dual 4' french doors on the other. Originally these doors were just openings. When we bought this home there was a partition wall in the middle from floor to ceiling to separate the room into two rooms where the original owners had an office space near the fireplace. The very first thing we did when we bought the house was tore that wall down to create one big family room. This room served us well and dubbed as a play room while the kids were toddlers. We quickly realized this became more of a cleanup chore more than anything so we decided to make the room a movie style room.
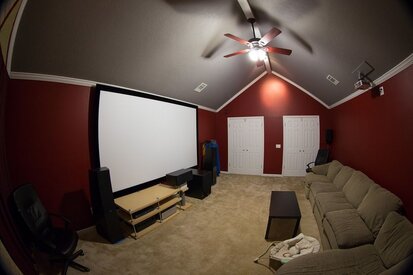
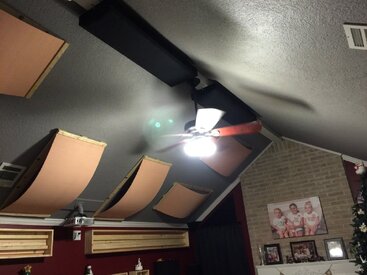
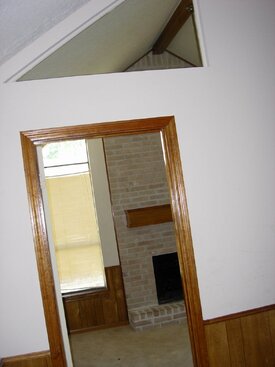
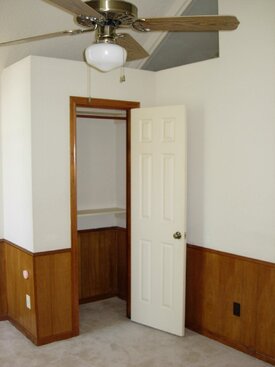
One of the first tasks I had was to put doors in. There was just two openings but they were framed up the same dimension as french door frames. So I routed out door hinges, put door stops around the frame and installed the 4 doors along with a gasket around the edges. The room will ever evolve but I do need to install a sill plate and gasket on the bottom to further isolate the room. The next task was to paint the room, replace the baseboards with new, and also installed crown molding along the walls/ceiling. One hard task that I learned was the difficulty on installing crown along a cathedral style ceiling and figuring out how to do the joint that transitions the wall to the angled part of the ceiling.... that was a lengthy process for something so minuscule. My windows were a tad funky so I made traingles out of 4" minwool to fill in the triangle space. The photos show them as raw but I later wrapped them in black fabric and doesn't look too bad. I then built some panels that cover the windows that have gaskets and they hang via screws on each side like a simple picture frame so for the times we want it as a family room I can quickly remove the panels to expose the windows which have 2" blinds. Black curtains cover these during normal use. I had plans on painting them but the curtains cover them up perfectly so didn't feel like wasting the time. They work very well and make the room 98% dark during the daylight hours.
I've always been fascinated with recording studios and acoustics ever since I was 8 and could first remember visiting my uncle Jeff who is an audiophile nut extremist. He's spent the last 40 years building his system to where it's at now which when you walk into it looks almost like a recording studio... although in his own way. He's the one that has taught me everything I know and also had me read the Master Handbook of Acoustics by Alton Everest. I got my first copy of that book when I was 14 and I can assure you it all looked and read like greek to me. I still don't have a huge grasp on it but I know enough to be dangerous as they say.
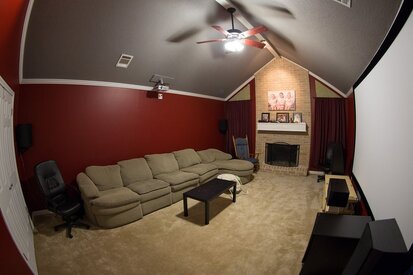
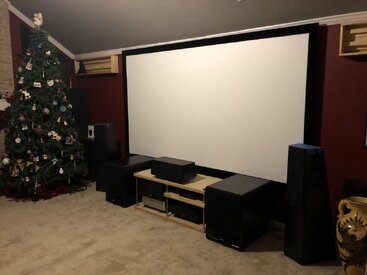
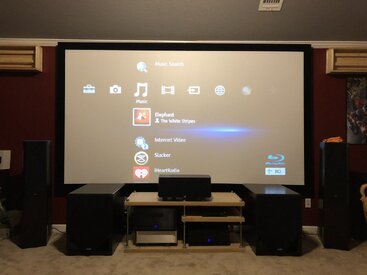
My first order of business was to get the basics. I needed speakers, receiver, projector and a screen. The room was presentable as a nice family room with a big TV. My first set of speakers though was the NHT SuperZero's from 1992 that I got for $250 for a set of 5. They are decent little speakers but my room is rather large so they didn't last long. I was able to find a nice set of used speakers from Sonnie and acquired my first real set of speakers... the SVS Ultra system. This is basically the empty room as you see it in the first few photos.
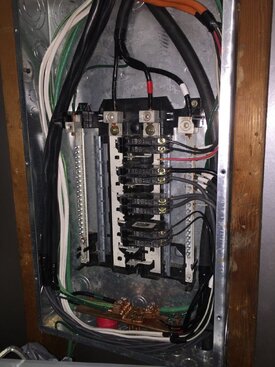
My next order of business was power delivery to where my audio rack sits. I'm a Master Electrician by trade so this was my time to shine. I installed a second dedicated power panel. Put 10ea of 20 amp circuits and ran wire to a 14x14x4 PVC box that I cut the drywall out and installed flush with the wall behind my rack. I used surplus wire I had from previous projects so I ran a #2awg cable for my dedicated plug for my amp. I ran 3ea of #8awg wire for my dedicated plugs one for each subwoofer (just ordered my second) and my processor. Then I ran 3ea #10awg feeders each for my bluray player, two spares and then ran a single 14awg circuit to a dedicated outlet just for my gigabit network switch. I also ran a dedicated 15a circuit for my projector location. For the grounding I've installed a #2 cable from each of the receptacle grounding pigtails to an isolated ground bar within the panel. This has a #2awg cable running to three ground rods outside forming a triangle formation. A completely isolated ground system for each plug however tied together at the plugs to help eliminate any ground differences. I've recently acquired a 15kva isolation transformer and plan to change up this setup a tad and move to fuses and eliminate my panel entirely. I'll come off the meter to a wireway gutter and splice the feed off the meter and feed the main panel but also feed a dedicated disconnect switch for my audio panel. From this disconnect switch I'll have the isolation transformer and then have a fuse panel setup for my circuits which will have second isolation transformers to isolate the video equipment from the audio equipment.... Again, always under construction.
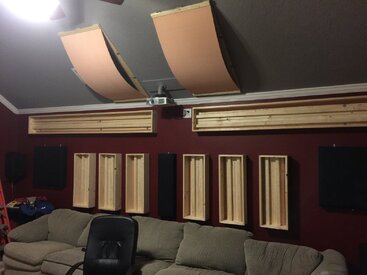
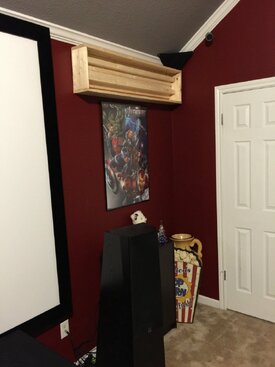
Since I'm a big DIY type of guy and I love acoustics and know the importance of tuning the room for good sound I decided to start building my own panels. I built some absorption panels from 4" 4lb density minwool wrapped in black fabric and then designed my own custom 2d QRD panels and bass traps. My bass traps are 6' tall and 24" wide at the front and fill the entire corner all but 4" to leave a partial gap. I did these as a test and will more than likely move to a square full design later. My QRD panels I designed around dimensions and seating location. I only have about 34" from my head to back wall and this left me with no choice but to use a higher frequency range. They use standard 1x furring strips and 1x6' and are very cheap to make. I think the 8' long ones cost me about $20 total each. They scatter from 626hz, diffuse at 1200 and the HF cutoff is at 4500hz. They made a huge improvement on the sound and again I'm limited on diffusion by my distance to the rear wall. If I ever change my room to length wise I would be able to design some panels that work down to about 275hz with a dual design having smaller fins to extend the upper range back up to the 5khz range. My entire goal would be to cover only about 50-60% of the wall with treatment and off what is treated 75% would be diffusion. The bass traps and various other panels should provide enough absorption to keep the decay under control. I then proceeded to build some poly diffusers of two depths and placed those on the walls. Right now my treatments are unfinished as I'm still testing them. The poly diffusers need to be capped on the ends and completely filled with the minwool 4lb density to act as bass traps and also give a dead sound to them. The inside of the curves have a thick 3/16" rubber pad glued to them right now to make sure they don't ring. I need to paint everything and/or wrap with fabric. I also need to treat the wide walls which will have to be panels on stands. When listening to music I have a few poly panels I place between the speakers and they really help hide the speakers well in their sound.
On the equipment side I'm running the following:
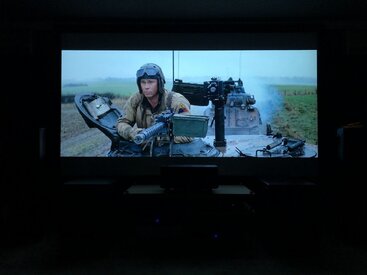
BenQ W1070 projector
Jamestown 135" screen
Krell Showcase 7 amplifier
Emotiva XPA-7 amplifier (for sale)
Emotiva XMC-1 Processor w/ Dirac Full Processing
Cheap Sony Bluray
Dual HSU VTF-15 Mk2 Subwoofers (2nd ordered 12/26/17... waiting delivery)
SVS Ultra Towers Speakers
SVS Ultra Center
SVS Ultra Bookshelfs
Homebuilt Rack
Next upgrade: Oppo UDP-205 4k Bluray Player
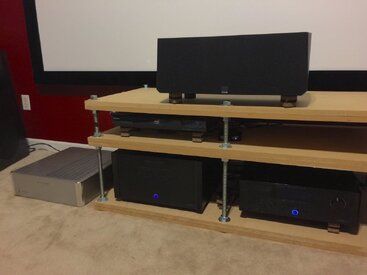
The rack is temporary. I needed something to get started. It's made of 1.5" thick of 2 3/4" layers of MDF and 3/4" all thread. My plan is to order a nice maple rack from mapleshades with the same design as mine. My first equipment purchased for this setup was the Krell amp. I landed a great deal although later realized that the amp was quickly at it's end of life and had to get it rebuilt just a year later. When the Krell started acting up I purchased the Emotiva XPA-7 amp in order to have something while the Krell was being repaired and that was completed summer this year. The sound on the Krell is fantastic so the Emotiva will be leaving soon enough. I recently (12/26/17) purchased my second subwoofer so I can finally have a dual setup. My last piece of my equipment needed will be the Oppo UDP-205 player which will come summer of 2017. I'm hoping to move to a 4K projector by the end of the year as well as upgrade to the Atmos setup and add ceiling speakers.
Again everything in my system is a work in progress which I could never call this completed although I get to enjoy it as I work on it. I'll be able to progress this slowly and hopefully have it really where I want it within the next 3-4 years.
Photos as of 12/30/17:

One of the first tasks I had was to put doors in. There was just two openings but they were framed up the same dimension as french door frames. So I routed out door hinges, put door stops around the frame and installed the 4 doors along with a gasket around the edges. The room will ever evolve but I do need to install a sill plate and gasket on the bottom to further isolate the room. The next task was to paint the room, replace the baseboards with new, and also installed crown molding along the walls/ceiling. One hard task that I learned was the difficulty on installing crown along a cathedral style ceiling and figuring out how to do the joint that transitions the wall to the angled part of the ceiling.... that was a lengthy process for something so minuscule. My windows were a tad funky so I made traingles out of 4" minwool to fill in the triangle space. The photos show them as raw but I later wrapped them in black fabric and doesn't look too bad. I then built some panels that cover the windows that have gaskets and they hang via screws on each side like a simple picture frame so for the times we want it as a family room I can quickly remove the panels to expose the windows which have 2" blinds. Black curtains cover these during normal use. I had plans on painting them but the curtains cover them up perfectly so didn't feel like wasting the time. They work very well and make the room 98% dark during the daylight hours.
I've always been fascinated with recording studios and acoustics ever since I was 8 and could first remember visiting my uncle Jeff who is an audiophile nut extremist. He's spent the last 40 years building his system to where it's at now which when you walk into it looks almost like a recording studio... although in his own way. He's the one that has taught me everything I know and also had me read the Master Handbook of Acoustics by Alton Everest. I got my first copy of that book when I was 14 and I can assure you it all looked and read like greek to me. I still don't have a huge grasp on it but I know enough to be dangerous as they say.
My first order of business was to get the basics. I needed speakers, receiver, projector and a screen. The room was presentable as a nice family room with a big TV. My first set of speakers though was the NHT SuperZero's from 1992 that I got for $250 for a set of 5. They are decent little speakers but my room is rather large so they didn't last long. I was able to find a nice set of used speakers from Sonnie and acquired my first real set of speakers... the SVS Ultra system. This is basically the empty room as you see it in the first few photos.
My next order of business was power delivery to where my audio rack sits. I'm a Master Electrician by trade so this was my time to shine. I installed a second dedicated power panel. Put 10ea of 20 amp circuits and ran wire to a 14x14x4 PVC box that I cut the drywall out and installed flush with the wall behind my rack. I used surplus wire I had from previous projects so I ran a #2awg cable for my dedicated plug for my amp. I ran 3ea of #8awg wire for my dedicated plugs one for each subwoofer (just ordered my second) and my processor. Then I ran 3ea #10awg feeders each for my bluray player, two spares and then ran a single 14awg circuit to a dedicated outlet just for my gigabit network switch. I also ran a dedicated 15a circuit for my projector location. For the grounding I've installed a #2 cable from each of the receptacle grounding pigtails to an isolated ground bar within the panel. This has a #2awg cable running to three ground rods outside forming a triangle formation. A completely isolated ground system for each plug however tied together at the plugs to help eliminate any ground differences. I've recently acquired a 15kva isolation transformer and plan to change up this setup a tad and move to fuses and eliminate my panel entirely. I'll come off the meter to a wireway gutter and splice the feed off the meter and feed the main panel but also feed a dedicated disconnect switch for my audio panel. From this disconnect switch I'll have the isolation transformer and then have a fuse panel setup for my circuits which will have second isolation transformers to isolate the video equipment from the audio equipment.... Again, always under construction.
Since I'm a big DIY type of guy and I love acoustics and know the importance of tuning the room for good sound I decided to start building my own panels. I built some absorption panels from 4" 4lb density minwool wrapped in black fabric and then designed my own custom 2d QRD panels and bass traps. My bass traps are 6' tall and 24" wide at the front and fill the entire corner all but 4" to leave a partial gap. I did these as a test and will more than likely move to a square full design later. My QRD panels I designed around dimensions and seating location. I only have about 34" from my head to back wall and this left me with no choice but to use a higher frequency range. They use standard 1x furring strips and 1x6' and are very cheap to make. I think the 8' long ones cost me about $20 total each. They scatter from 626hz, diffuse at 1200 and the HF cutoff is at 4500hz. They made a huge improvement on the sound and again I'm limited on diffusion by my distance to the rear wall. If I ever change my room to length wise I would be able to design some panels that work down to about 275hz with a dual design having smaller fins to extend the upper range back up to the 5khz range. My entire goal would be to cover only about 50-60% of the wall with treatment and off what is treated 75% would be diffusion. The bass traps and various other panels should provide enough absorption to keep the decay under control. I then proceeded to build some poly diffusers of two depths and placed those on the walls. Right now my treatments are unfinished as I'm still testing them. The poly diffusers need to be capped on the ends and completely filled with the minwool 4lb density to act as bass traps and also give a dead sound to them. The inside of the curves have a thick 3/16" rubber pad glued to them right now to make sure they don't ring. I need to paint everything and/or wrap with fabric. I also need to treat the wide walls which will have to be panels on stands. When listening to music I have a few poly panels I place between the speakers and they really help hide the speakers well in their sound.
On the equipment side I'm running the following:
BenQ W1070 projector
Jamestown 135" screen
Krell Showcase 7 amplifier
Emotiva XPA-7 amplifier (for sale)
Emotiva XMC-1 Processor w/ Dirac Full Processing
Cheap Sony Bluray
Dual HSU VTF-15 Mk2 Subwoofers (2nd ordered 12/26/17... waiting delivery)
SVS Ultra Towers Speakers
SVS Ultra Center
SVS Ultra Bookshelfs
Homebuilt Rack
Next upgrade: Oppo UDP-205 4k Bluray Player
The rack is temporary. I needed something to get started. It's made of 1.5" thick of 2 3/4" layers of MDF and 3/4" all thread. My plan is to order a nice maple rack from mapleshades with the same design as mine. My first equipment purchased for this setup was the Krell amp. I landed a great deal although later realized that the amp was quickly at it's end of life and had to get it rebuilt just a year later. When the Krell started acting up I purchased the Emotiva XPA-7 amp in order to have something while the Krell was being repaired and that was completed summer this year. The sound on the Krell is fantastic so the Emotiva will be leaving soon enough. I recently (12/26/17) purchased my second subwoofer so I can finally have a dual setup. My last piece of my equipment needed will be the Oppo UDP-205 player which will come summer of 2017. I'm hoping to move to a 4K projector by the end of the year as well as upgrade to the Atmos setup and add ceiling speakers.
Again everything in my system is a work in progress which I could never call this completed although I get to enjoy it as I work on it. I'll be able to progress this slowly and hopefully have it really where I want it within the next 3-4 years.
Photos as of 12/30/17: